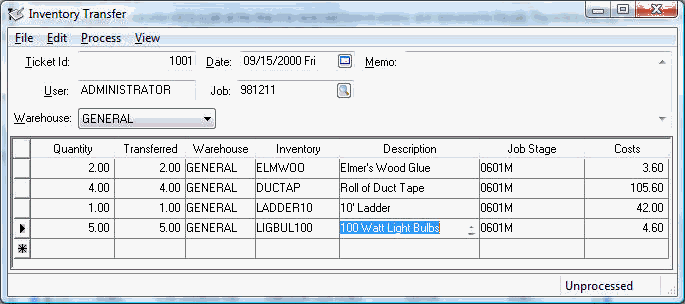
Select Transfer from the Job Costing menu to open the following window:
The job transfer materials list can be used when Inventory is transferred to a job. Often an inventory transfer is created daily to record any product that is posted to the job. Transfers are not necessary if the inventory items were purchased for a specific job and the job and job stage were entered into the expense invoice.
Transfers can also be used to create a materials list from a quote or proposal. This materials list is often created before product is transferred or purchased. Transfer materials list can be used to create purchase orders for product, subcontract labor, and supplies. Inventory transfers can be created by manually entering product lists when a materials list is determined for a job. Transfer tickets can also be created from the jobs budget ( Proposal) dialog. Review Job Materials > Materials List within a proposal for instructions and examples of using a job materials list within the transfer dialog.
Complete the following steps to create a job transfer:
Select Transfer from the Job Costing menu to open the following window:
Enter a Ticket Id or tab to automatically insert the Next Inventory Transfer Ticket. The Next Inventory Transfer Ticket can either be viewed or changed by clicking the . This ticket number is incremented each time the Next Inventory Transfer Ticket number is displayed.
Enter the Date of the transfer. All general ledger transactions generated by this transfer ticket will contain this date.
The Memo entry can be used to describe the transfer or to record miscellaneous information.
The User will default to the user's login name.
Enter the Job ID. The Job Stage may be set from the Inventory Item's Default Job Stage setting. Review Job Materials > Default Stage for more details on this time saving setting.
Enter the inventory transfer detail using as many lines as needed.
Enter the Quantity that is needed for a job. The quantity Ordered is recorded in the Count tab of the inventory item and affects committed costs. Review Committed Costs for more details.
The Transferred field should be empty if the product is needed on the job but has not been transferred from inventory. Keeping the Transferred field blank has the same effect on the inventory counts as having the shipped value zero within a sales order. The net inventory count is affected only in the Transferred column. The Transferred amount must equal the Quantity before the Inventory Transfer ticket can be processed. The Transferred amount can be increase using barcode scanners. Review [Inventory] Barcodes > Entering Barcodes for instructions to pre-configure barcodes or to create a product by scanning a new barcode.
Enter the inventory Item that is being transferred. The Description field will be filled from the information entered in An inventory Item must be entered on each line of the ticket. Review Product Items and Job Costs for inventory transaction details.
The Unit of Measure field is an optional field that identifies the unit of measure being used for this inventory item. Review the Tracking Counts > Unit of Measure section of the Inventory documentation for more details. If multiple units of measure are not used for inventory items, this field can be removed from the invoice by right clicking on any column title and hiding the Measure column.
Review [Inventory] Products > Notes and Instructions for instructions on using the Internal Note as well as product notes and descriptions.
Enter the Job Stage that is receiving the inventory. The Job Stage setting must be entered for every line of the transfer ticket unless the Default Job Stage within the inventory item is populated. Review Job Materials > Default Stage for more details on this time saving setting. A stage must be classified with a source of Other or Inventory to be used within the inventory transfer window. Review the Introduction > Classifications section for more details.
The Cost amount will be inserted from the perpetual or last cost method depending on the Inventory Method setting within . The last cost will be used if the inventory item is not set to track counts. This cost can be changed to reflect the cost the user wishes to apply to the job.
Select from the Inventory Transfer menu to transfer the contents from inventory to a job. The costs will not be posted to a job until the ticket is processed. Review Product Items and Job Costs for details on the transactions created from this process. Select (Ctrl + S) from the Inventory Transfer menu to save the transaction details without processing the ticket. The inventory count is not decreased until the ticket is processed. Select or press the Ctrl + N keys to create a new inventory transfer ticket. Select to exit the window or press the Esc key.
Select from the job transfer menu to import product information from a CSV file. Review [Main] Technical > Import Document Details for instructions to use this data entry saving tool.
An automotive core inventory item can be added to a job Transfer. Review [Main] Automotive > Parts Catalog > Core Charges and Returns for instructions to create or add Automotive items into a job.
Review Job Materials > Subcontractor Labor within a Job Transfer for instructions to add labor to a materials list.
Review Subcontractor Labor within a Job Transfer