The most common tool used to create a materials list for a job is the proposal dialog within EBMS.
Open or create a proposal that contains the list of materials as shown below:
Verify the job information within the job quote or change order: Review Jobs > Entering a New Proposal or Job Budget for job info instructions.
Create a project header only if you wish to hide some of the detail information on the quote such as pricing, quantities, or product details. Review Proposals > Materials List within a Proposal to create a list of products within a quote that are either hidden or displayed.
Enter the Product code for all the materials that will be pulled from inventory or special ordered for the job. Enter any product classification for all materials except Service. Never use a item classified as Service for materials.
Enter the Job Stage that matches the Product classification. The Job Stage setting can be copied from the product items's > Advanced > Default Job Stage to save data entry. The Default Job Stage is only useful if product codes determine a common job stage. Review Default Stage for details to set this time saving setting within the inventory item.
Enter a product classified as No Count for line items that identify steps that are subcontracted to subcontractors. Use a product classified as Service only for lines that are record the price and costs of labor recorded within the labor module of EBMS.
Note that all lines with a Product code and not classified as Service will be copied to the Inventory Transfer ticket. The classification of products effect how products are processed. Review Product Catalog > Item Classifications for more details.
Adjust the job contract or proposal total if necessary. Note that the prices of the items within the materials list will be adjusted to equal the adjusted materials list header.
Review Proposal > Pricing for tips on proposal pricing for the job.
Review Default Stage settings to set the appropriate stage from the inventory item.
Review Proposal > Sets and Templates > Templates for tips on creating materials templates for a particular job or project
Review Proposal > Details Import Option for instructions to import materials lists from a spreadsheet or other text file.
Complete the following steps process the materials list:
Select Process > Apply To Job to apply the proposal budget to the job.
 to
to
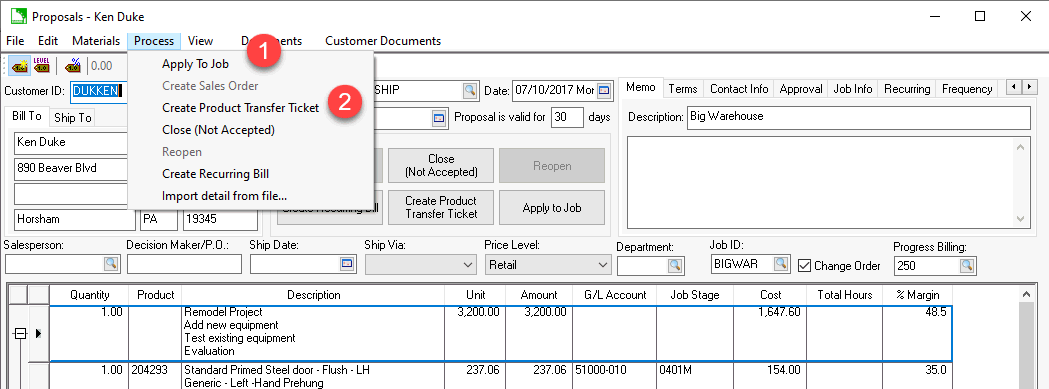
Select Process > Create Product Transfer Ticket from the proposal menu as shown above.
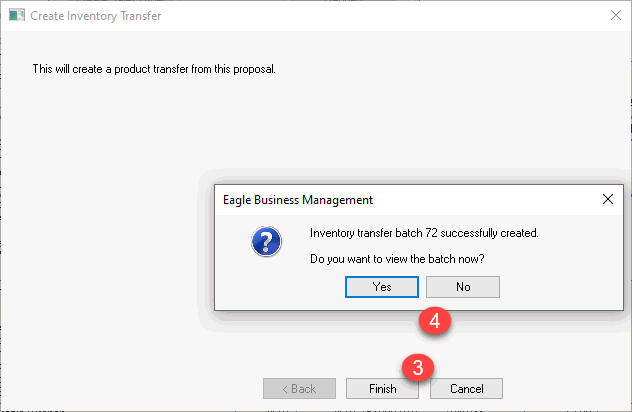
Click Finish to create the inventory transfer batch.
Click Yes on the view batch dialog as shown below:
Only the proposal lines that meet the following criteria will be copied from the proposal to the Inventory Transfer dialog:
Lines with a Product code that are not materials list headers
Product codes that are considered product and are not shortcuts. Any product with the Advanced tab > shortcut option enabled will NOT be copied. Review Job Costs > Product Items and Job Costs
The Job Stage is classified to receive Inventory transactions as set in Job Costing > Options > Stage Classifications. See setting requires in Job Materials > Overview section.
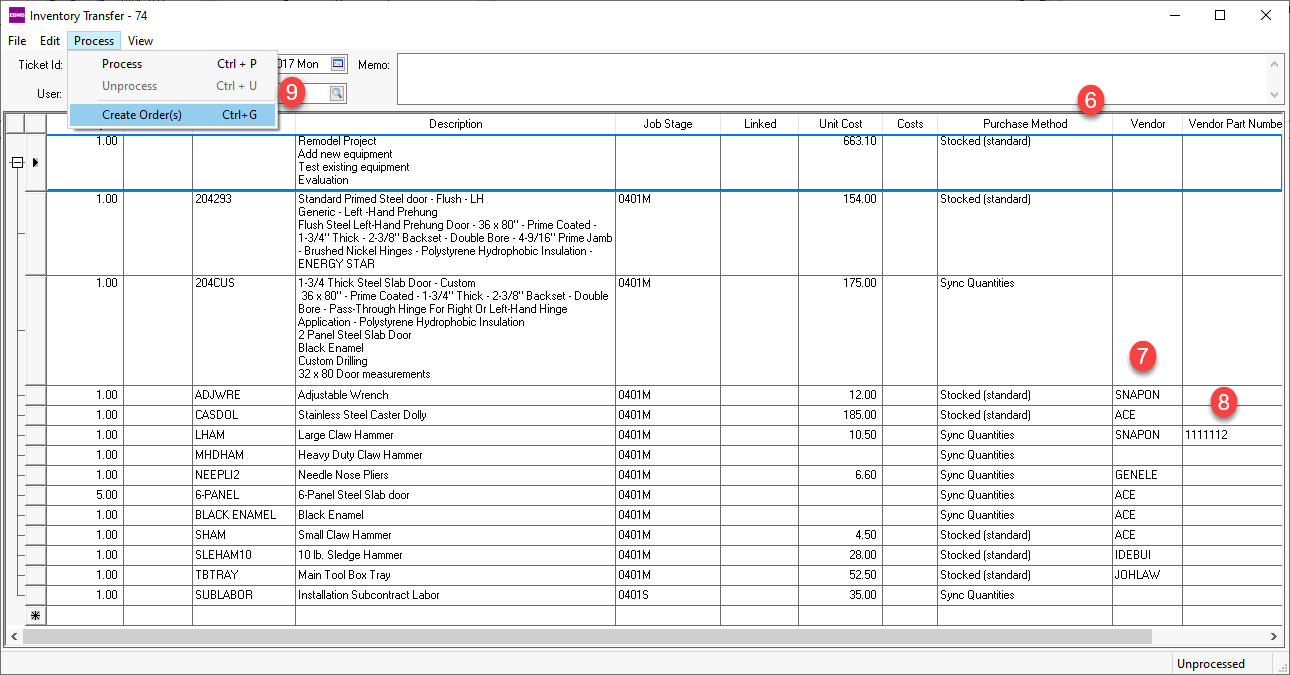
Set the following Purchase method based the source of the materials:
Select Stocked for all materials pulled from inventory.
Select a special order method (Sync Quantities or Associated) for all materials or services that are purchased directly from a vendor for this project. Use these purchase methods for subcontracts and any other service contracted from a vendor. Review Purchasing > Special Orders > Overview for special order purchase method details.
Set the Vendor code for all items that are purchased directly from a vendor for the project.
The Vendor Part Number can be added if the vendor's part number is needed on the purchase order.
Select Process > Create Order(s) to create purchase orders. The following dialog appear for each vendor:

Choose Select Existing PO to append to an existing purchase order.
Click View to view a purchase order before appending.
Select the existing purchase order and click Select.
A summary page will open at the end of the process as shown below:
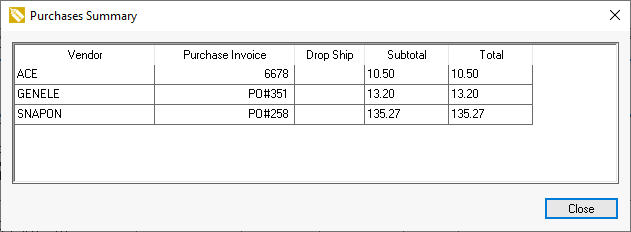
The Transferred amount should reflect the amount of materials that has consumed within the job or project. Note that Costs are not calculated until the Transferred quantity is populated. The Transferred amount can be set from the purchase order by selecting the Sync Quantity Purchase Method.
Select Process > Process to apply the total Costs to the job. Enable the Job Costing > Options > Transfer > Create back orders when processing an inventory transfer option to create an additional transfer ticket for the items that have not been transferred to the job.
Review [Inventory] Special Orders and Drop Shipment Items > Purchasing Special Orders for more details on the process of creating purchase orders for special orders.
Review Material Purchase Orders for instructions on processing purchase orders when materials arrive at the job site or at the job staging area.
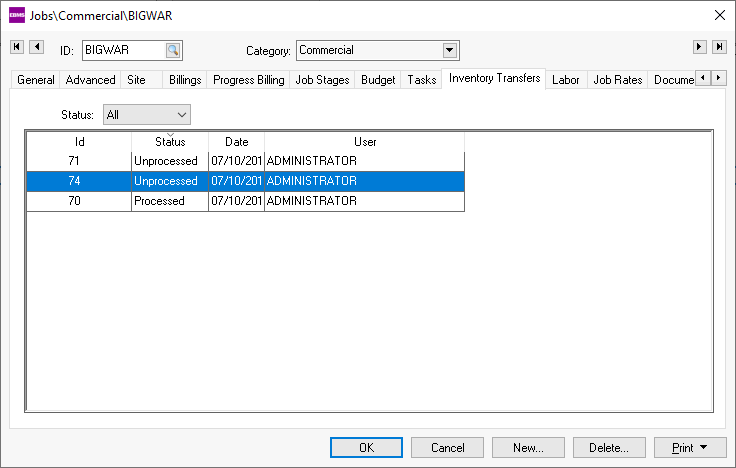
The Inventory Transfer materials lists can be accessed from the Inventory Transfer tab of the job as shown below: