Materials Resource Planning (MRP) Using Purchase Methods
The EBMS software contains many tools to manage inventory stock levels.
These tools are used to purchase raw materials, parts, or other product
required to manufacture an item or create a mix.
Prerequisites
The following steps are prerequisites before continuing with the MRP
step:
Create inventory items within the EBMS product catalog for the
finished goods as well as the sub-assemblies or raw material. Verify
that the default Purchase Method
is set within each item. Items that are ordered from the supplier
after the manufacturing batch is created should contain a Count
tab > Purchase Method setting
of Sync Quantities or Associated like a special-order
item. Items that are stocked and purchased before the manufacturing
batch is created should have a Count
Purchase Method of Stocked.
Review the Purchasing > Purchase
Methods section for more details on different purchase methods.
Review the Product Catalog
> Entering New Products section for more details on creating
product records.
Create a bill-of-materials (BOM), mix, or component list for
the finished item. Note that optional components can be configured
within a component list. Review the Components
and Accessories Overview section for more details on creating
these materials lists.
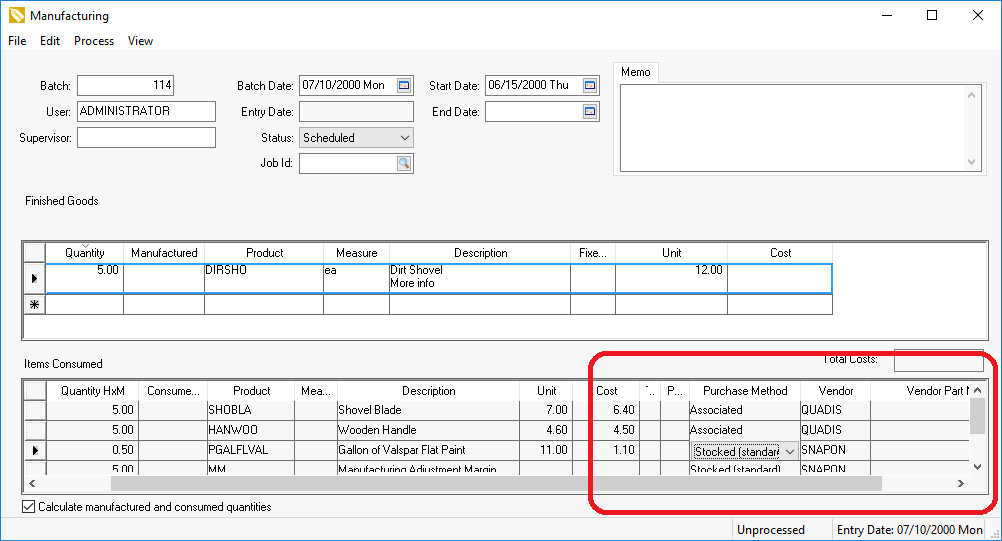
Create manufacturing batches for the planned finished goods
as shown below:

Only populate the Quantity
column of the Finished Goods
list and let the Manufactured
column blank. Review the Manufacturing
> Creating a Batch > Creating a Simple Batch section for
more details.
Set the proper Purchase Method
as shown within the circled settings shown above. Items that are ordered
from the supplier after the manufacturing batch is created should
contain a Count tab > Purchase Method setting of
Sync Quantities or Associated
like a special-order item. Items that are stocked before the manufacturing
batch is created should have a Count
> Purchase Method of Stocked.
The default Purchase Method
can be set within the Count
tab of the product record so the setting does not need to be set within
the batch. Review Purchasing >
Purchase Methods for more details on different purchase methods.
Enter the Start Date
or other batch dates to schedule the batch as shown above. Review
Schedule Dates for more details on
batch dates.
Manufacturing dates and other information can be changed
from a batch list. Review Scheduling
a Batch for more details on the batch scheduling tool.
Purchasing
The purchasing process of the parts or raw material used within the
manufacturing batch should only be attempted after the manufacturing batch
is entered including the Consumed Items.
Complete the following steps:
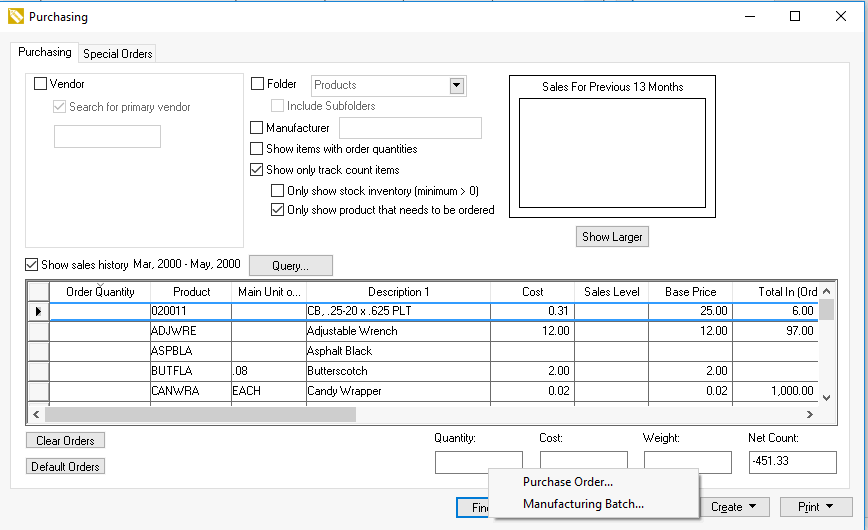
Open the Purchasing
tool for the first step in the MRP process by selecting Product
> Purchasing from the main EBMS menu as shown below:

The materials resource planning (MRP) process within the purchasing
window depends on the source of the Consumed
Goods within the batch.
Items that are in stock: Use the Purchasing tool to maintain
inventory stock levels. Click on the Create
> Purchase Order option to create a purchase order for
items needed for manufacturing. Review the Creating
a Batch > Purchasing
the Required Materials section for details on how to create
a purchase order based on the stock level settings needed raw
materials.
Items that are manufactured as sub-assemblies or sub-mixes:
Use the Purchasing tool
to maintain inventory stock levels of manufactured items as shown
above. Select Create > Manufacturing
Batch from the purchasing window instead of the Create
> Purchase Order option.
Items that are special ordered from the supplier
after the manufacturing batch is created: Unlike options A &
B, the Special Orders
tab allows the user to query batches based on the manufacturing
batch's Start Date to
only identify the batches scheduled within a user specified date.
Complete the following steps to create purchase orders for items
that special orders for specific manufacturing batches:
Special Order Purchasing
Click on the Special Orders
tab within the Products > Purchasing
tool as shown below:

Enable any query options such as the Vendor
option to only show the items for a specific Vendor,
Folder, Manufacturer, or Purchase
Method. Review the Purchasing
> Special Orders and Drop Ship Items > Purchasing Special Orders
section for more details on this purchasing tool.
Enable the Only Include Ship
Dates Within __ Days option to only list the items that are
needed in the next __ days. For example, if the user enters 14 Days the system will ignore any
manufacturing batches that are scheduled in the future beyond 14 days.
Click Find F5 to list
all the items within the selected query settings.
Select the items to purchase but clicking on the Selected
column. Click Select All to
order all items.
Click Create PO to create
a purchase order for the selected items. Special order details lines
that are purchased on a purchase order will be removed from the Special Orders list. Review the
Purchasing > Special Orders
and Drop Ship Items > Purchasing Special Orders section for
more details on the purchasing process.
The EBMS software will list all consumed items entered within all manufacturing
batches unless batches are queried by the batches' Start
Date within the Special Orders
tab. It is recommended that the user wait to enter and schedule manufacturing
batches until the consumed items that are stocked should prompt the purchase
of the inventory items. For example, if the Finished
Goods within a batch are not needed for a few months, the batch
should not be entered until the Consumed
Goods, parts, or raw material should affect the purchasing process.
Review the Purchasing >
Inventory Stock Level Settings section for more details on how sales
orders and manufacturing batches affect the purchasing process.


