
A job may be divided into stages or sub groups so the user can analyze a portion of the job. For example, a building contractor may create a job for each building or project. The project may be divided into stages such as site work, foundation, framing, roof, electrical, plumbing, finishing, etc. The contractor will need to associate a job with each of the direct costs as well as a stage.
Each job has its own list of stages. The stages within a job may be very similar to other jobs or may vary dramatically. A stage must be created in the master stage list before it can be entered into a job. Go to Job Costing > Options > Stages tab to create new stages within the master stage list. Review the Introduction > Stages section of this manual for more instructions on Stages.
Click on the Job Stages tab of the main Job Window (Job Costing > Jobs > Job Stages tab) to view the stage list for a job. Change the way you view the stages by selecting from the list of options under View.
When a new job is created, the Stage List is either copied from another job (review the Adding a New Job section for details) or from the default settings (review the Getting Started > Setting Job Defaults section). Entering a number of stages within each job can be time consuming. This step can be greatly simplified by entering a default list of stages within each job folder. Go to Job Costing > Options > Job Folders tab and click the Edit Defaults button to enter the default list of stages. Stage folders and stages should be set before job budget amounts or expenses are entered.
Stages can be added in groups or individually. Highlight the parent folder and click on the New Group button to insert a folder or folder group and the stages within those folders. The following dialog will appear:
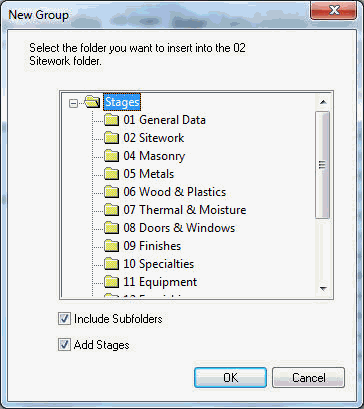
Select the folder you wish to insert. Toggle the Include Subfolders switch ON to insert any subfolders of the folder that is selected. Toggle the Add Stages switch ON to all add stages within the selected folder(s). Click OK to add a stage.
To insert a list of folders the user must highlight each folder and click the New Group button for each folder. An alternative to inserting each folder individually is to delete the parent folder and re-insert it with the Include Subfolders switch turned ON.
The default stage's general ledger
account must be set within each stage when a group of stages is inserted
using the Add
Group button. Highlight a stage within the
newly inserted group of stages and click the Stage Properties
button. Click on the Advanced
tab as shown below:
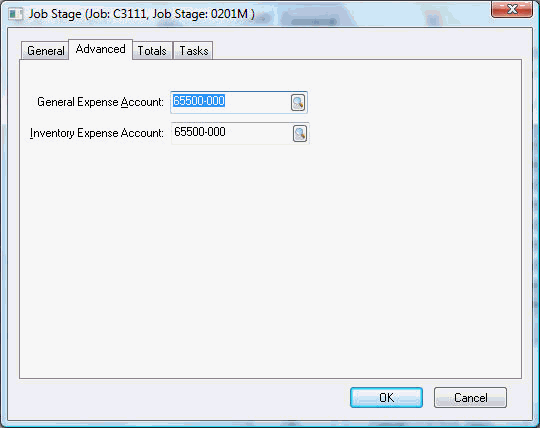
Enter the appropriate General Expense G/L Account. The stage's general ledger account (Expense Account + Department) is used in the following documents:
The account is copied into the expense invoice or purchase order when an inventory item code is not present on the PO. Note that this overrides the vendor's default general ledger account.
The G/L is inserted into the timecard if the Timecard General Ledger Account option is set to Use Job Stage Account within payroll's work code. For more details, refer to Labor Expenses.
Enter an Inventory Expense Account if the stage is classified with a source of inventory. This entry will not exist if the Determine direct job cost accounts option found in Job Costing > Options is disabled. Review the Job Costs > Inventory Items and Direct Job Costs section for more details on the Inventory Expense Account entry.
Review the Getting Started > Stages section for details on the other stage entries.
Changing a Job's Stage Folders
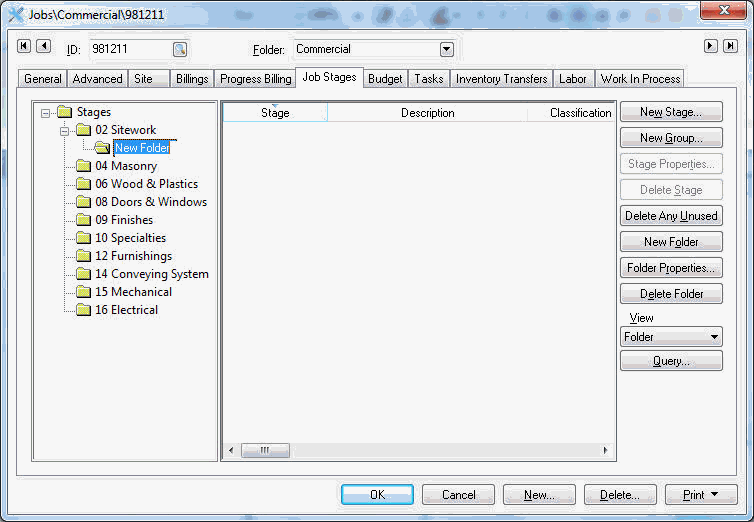
To create a new stage folder only, highlight the folder in which the new folder will be placed and click the New Folder button. A new folder will appear labeled New Folder. Enter the new folder's label and press the enter key.
Click the Properties button after a folder has been highlighted to rename the folder label.
Click the Delete Folder button to remove a folder or an entire group of folders and stages.
Folders may be moved from one parent folder to another by clicking on a folder with the mouse and dragging it to the new parent folder. See a Windows manual for more details on dragging and dropping objects.
Adding Individual Stages
Click on the New Stage button to launch the new stage wizard.
The following dialog may appear
depending on the view setting within the job's Job Stages tab. Continue with step 3 if the following dialog does
not appear since the folder was selected on the Job Stages list. Select the job's folder group as the location for
the new stage and click the Next
button to view next page.
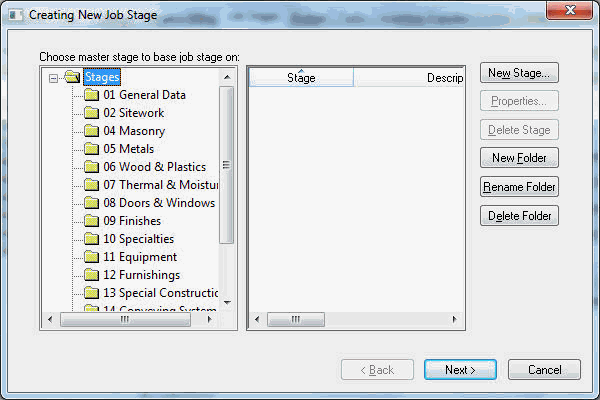
Select a new stage from the dialog
shown below.
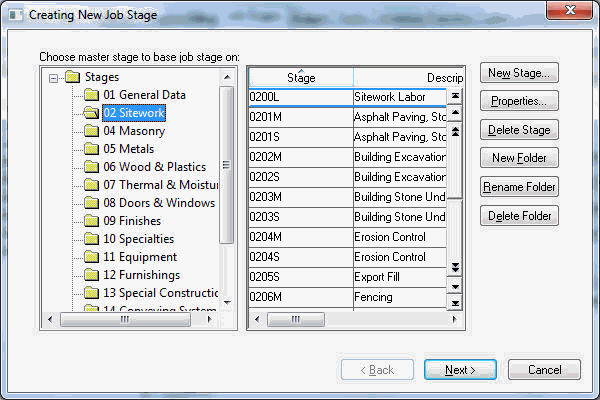
A stage must be created within the master stage
list before it can be added to a job. Click on a master stage group
to view the available stages in the right pane.
Click the New Stage button
to create a new stage within the Master Stage list. Review the Introduction > Stages section for more details
on creating and organizing the Master Stage List.
Use the New
Folder,
Rename Folder,
Delete Folder,
or Delete Stage buttons
to change the master stage list.
Select a stage from the list. Click
Next
and the following window will appear:

The stage Description may be altered for this job but will not affect the description within the master stage list. Go to Job Costing > Options > Stages to permanently change the stage description.
The stage Classification cannot be changed within a job but must be set within the master stage list. For details on this setting see the Getting Started > Classifications section.
The Status of each stage may be changed individually; it will also change as the job status is changed. This optional setting is used for scheduling purposes.
Enter miscellaneous information concerning the stage within the Note field.
Click the Next
button to continue.
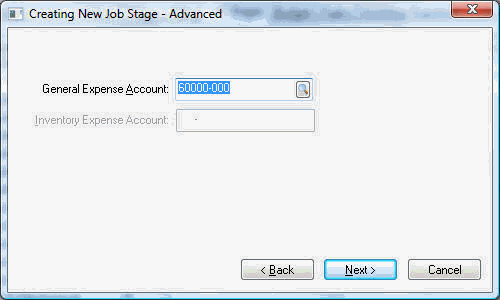
Enter the appropriate General Expense G/L Account. The stage's general ledger account (Expense Account + Department) is used in the following documents: The account is copied into the expense invoice or purchase order when an inventory item code is not present on the PO. Note that this overrides the vendor's default general ledger account. The G/L is inserted into the time card if the Timecard General Ledger Account option is set to Use Job Stage Account within payroll's work code. For more details refer to the Job Costs > Labor Expenses section.
Enter an Inventory
Expense Account if the stage is classified
with a source of inventory. This entry will be disabled if the
Determine direct job
cost accounts option found in Job Costing > Options
is disabled. The Inventory
Expense Account and the General Expense Account may
be identical if the stage is used for general materials and inventory.
Review the Job
Costs > Inventory Items and Direct Job Costs section
for more details on the Inventory
Expense Account entry. Click
the Next button to continue.
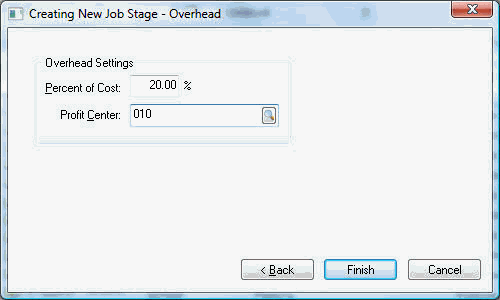
Enter the Percent of Cost value. Review the Job Overhead > Adding a Percentage Overhead section for more details on this entry. Both of these entries are used to calculate overhead and can be ignored and left blank if no overhead calculation is required.
The Profit Center field will not appear if the profit center option is not enabled. For more details about profit centers and job costing, review Financials > Departments and Profit Centers for more details.
Click Finish to insert the new stage.
Stage settings can be edited by clicking on the Stage Properties button within the Job Stages tab of any job.
For more information on the Totals tab, review the Job Costs > Evaluating Job Costs and Job Overhead > Adding a Percentage Overhead sections.
The Delete Stage and the Delete Unused buttons may be used to remove unwanted stages from the Job Stage List. The Delete Stage button will remove stages one at a time while the Delete Unused button will remove all stages that do not contain any budgeted income or any budgeted, actual, or committed cost amounts within the stage's Total tab. Highlight the root folder to remove all the unused stages within a job or highlight an individual sub-folder to remove only the stages within a folder. Click on the Delete Unused button and click Yes to the warning message after the desired folder has been selected.