The rental module within EBMS will create a rental contact that lists the rented equipment, pricing based on various rental period rates, beginning meter readings, rental date, times, and other contract details. Many contracts are printed on preprinted
contract paper that contains the legal jargon on the back side of the contract. This contract form is ideal but note limited to companies that bill the rental when it is returned.
The rental contract option in EBMS () is the main dialog used to list rental equipment, add consumables, check out, and return rentals, and facilitate various billing options. The rental contract is managed from this page by pulling rental items from the product catalog and billing using the common sales invoice tools. This combination of tools gives the user maximum flexibility to include rentals with other sales or revenue.
It is important that the rental pricing and rental items are created and set up before a contract is created. Review the Getting Started > Creating Rental Service Codes before a contract is created. Review the Rental Pricing section of this manual for more details on rental pricing.
Complete the following steps to create a rental contract:
Enter a Customer ID to identify the renter. Use the Reserving and/or Checking Out a Rental option to start with the rental equipment and identify the
customer after the equipment is located and available. The following dialog will appear with existing contracts.
Click Yes to open an existing contract or No to create a new document.
The Contract # is created using the same value as a sales order or sales invoice number. The Next Invoice Number can be viewed or changed in the Sales > Options > Invoices and S.O. tab.
The Entry Date records the date the contract was created. This date defaults to the date the contract was created. This date has no affect on scheduling rentals or billing transactions.
The Contacts tab is used to select customer contacts for this proposal. Review CRM > Contact Management to add or edit contact information.
The Rental Period settings are used to reserve equipment for a specific time period. These entries can be ignored if the rental equipment is checked out immediately. Complete the following steps to reserve the equipment before checkout:
Enter the Start date. A day of a week can be typed in the date field or the calendar button clicked. The Calendar button is located on the right side of any date field.
Enter Time if the rental is reserved at a specific time.
Select a
Duration option or type the duration. The duration consists of a decimal number and the time label. The label options are minutes, hours, weeks, months, and years.

The Rental Period Status will default to Active but the status can be changed to Pending or Canceled to remove the rental from the reservation calendar.
Enter the customer's PO# (Purchase Order) or Job number or code for this rental. Keep this field blank if no purchase order is used.
The Sales Person field should reflect the salesperson that created the contract. This entry can be used to process commissions. Review the Sales > Salesperson Commissions section of the sales documentation for more details. To default this field to the user name used in the EBMS Login process, switch the Default sales person to User Name tab ON in .
Enable the Deliver option if the rental requires delivery. Review the Managing Rental Deliveries section for more details on delivering rentals.
Enter the Job ID and Stage information if the rental is billed to a job rather than billed to a customer. Review Billing a Rental to a Job for more details on this billing option.
Complete the following steps to list the equipment that is being rented:

Select the rental item from the Product Catalog column or enter the Serial Number of the actual equipment. The Product Catalog may be selected from a list by clicking on the lookup button. If the Inventory Item is entered, the first available serial number will be displayed. Click on the lookup button to view all the available serialized items connected to a specific rental service item. Review the Getting Started > Creating Rental Service Codes section for details on creating rental codes. Enable Default the serial number when entering a rental item in the contract option to auto populate the serial number to the next available serialized item. The Serial Number column can be ignored if the equipment being rented is not serialized.
Review [Inventory] Products > Notes and Instructions for instructions on using the Internal Note as well as product notes and descriptions.
The Date Reserved and Time Reserved is copied from the Rental Period entries on the header of the rental contract. These columns can be ignored and hidden if the rental equipment is not reserved but is being checked out immediately. Review the Standard Features > Column Appearance section of the main manual for more details on hiding columns.
The rental costs are shown within the Total column for each rental item. This column is found to the right of the Date and Time Due Back, Date and Time Returned columns. The Total price is calculated from the Duration setting of each rental item.
The Duration column is copied from the Duration setting on the header of the contract. The user can change the Duration for each rental item individually or change the Duration setting in the Rental Period settings within the header of the contract to change the Duration of all the items.
The rental
Rate is set based on the lowest available rate for the
Duration period. Right-click on any rental item line and select
View Rate Table from the context menu as shown below:

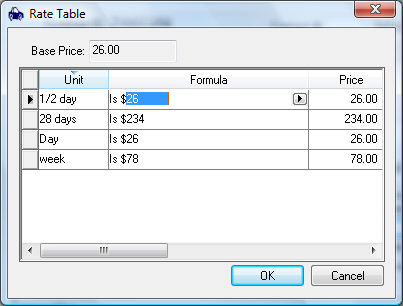
Click on the Explain Rental Charge option to view the formulas used to calculate the rental charge. Review the Rental Pricing Overview section for more on rental pricing.
The status is shown for each rental item. Equipment can be organized by status for management purposes. Review Status of Rental Items for instructions to list or report equipment by status.
Add any desired consumables to the Consumables list at the bottom of the contract dialog. Enter the consumables in the same manner as a sales invoice.
Click the Estimate Total button at the lower right corner of the contract dialog to view the estimated total of the rental and consumables excluding tax or delivery fees.
Review Process a Rental to steps to Check Out rental equipment and print the contract.