Creating a Simple Batch
The Manufacturing window is the tool used to create new inventory or to process an assembly of inventory items. Go to and the following window will open:
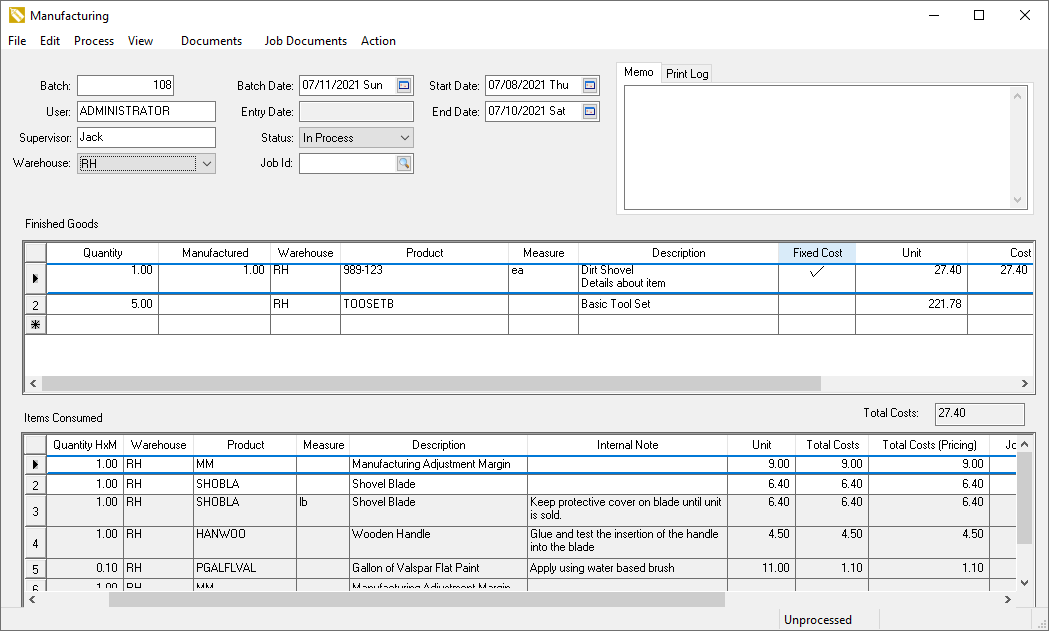
The Batch value is used to identify a specific manufacturing batch. Press the Tab key to automatically increment and set the next batch number. The user can
manually enter the Batch code by entering an alphanumeric code that identifies the manufacturing batch. Go to the to change the Next Batch Number value.
-
The User will default to the EBMS login name. This name should identify the user who entered and processed the batch information with EBMS.
-
The Supervisor entry is to record the supervisor name for reporting purposes. This entry can be ignored if the supervisor information does not apply.
-
Enter the date when the batch will be completed. The Batch Date is used for all general transactions and postings that are created at the time the batch is
processed. This entry can be kept blank if the batch is not completed at the time of the data entry. A blank completed date will be set to the current date at the time the batch is processed.
-
Set the Status of the batch. This value will be changed to Completed at the time the batch is processed. The status options can be changed or additional
options can be added. Review the Batch Status section for instructions on adding or changing status options.
-
The optional Start Date and End Date is useful to schedule batch. Review Batch Scheduling and MRP > Scheduling a Batch for scheduling details.
Finished Goods
Enter the Finished Goods that are being manufactured.
-
Enter the Quantity of the finished goods being manufactured. The Quantity value affects the whole good’s Net Ordered in the count tab of the inventory item. Review the Tracking Counts > Inventory Item Count section.
-
Enter the quantity that was Manufactured. This quantity should be zero until the inventory is manufactured or until the materials needed to manufacture the items have been pulled from inventory stock. The Manufactured quantity must
equal the Quantity column before the batch can be processed. The Manufactured quantity affects the total inventory on hand in the.
Complete the following steps
to always copy the Quantity amounts to the Manufactured column:
-
Select from the main EBMS menu.
-
Click on the Manufacturing tab of the options dialog.
-
Enable the Default Manufactured Quantity to equal the Quantity amount option. This option is useful if the user enters the manufacturing batch after the items have been manufactured.
-
Enter the finished good’s Inventory ID that is being manufactured. This inventory item must be classified as Track Count or other perpetual classifications such as Serialized items or Special Orders. All items such as
No Count or Service be manufactured.
-
Review Product Catalog > Notes and Instructions for more details on the Internal Note entries as well as product notes and descriptions.
-
The Unit cost and the Cost columns cannot be changed by the user. The Unit cost value is calculated from the total of the Cost column within the Items Consumed list.
-
The Cost value equals the total of the Total Costs Cost (G/L) and Cost (Pricing) Values section if the Cost (G/L) and Cost (Pricing) columns appear.
-
Enable the Sync MFG/Consumed option if the finished goods item contains a bill of materials (components). Review Materials Resource Planning > Sync Finished Goods Quantities with Items Consumed for information on this important option.
Items Consumed
The Items Consumed list is compiled for each individual list found in the Finished Goods list. Click on any Finished Goods line to view the list of components in the Items Consumed list.
The list will either show:
-
A list of inventory items copied from the component tab of the inventory item. Review the Using Inventory Components for Manufacturing section for details in creating a component list
for a finished goods item.
-
A single blank line will no product code will be created with a Quantity of 1. The Unit price will default to the last cost recorded in the inventory tab of the finished goods item. Open the finished goods item in and click on the Pricing tab to view the Cost value.
The user can add components to the Items Consumed list or change the contents of the list. The contents of the following columns can be changed by the user:
-
The Quantity column reflects the amount of each Item Consumed that is contained within each Finished Goods item. EXAMPLE: If 5 tool boxes are being manufactured and each tool box contains 2 screwdrivers, the Quantity should equal 2 since there are 2 screwdrivers in each tool box. Do not enter an amount of 10 into the Quantity column since the total amount is reflected in the Total Quantity column.
-
The Consumed column reflects the total number of items consumed. The following formula will be used if the Sync Mfg/Conumed option is enabled: Consumed = Quantity of Finished Goods * Quantity of Items Consumed. Review Materials Resource Planning > Sync Finished Goods Quantities with Items Consumed for information on the important Sync MFG/Consumed option.
-
If the Inventory ID is blank, no transactions will be created. Transaction details are described later in this section. Right-click on the Inventory ID and select lookup from the context menu to view component details.
-
Review the Tracking Counts> Unit of Measure sections for details on the Measure column.
-
Review Product Catalog > Notes and Instructions for instructions onusing the Internal Note as well as product notes and descriptions.
-
The Unit cost column reflects the cost value within the
if the quantity M anufactured is zero. The Unit cost equals the perpetual cost of the Item Consumed if the Total Consumed column contains a value.
-
Cost column = Quantity * Unit cost.
-
Total Costs column = Total Consumed (Column may be hidden) * Cost . The Total Consumed column equals the Total Quantity if the Calculate Consumed Totals is turned ON. Review Materials Resource Planning (MRP) > Manually Calculating Items Consumed for
details on the Calculate Consumed Totals switch and changing the Total Consumed columns. Review The Cost (G/L) and Cost (Pricing) Values section
if the Total Cost (G/L) and Total Cost (Pricing) columns appear.
-
Print column - Right click on each item in this column and select Show on Printed Document to append the component descriptions to the Finished Goods.
This enables the ability to easily search, display, and print the component details from the item description.
Repeat the steps listed above for each item that is being manufactured. It is recommended that you adjust the widths of the invoice detail columns to your specifications. Review [Main] Features > Column Appearance for more details.
Save and Process
Select from the manufacturing window menu to save the batch. The inventory counts of both the finished goods and the consumed items are updated when a batch is saved. An un-processed saved batch has the
same affect to inventory as a purchase order and a sales order. No general ledger transactions are created until the batch is processed. Right-click on any finished goods or consumed items Inventory code columns and select Lookup from
the context menu after the batch has been saved. Click on the count tab to see the affects to the inventory counts.
Select to enter a new batch.
Select to make a duplicate of a previous batch. This function can save time when batches are similar and can be copied rather than reentered.
Review Creating a Batch from the Purchasing Page to create a batch based on the product's stock levels.
Review Processing a Batch for steps to process inventory by decreasing the items consumed and increasing inventory of the finished goods.