Click Create Account to enter My Info and create a new EBMS customer record.
Customer accounts can be created to identify the customer and customer information. Price levels, terms, default shipping method, saved credit cards and other settings are managed within the customer. Customer accounts can be created within EBMS or from the website.
A generic customer account is used when the web user does not log in using a customer account. Review the Configuring the Shopping Cart > Creating a Generic Customer section for more details on the generic customer account options. Note that a generic customer must be setup before website information can be viewed.
Website pricing, available products, and shopping cart settings can be controlled from the customer record. For example, the retail price may show on the web until a customer with a wholesale account logs into the site. After logging in, the wholesale account will not see the retail pricing. The customer's user name and password will be stored within the customer record. Review Advanced Options > User Created Customer Accounts for the option to allow the customer to create an account online.
The website customer has the option to login with their
customer account from the My Account tab, login link, or checkout page.
Click Create Account to enter My Info and create a new EBMS customer record.
Enter account information including the required Login Information Username and Password. This information is stored in the Website tab of the customer record in EBMS. Saved Credit Cards can be removed by the user on the account page. These Credit Cards can also be viewed from the Terms tab on the customer account in EBMS.
Click Create Account to create new customer account.
Click Sign In to access the customer portal.
Click on My Account to change customer information.
Click Update Account Information to save customer information to EBMS.
Click Update Your Password to change site password
Click on Update Payment Preferences to add credit card information to an account in a secure manner. Review Saving Customer Credit Cards for details on the EBMS method of storing payment cards within an account.
Click Update Communication Preferences to add or remove the account from communication lists.
Click Order History
to review or print invoices. The invoice list Payments can also
be made from this page.
Click Pay Orders to pay for outstanding orders.
All product pages will reflect the product price level selected on the customer's account in EBMS. This is useful when a website customer buys product at a different price level than the general public, such as wholesale. Go to Sales > Customers > Customer Record > General tab > Price Level dropdown to specify the correct price level.
The customer specific payment types and terms indicated on the customer record in EBMS are listed at checkout. This can include Charge on Account and Due options. Saved Credit Cards can also be used from the website. Go to Sales > Customers > Customer Record > Terms tab to set account options. View the Payment Options section for more details.

Billing and shipping information is defaulted at checkout using information on the customer account General tab. The Default Shipping Method is also selected by default. This shipping method can be changed by the user on their account page.
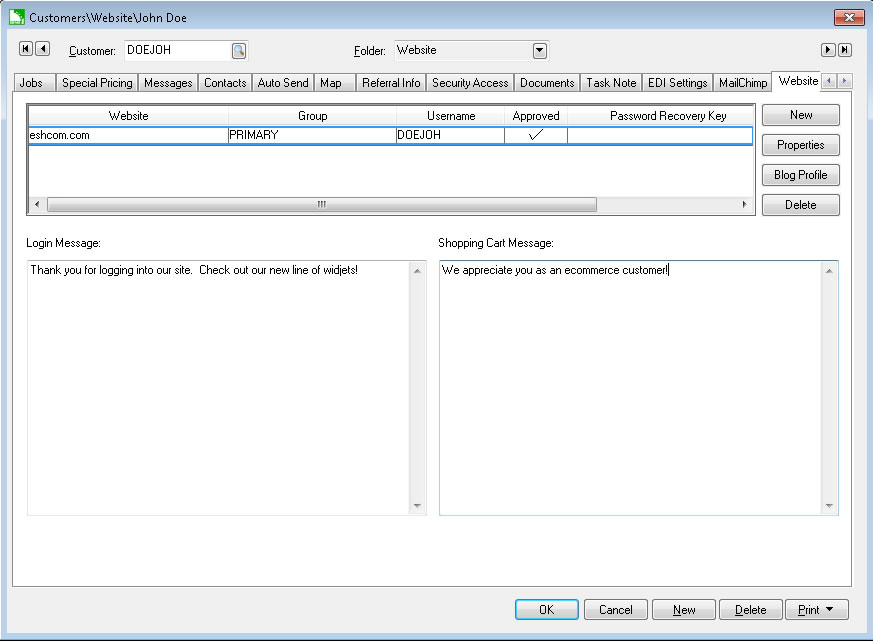
Complete the following steps to create or change user information including the user's user name and password for a customer:
Open a customer record within EBMS
and click on the Website tab
as shown below:
Click the New
button to create a new login account or click Properties
to view or change an existing account as shown below:
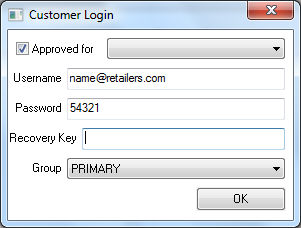
Enable the Approved for option to activate the users e-commerce account. This option can be disabled to temporarily inactivate the account.
Enter a User name. The customer's e-mail address is often used for the user name.
Enter the Password. This field is not hidden unless the user security restricts this information. Review the Getting Started > Security section of the main EBMS documentation for more details on restricting this field within EBMS.
Recovery
Key - is automatically generated by a web customer
selecting Forgot your Password?
from the website cart or login pages as show below.
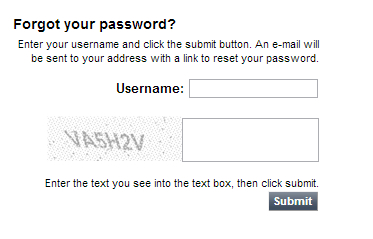
The Username is matched
to the EBMS customer account and a password recovery key is automatically
emailed to the web customer with the recovery key included. The
recovery key is stored in EBMS until the web customer successfully
changes their password.
Select the appropriate web Group. Review the Getting Started > Customer Group Settings section for details on this setting.
Click OK to save.
Multiple user accounts can be created for the same customer for a common website. Repeat the steps above for any additional accounts. The User name and Password can also be created by the user if the Allow web user to create a new customer option is enabled in Sales > Web > The address of your website. Review the Advanced Features > User Created Customer Accounts section for more details on managing account user names and passwords.
Enter a Login message to customer that will appear when the user logs into the website. Special messages and advertisements for a specific customer can be placed within this Note.
Enter a Shopping cart message that will be displayed below the shopping cart during the checkout process. Complete the following steps to filter down a customer message to all customers or a group of customers:
Go to Sales > Options and click on the Customer Folders tab.
Highlight the root folder for all customers or a folder group and click on the Edit Defaults button.
Click on the Website tab to enter the Customer message.
Enter the Customer message and then filter down the message. Review the Standard Features > Change Defaults, Filter Down Data, and Globally Change Data section of the main EBMS documentation for more details on filtering down data.
Click OK to save settings.