Launch the following
dialog by selecting from the EBMS
menu:
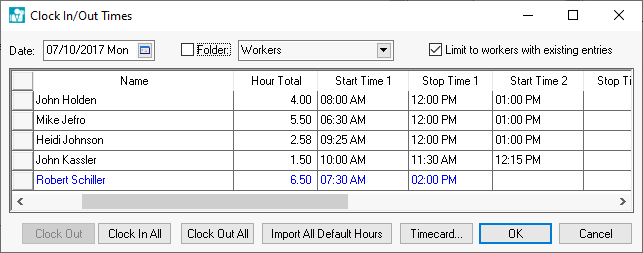
The Date defaults to the current date. Change this date to a past date for auditing purposes.
Enable the Folder option and select the appropriate folder by clicking on the drop down button to list only the employees within a specific folder. Entire work teams or crews can be clicked in or clocked out by grouping crews within folders. Review the Workers > Adding and Deleting Employee Folders section for more details on creating folder groups.
All the employees will be listed if the Folder option is disabled or the employees within a specific folder will be listed if the Folder option is enabled.
Enable the Limit to workers with existing entries to query out all employees that have not recorded Start Time or Stop Time. Enable this option to audit existing entries. Disable this option to list all employees to add new Start Times or Stop Times.
An individual employee can be Clocked in or Clocked Out by highlighting the employee and clicking the Clock In or Clock Out button. Note that the appropriate button will appear based on the status of the employee. Manually enter a prior time if necessary to change the status of an employee.
Use the Clock In All or the Clock Out All buttons to change the status of all employees. Note that the Clock in All button will only affect employees that are currently clocked out. The Clock Out All button has the same effect on all employees that are currently clocked in. Query the employee list by selecting a specific folder and enabling the Folder option.
The employee's Start Time and Stop Time settings can also be edited directly to correct time or add new times. Review the Daily Hour section for more details on the daily hours settings.
Default daily hours can be imported for all employees for the day by clicking on the Import All Default Hours button. Review Clock In/Out Parameters section for more details on setting these values.
Highlight an employee and click on the Timecard button to view the associated timecard or to open and set the work code values. Review the Processing Payroll > Entering Timecards for more details on entering work code settings.
Click the Close button to close the dialog. Note that all times are saved immediately and do not require the dialog to be closed to save.