Go to and the following window will appear:

The general ledger account within EBMS uses a 5-digit - 3-digit number identification. General ledger is the only module that requires a numeric ID. The 5-digit number identifies the general ledger revenue, COGS, expense, or balance sheet accounts. The 3-digit number prefixed with a hyphen identifies the profit center or division within the EBMS system. Review the Department and Profit Centers overview section for more details on the 3-digit number suffix. Recommended numbering schemes are reviewed later in this section.
It is important that the numeric General Ledger Chart of Accounts is coded and grouped in a proper accounting method. It is recommended that you review this entire section before creating a new GL account. Proceed by printing the Chart of Accounts () report and reviewing the way the current list is arranged.
It is recommended that users contact a consultant or your accountant if they are inexperienced with adding or creating general ledger chart of accounts. If you wish to have some direction from your EBMS consultant, please send an entire list of your chart of accounts and a description of the new account that you wish to create.
Creating a New Account
To create a new account to add to the chart of accounts, take the following steps:
Go to and the following window will appear:
Select the Edit pull-down menu and select New.
Select the appropriate General Ledger Folder. For
example, if you are creating a new expense account, you need to identify
the proper expense folder. You may need to expand or show subfolders by clicking on the (+) box to the left
of the expense folder. If the box contains a (-) character, the subfolders are already expanded. The new account
is placed in the folder in
the example shown below:

For details on the Add Folder, Delete Folder, Properties, and Edit Defaults buttons, review the Chart of Account Folders section.
Click Next to continue.
The next step is to create the New
account number.

The numeric ID of the new account must be within the Allowable Range shown. This allowable range is set within the general ledger folders.
The numeric codes within the standard EBMS chart of accounts are coded in a systematic way. This can be altered to match a specific company's needs. All short-term assets start with the zero (0), while the first number in each long-term asset account is 1. Short-term liabilities start with 2 while long-term liabilities are 3. Equity accounts start with 4, revenue - 5, Cost of Sales - 6, and expenses - 7, You will notice that the first digit of the allowable range in our example starts with 7 telling us this is an expense account.
As you review your chart of accounts report, notice that the second digit in all accounts that are within the expense folder identify what group of general expenses they represent. For example, 70??? codes represent general expenses while 71??? codes identify supplies, 73??? maintenance, and 75??? Utilities.
In the example above, the code starts with the 70 digits. Notice that no other number would be allowed because our allowable range is between 70000 and 70999. The chart of accounts may be structured considerably differently from the example or the set that was distributed with the software. EBMS does not require that the user follow the rules explained above, but there are many benefits if the general ledger structure is properly planned.
In the example above, the newspaper expenses were
kept separate from other advertising. Since the advertising account
is 70400, create a new account for newspaper advertising coded
70410. Notice that the first three digits of the code identify
the account as an advertising expense.
Notice that if the code that was entered is not five digits long
the system added zeros to the right side of the account code.
All general ledger codes must be 5 digits long.
Enter a description of the new account and click Next.

The next entry required is a Department Code. Enter a three-digit profit center or department code. If this account identifies an overhead expense or departments are not being used, enter three zeros into this entry field. Review the Creating Departments section for more details about departments. Click Next to continue.
The following page will only appear if the profit
center option is enabled. Review the Departments
and Profit Centers Overview for more details on the profit center
option.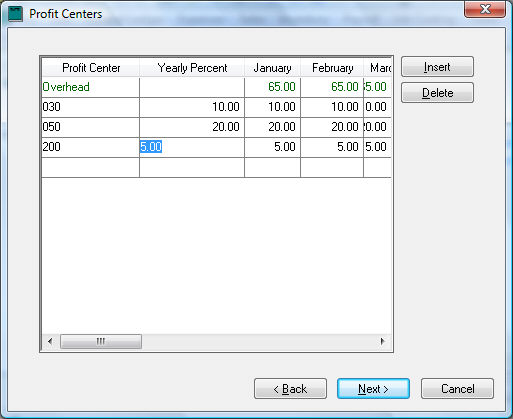
Complete the following steps to properly configure the profit center percentages:
Click Insert to create a new line.
Insert a Profit Center ID in Profit Center column within the new line.
Enter a percentage that you wish to distribute to this Profit Center, which will be copied to each monthly column.
Change monthly percentage column for the monthly percentages that are not identical.
Repeat for each Profit Center involved. For more
information on Profit Centers or details involving monthly distributing
percentages, see the Profit
Centers section of this manual.
Any percentage balance is allocated as overhead.
Click Next to continue.

Set the proper Classification for the new account. It is important that the proper classification is set before this new general ledger account is used. Review the Classification section of this manual for more details. When the proper classification is entered, click Finish to create the new account.
The General Ledger Account window will open displaying the new account. For complete details of fields found on this window, see the next section on Chart of Account Folders.