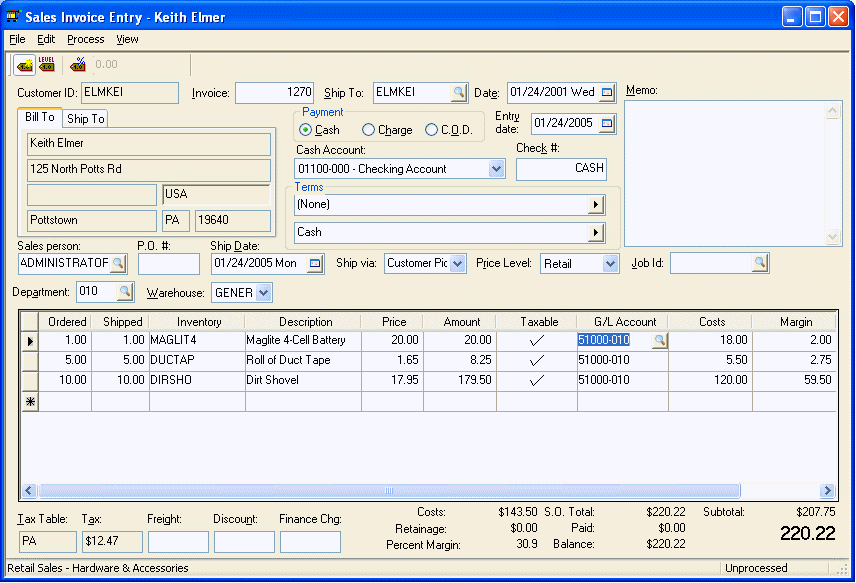
Sales invoices are entered the same way as sales orders, except that an invoice is processed. If a sales order exists for the invoice that you wish to process, locate the sales order (Review the Viewing and Editing Sales Orders section for more details) and make the appropriate changes described below and then process the sales order to create a sales invoice.
The invoice window has its own pull down menu that is used within the invoice and will be referred to as the invoice menu throughout this section.
Invoice detail can be entered so that it is shown or hidden on the printed invoice. Review the Materials List section for more details on how to enter invoice detail but not show it on the printed invoice.
Entering and Printing an Invoice
1. Go to Sales > Invoices and S.O.s, and the following window will appear. Note that this same window is used to enter sales orders.

2. Type the customer Id in the Customer Id field or select one from the selection window. This field will default to the customer that is currently selected on the customer list. A miscellaneous customer must be used to manually enter the name and address onto the invoice. Review the Miscellaneous Customer Overview section for details. Press the tab key to move from the customer Id field to the invoice field if no sales orders exist. If sales orders do exist for the current customer, the following dialog will appear.
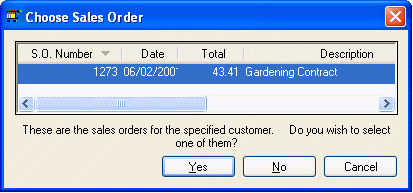
a. Highlight the sales order to edit or process and click the Yes button. To enter a new sales order or invoice click No.
3. Tab through the Invoice field to auto-generate the sales order number.
4. Enter the Ship To customer Id if the products are being shipped or ignore entry if customer is picking up the product (FOB). To manually edit the Ship To name and address, blank the Ship To Id and press tab on your keyboard. The Ship to tab will automatically show allowing the user to change the shipping address. The Ship To field defaults to the Id specified in the Sales > Customers > Terms tab > Ship To Id and does not need to be blanked if the Ship Via field equals the customer’s Standard Shipping Method (FOB) setting. Note that the shipping address will not be printed on the invoice unless the Ship Via field is changed. See Ship Via field description below for more details.
The invoice Date will default to today’s date each time a sales order is opened or a new invoice is being entered.
5. Click on the Payment method being used. Cash should be selected when the invoice is being paid immediately. An invoice is considered a cash invoice whether it is paid cash, personal check, or credit card. The Charge option should be selected when the customer is purchasing product on terms. COD or Collect on Delivery should be selected when an item is being delivered and the customer must pay the invoice at time of delivery. It is not possible to process an invoice with cash terms with the Charge option. Since a COD invoice is processed the same as a charge invoice, it is the only way that a cash invoice can be processed as charge.
The Entry Date defaults to the date when the sales order or invoice was created.
The Cash Account and Check # fields are only valid when the invoice Payment option is set to Cash. The Cash account identifies the general ledger cash account that records the incoming cash. This field defaults to the Default Cash Account specified in Sales > Options > General tab. Use the default account unless multiple cash accounts are setup in general ledger. For example, some may wish to setup a cash account for cash and personal check payments and another separate cash account for credit card payments. These cash accounts should be reconciled in a similar fashion as a checking account to make sure that all the monies were collected for the cash invoices. Reconciling the cash account balances with actual cash is a very important step in maintaining accurate bookkeeping. Review the Reconciling Cash Accounts section for more details in managing a cash account.
The Check # field records the payment identification and is normally entered when the invoice is processed. If the invoice is being paid by a bank check, enter the check number; if paid by cash, enter "Cash"; and if paid by credit card, enter the type of credit card being used, such as Visa, MC, Discover, ETC.
6. Enter the Terms of the invoice. The terms default to the settings specified within the customer’s record. They can be changed from the default setting to an alternative selection. This will change the invoice terms only and will not change the customer’s default setting. To permanently change the terms for a customer you need to go to Sales > Customers > Terms tab > Payment Terms.
a. To change the Discount terms take the following two steps: discount field. A drop down list will display all the discount options. If no discount is offered on this invoice set the entry field to "(none)" and ignore the second step.
b. After the discount template is set, the discount detail needs to be entered. For example, if the option "__ % paid in __ days" is selected, the discount percentage and the number of days in which the customer is allowed to take the discount must be entered.
7. Set the Due terms for this sales order by completing the following two steps:
a. Set the template entry by clicking on the right arrow and selecting one of the options. If this field is set to (none) the customer will be issued this invoice with no terms. The most common terms template is "Net __ days" Complete this entry by setting the number of days as shown in next step.
8. A template may require term details such as a date or number of days. For example, if the "Net __
a. Set the proper discount template by clicking on the right arrow button to the right of the days" template is selected, the exact number of days must be entered to complete due date terms.
9. The Sales Person field should reflect the sales person who entered and processed the invoice. To default this field to the user name used in the EBMS Login process turn the Default sales person to user name switch ON in Sales > Options > Invoice/S.O. tab - User Preferences.
10. Enter the customer’s PO# (Purchase Order) for this invoice. Keep field blank if no purchase order is used.
11. Enter the Ship Date the invoice products were shipped. Ignore this field if customer picked up the invoice items or service was rendered in-house.
The Ship via is used to specify the method of shipment and defaults to the pickup code recorded in Sales > Customer > Terms tab – Standard Shipping Method (FOB). If this code is changed to anything besides the default setting the sales order will print the Ship To name and address on the printed invoice, and automatically calculate Freight charges. The Freight charge will be calculated only if the total of the sales order is below the Minimum Free Freight amount entered in Sales > Customers > Terms tab. To view the Freight charge amount go to View > Advanced Options – Freight Charge field, which is copied from the Sales > Customers > Terms tab when a sales order or invoice is created. If the freight charge is manually changed on the invoice, the Freight Charge amount will be zeroed in Advanced Options, and the Freight amount will no longer be calculated automatically.
12. The Price Level field defaults to the price level specified for the customer entered in Sales > Customers > General tab > Price Level field. This setting is used to set the appropriate inventory pricing on the sales invoice. See Inventory > Inventory Items > Pricing tab to view or set the different sale prices for each inventory item. To permanently change the Price Level setting for a customer go to Sales > Customers > Terms tab.
Enter the invoice detail using as many lines as needed.
13. Enter the quantity the customer Ordered. The Ordered quantity is recorded in the Count tab of the inventory item if an inventory item is entered.
14. The Shipped field should reflect the amount that the customer received and the invoice total will be calculated by this quantity. If the Shipped amount is less than the Ordered amount and the Create backorders automatically switch is on, a new sales order will be created for the balance amount that has not been shipped. Go to Sales > Options > Invoices and S.O.s tab to set the Create backorders automatically when processing a sales orders option. The amount ordered on the backorder would be the total amount ordered less the amount shipped to date.
15. Enter the Inventory item Id code. The Description, Cost, Taxable switch and G/L code will automatically be filled in from the information entered in Inventory > Inventory Items. To view inventory item details such as the total count on hand or other details, right click on Inventory item field and select Lookup on the context menu. To select from a list of items click on lookup button to the right of Item field and choose from the inventory list.
16. The Unit of Measure field is an optional field that identifies the unit of measure being used for this inventory item. Review the Unit of Measure Overview section for more details. If multiple units of measure are never used for any inventory items, ignore this field. Review the section on Column Appearance for details on removing this column from the invoice window.
17. The Unit Weight field is an optional field that can be set for each inventory item in Inventory > Inventory Item > General tab > Gross Weight field. Ignore this field if weights are not used. Review the section on Column Appearance for details on removing this column from the invoice window.
18. Weight - This is the total weight for this line in the invoice. It equals the Shipped column amount times the Unit Weight. Review the section on Column Appearance for details on removing this column from the invoice window.
19. The Description field describes the item being sold and will be printed on the sales invoice. If the item doesn’t have an inventory code, leave the Inventory item field blank and manually type a Description of the item being sold. To type more than one description line on the invoice, leave Ordered, Shipped, and Item fields blank on the following line(s) and type the notes in the description column. Rather than typing in a description line each time you invoice for a specific service or non-inventory item, create a new "inventory item" and set the inventory Classification as Service. See Using Inventory to Bill for Service Rendered for more details on how to use the inventory system to save data entry time when entering sales invoices.
20. Enter the sale Price of the item. Note that when you enter an inventory item a price is copied from the inventory record based on the price level but can be changed anytime before the invoice is processed. This Price amount is used to calculate the extended amount and the invoice total. Amount = Shipped * Price.
21. The Amount field will automatically be calculated from the Quantity Shipped entry and the Price.
22. If the Taxable column is checked, sales tax will be calculated using the Tax table setting located at the bottom of the sales order. If the Tax table is set to NONE, EXEMPT, or any other tax table with a Null rate, the Taxable check mark will not have any effect on the Tax amount and can be ignored.
23. Enter the correct revenue G/L Code. This field automatically defaults to the general ledger code that has been set for the specified inventory code (Inventory > Advanced tab). This code can be changed manually for this specific invoice.
24. The Cost amount will be equal the total perpetual cost if a track count Item was entered and the Inventory Method was set to Perpetual. Go to Inventory > Options > General tab to set Inventory Method. If the Inventory Method is set to Periodic it is recommend that the cost column be hidden. Right click on the Cost column heading and click the Cost option to hide the column. The profit of a detail can be calculated by subtracting the cost from the extended price.
It is recommended that you adjust the widths of the invoice detail columns to your preferences. Review the Column Appearance section for more details. Repeat the steps listed above for each invoice detail line.
25. The sales Tax table is used when calculating the sales Tax amount. To set the invoice as tax exempt set sales tax table to EXEMPT. To change the Tax table setting for all future sales orders for a customer go to Sales > Customers > Terms tab and change customer’s default Tax table.
The sales Tax is automatically calculated based on the total taxable (all detail lines that have the Taxable column checked) and the Tax table setting. The sales tax amount can be manually altered by clicking on the check mark to the right of the Tax label. Do not manually change the tax total rather than checking the appropriate detail lines since the taxable total amount will not be accurate if the Taxable column is not properly selected. The only reason to manually change the Tax amount is if the tax has manually been calculated on a hand written invoice and the tax was rounded to a slightly different tax amount.
26. Enter any Freight charges that need to be added to the invoice. This charge is automatically calculated if the Ship Via entry does not equal the Standard Shipping Method (FOB) within the Sales > Customer > Terms tab. This setting (FOB) comes standard in EBMS. The FOB setting assumes that the items are being picked up or service was rendered. This can be changed on any sales invoice. If a customer always gets items shipped, it may be helpful to change the Standard Shipping Method (under Sales>Customer>Terms) to UPS or something similar. See the Calculating Freight Charges on Sales Invoices section for more details. The Freight charge will be calculated only if the total of the invoice is below the Minimum Free Freight amount entered in Sales > Customers > Terms tab. To view the Freight charge amount go to View > Advanced Options – Freight Charge field that is copied from the Sales > Customers > Terms tab when a sales order is created. If the freight charge is changed on the invoice the Freight Charge amount will be zeroed in Advanced Options so the Freight amount will no longer be calculated automatically.
27. Enter a Discount amount for the invoice. A discount will automatically be calculated if the invoice discount Terms are set. Note that if you manually enter a discount amount in the Discount field the discount Terms on the invoice will be erased.
28. The Overdue amount is automatically updated when customer finance charges are updated on overdue invoices but it can be changed anytime before the invoice is paid in full. This value can also be changed in the Sales > Customer Payments window.
29. To add or edit an invoice note or Memo go to invoice menu option View > Memo. This memo can also be seen on the upper right corner of the invoice window if the screen size is large enough.
30. To view or edit advanced invoice settings select invoice menu option View > Advanced Options and the following window will appear.
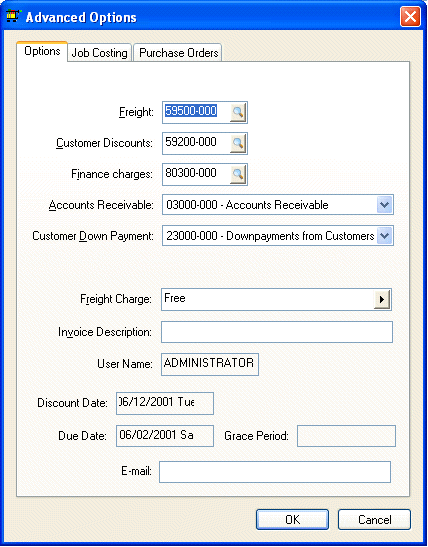
The Freight, Finance Charges, Customer Discounts, Accounts Receivable, and Customer Down Payment fields are general ledger accounts that are copied from the customer’s Advanced tab. These codes normally will not need to be changed.
The Freight Charge is copied from the Sales > Customer > Terms tab and is used to calculate freight charges automatically. This field is blanked if the Freight amount is changed on the invoice footer.
The Due Date and Discount Date are calculated from the terms field. These dates cannot be changed without changing terms. Click Ok to save advanced options and return to the invoice window.
31. To process the invoice, go to Process > Process using invoice menu selection or press Ctrl + `P’ on the keyboard. A copy of the invoice will print. To customize options for user’s needs follow these steps:
a. Go to Sales > Options > Reports.
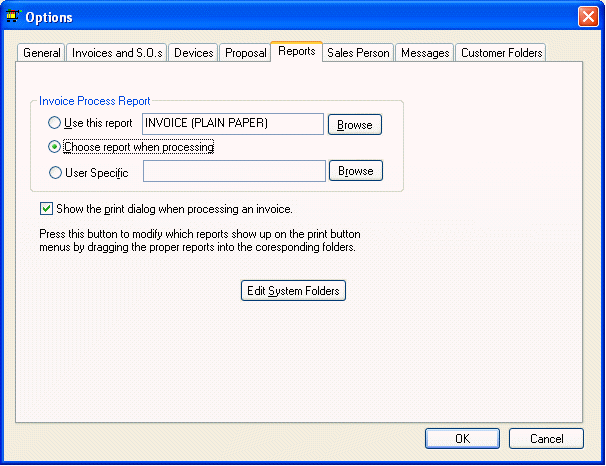
a. Select the Use this report option to set a standard invoice report. Click on the Browse button to select the specific invoice report form. Standard preprinted or plain paper invoice forms can be used or Eagle Solutions can create a customized invoice form. Contact your EBMS consultant for custom invoice options.
b. Turn the Show the print dialog when processing an invoice option OFF if the invoice is always printed to the same printer. This will save a step by ignoring the redundant print dialog each time an invoice is processed.
c. The Choose Report when Processing option can be selected if different invoice forms are used. All forms contained within the File > Reports > System Folders > Sales > Invoice/S.O. folder will be listed in a report option list each time an invoice is processed.
Click on the Edit System Folders button to view or edit the invoice form list.
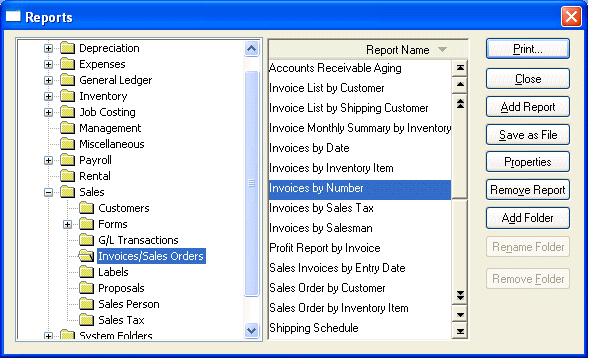
See the Form Configuration section for more details.
32. If no invoice is to be printed, go to Process > Process/No Print or press Ctrl + ‘R’ on the keyboard.
33. To print an invoice or sales order without processing it, select invoice menu File > Print and select the appropriate report.
34. If the invoice’s payment type is Charge or COD, the invoice will appear in the Customer Payment window. If the invoice was set as cash, no additional processing is needed for this invoice.
To enter another invoice select File > New or press Ctrl + `N’ on the keyboard and the system will prompt you to save the invoice.