Configuring Checks
1. Go to the Expense > Bank Accounts menu.
2. Select a bank account that has the Type "Checking". Check reports can only be set for checking accounts.
3. Select the check form for the check report by clicking Select Report beside Check Report. The report window will appear.
4. Open the Report > Expenses > Forms > Preprinted folder. Select the proper size check form. Click Select Report.
For example, if your check form size is 8.5" X 11", then use the Check (8.5X11) report. Note that if the check size is 8.5" X 7", you will need to set up the printerís paper size for 8.5" X 7". See the section below to set up paper sizes.
Configuring Sales Invoices
EBMS offers a variety of available invoice style options. Both preprinted forms and plain paper layouts are available. The Preprinted forms are useful if a dot matrix printer is being used and duplicate copies are required. The plain paper invoices are convenient to print on laser or ink jet printers. Invoice forms can be customized using crystal reports to allow for a unique invoice layout. Contact your Eagle Solutions consultant for details.
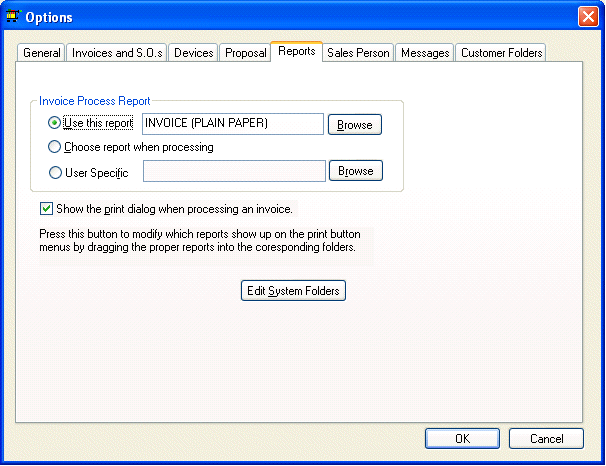
1. Go to the Sales > Options menu. Select the Reports tab to open the following dialog:

2. Set the Invoice Process Report option to Use this report to always print a sales invoice using the same form. This is the most common configuration. If the options is set to Choose report when processing a report list will appear each time an invoice is processed allowing the user to choose from a number of different form types.
3. Open the folder Reports > Sales > Forms. If you are using preprinted invoices, select the Preprinted folder; otherwise, select the Plain Paper folder.
In the Plain Paper folder, highlight Invoice (Plain Paper), and click Select.
In the Preprinted folder, select Invoice (Dot Matrix)(Preprinted) or Invoice (Ink or Laser)(Preprinted) according to which printer you have.
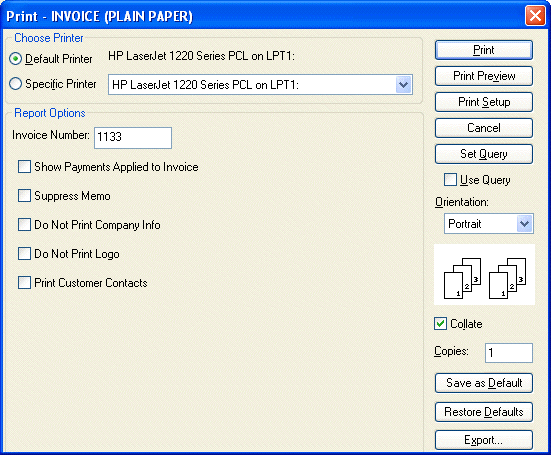
4. The first time an invoice is processed the following print dialog will appear:

Select the printer and the proper options. If Suppress Memo is turned ON, the invoice memo will not be printed on the invoice. You can opt to print your company logo. To print the company address and telephone number, select Print Company Info. See the Company Setup section to set up your logo and company information. The Report options may be different depending on which report is being printed.
To keep these configurations, press Save as Default. After these configurations have been saved as the default, this dialog will no longer appear when processing an invoice unless the Shift key on the keyboard is held down while processing the invoice.
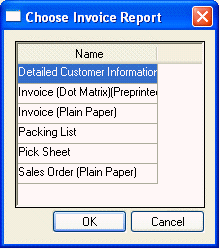
5. If the Choose report when Processing option was set in Sales > Options > Reports tab the following list will appear each time an invoice is processed.

This list option is useful if you need to choose between different invoice forms. Select the appropriate report and click OK. The reports in this window are found on the File > Print menu on the sales invoice. See the next paragraph for details on changing the reports on this menu.
Configuring Sales Orders or Sales Invoice forms
1. Go to the Sales > Invoices & S.O. menu.
2. In the invoice menu go to File > Print > Add Report. The report window will appear.
Note: The report window will open at the Report > System Folders > Sales > Invoices/S.O.s folder. This folder determines which reports are on the print menu. Do not select a new report from this folder. Go to the Report > Sales > Forms > Plain Paper folder. Select a report such as the Sales Order (Plain Paper) report and this report will be added to the print menu. See the Print Button section for more information on system folders.
Repeat the above steps for each report that should be added to the File > Print menu of the invoice.
Configuring Purchase Orders or Expense Invoice Forms
Configuring expense invoice forms is similar to setting sales invoice configurations.
1. Go to the Expense > Invoices & P.O.s menu.
2. In the invoice menu, go to File > Print > Add Report. The report window will appear.
3. Open the Reports > Expenses > Forms > Plain Paper folder. Select a report such as the Purchase Order (Plain Paper) report and this report will be added to the menu.
Repeat the above steps for each report that should be added to the File > Print menu of the invoice.
Configuring the Check Register Report
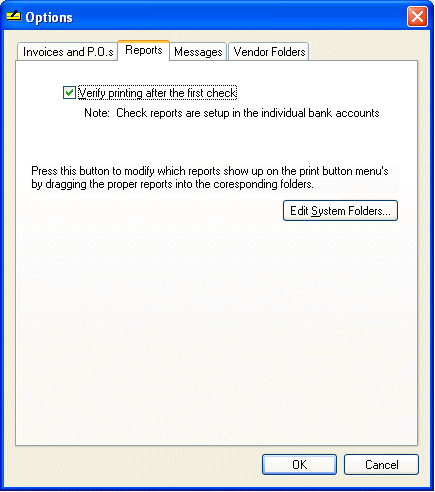
1. Go to the Expense > Options menu. Select the Reports tab.

2. Click the "Verify printing after the first check" on to have a message box appear after a check is printed to verify the check is correct.
To print this report go to the Expenses > Bank Account Reconciliation menu. If there is more than one bank account, a list of bank accounts will appear. Select the proper account. Click on the Wizards button. Choose Process Check Register.