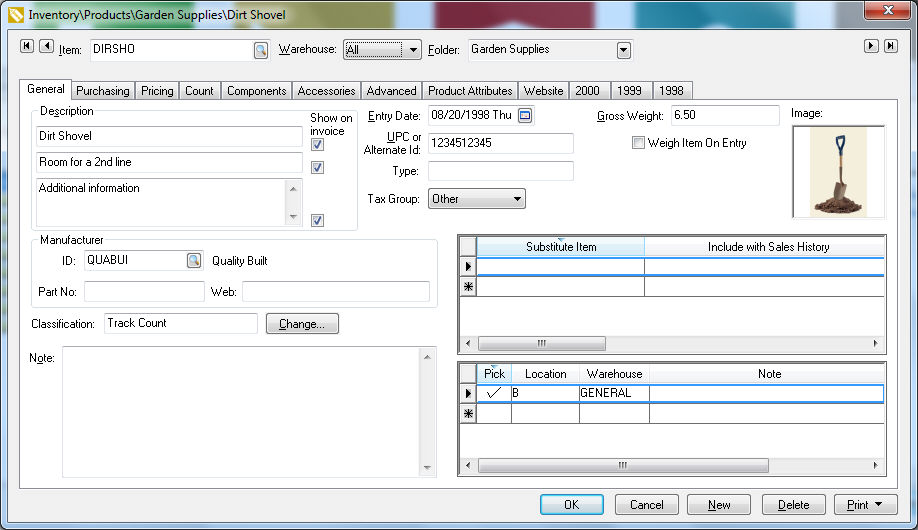
Go to Inventory > Product
Catalog > General
tab and the following window appears:

Enter the Item ID field to load an item. To load another inventory item, enter another item ID or click on the lookup button to the right of the field and select a new inventory ID.
Right-click on the inventory Item field with your mouse to open the context menu and change the item's identification ID. Select Change ID, which will start a lengthy process of changing the current inventory item's ID throughout the system.
Clicking on the down arrow button to the right of the current folder name and selecting a new folder can change the inventory item's Folder.
Enter a Description of the inventory item. This description may span up to three lines. Note that if you type information into the second and third lines the Show on Invoice switch is ON. If the Show on Invoice switch is ON the matching description line will show on the sales invoice. Turn the description line OFF to enter a description that should not show on the sales invoice. If the first line is switched OFF, the user will be prompted to manually enter the item description.
The Entry Date reflects the date on which the new inventory item was created. This date is for reference purposes only and should not be changed.
Enter the Gross Weight of the inventory item. This weight is used within a sales order or invoice to calculate the total weight of an order. Review the Freight and Shipping Charges > Freight and Shipping Calculations section within the Sales documentation for more weight and shipping configuration options. This field can be kept blank if total weight is not needed or if the inventory item does not have a weight.
An optional Image can be added by right clicking on the Image frame and selecting Insert Image from the context menu. This image must be a .jpg file format and may not be larger than 500kb. Review Quick Reference Context Menu for instructions to access this image from an invoice.
Enter the UPC Code if a point of sale scanner is used. The Universal Product Code can be found under a barcode on most products sold today.
Use the optional Type field to group items for query or reporting purposes.
Enter the stock Location(s) of the inventory item within the Location list. This optional list allows the user to identify one or more locations of the item within a warehouse or store. Review the Purchasing > Stock Locations section for more details.
Select the taxable option from the Tax Group drop down if sales tax is calculated for this group of items. Review [Sales] Sales Tax for more details on sales tax set up. Review the [Sales] Sales Tax > Calculating Fuel Taxes for an example of calculating flat taxes such as fuel taxes or FET taxes.
Select the appropriate Manufacturer ID. Review the Product Catalog > Manufacturer Settings section for more details on this optional setting.
Enter the manufacturer's Part No and an optional Web URL that contains details about the specific item. The manufacturer Part No can be used when searching for a product within an invoice or proposal.
The current inventory item's Classification should not be changed unless necessary. Review the Item Classification section for classification details.
The Note field can be used to enter miscellaneous comments or information about the current inventory item. The length of this entry is not limited but will scroll if more information is entered than can be displayed on the note window.
The Substitute Item list is an optional table to list replacement parts when an item is discontinued or optional parts such as non OEM parts. Review the Substituting an Inventory Item section for more details on the Substitute Item settings.