Select
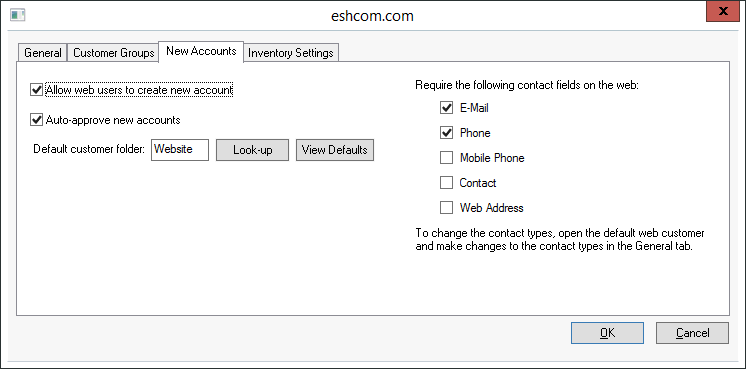
Enable the Allow web user to create a new account option as shown above to enable web users to create their own customer account.
Enable the Auto-approve new accounts option to allow a user to create an account and place an e-commerce order immediately. Disabling this option will require the EBMS user to approve the account before the user can use the new account to login into the e-commerce site and place an order within the shopping cart.
Create a customer category that contains new e-commerce customer accounts if it does not already exist. This folder should also contain the website generic customer. Note that customers can be moved to other groups at any time. Review the Sales > Customers > Adding and Deleting Customer Folders section of the sales manual for more details on adding customer categories.
Set the Default customer category setting to match the e-commerce customer category created in step 3. Note that the customer category setting will determine the default terms, shipping options, price level, and other settings within the new customer account. Select the folder by clicking on the Look-up button. Review the Configuring the Shopping Cart > Customer Accounts section for more details.
-
Click on the View Defaults button to view the settings the new account will inherit. Make sure each of the following settings are properly set before the Allow web users to create new account option is enabled.
-
The follow General Tab will open as shown below:
-
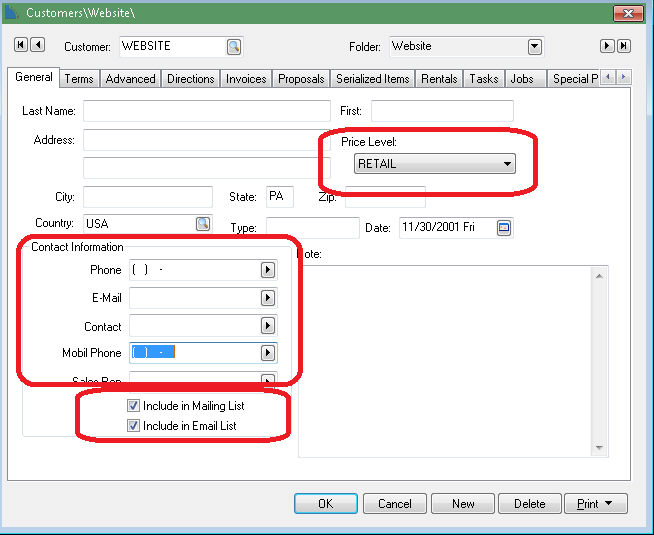
Set the appropriate Price Level. Review Inventory > Pricing > Default Pricing and Price Levels within the inventory documentation for more details on price level settings.
-
The contact list determined by this setting will determine the order and information of the contact list. Review Sales > Customers > Setting Customer Defaults of the sales documentation for more details on default customer settings.
-
Enable the Include in Mailing List and the Include in Email List options if you wish to have all user created customer accounts inherit these options.
-
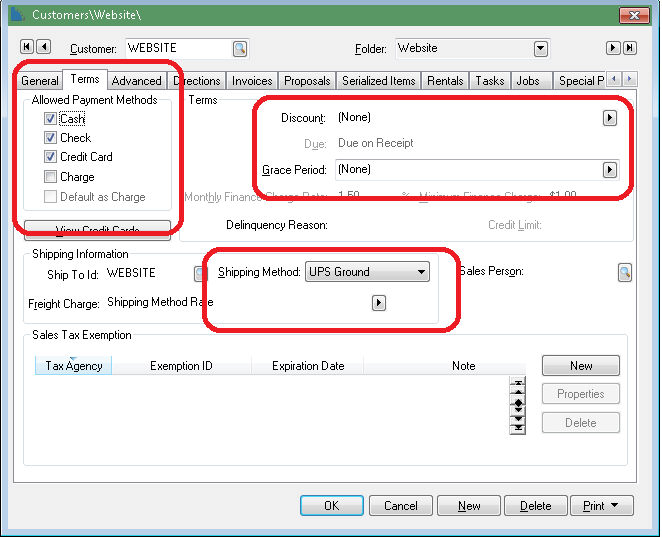
Click on the Terms tab and set the following settings:
-
Set the appropriate terms for a new e-commerce customer.
-
The Cash and Check settings are not applicable for an e-commerce account. You can ignore these settings.
-
The Credit Card option should be enabled to allow credit card payments for new accounts. Review the Processing Orders > Processing Credit Cards section for more details.
-
The Charge option should be disabled since new accounts need to be approved for terms. Review the Configuring the Shopping Cart > Payment Options section for more details.
-
The Default as Charge option should be disabled as well unless the Collect on Delivery shipping option is selected.
-
-
Set the Discount and Due terms.
-
Set the Due terms option to Collect on delivery if the Charge payment method is enabled.
-
Set the Default Shipping Method setting. Let the setting blank if the system should not default the shipping method requiting the user to select a shipping method during check out. Review the Configuring the Shopping Cart > Shipping Options to make sure the shipping method is enabled for the e-commerce site.
-
-
Review the settings within the Advanced tab. Review the Sales > Customers > Setting Customer Defaults section in the sales documentation for more details on other default customer settings.
Require the following contact fields on the web requires the website user to enter certain information in order to create an account. Enable each contact field that is required. The list of contact options are taken from the defaults on the customer category. Click on the View Defaults button and setup Contact Information entries needed on new accounts.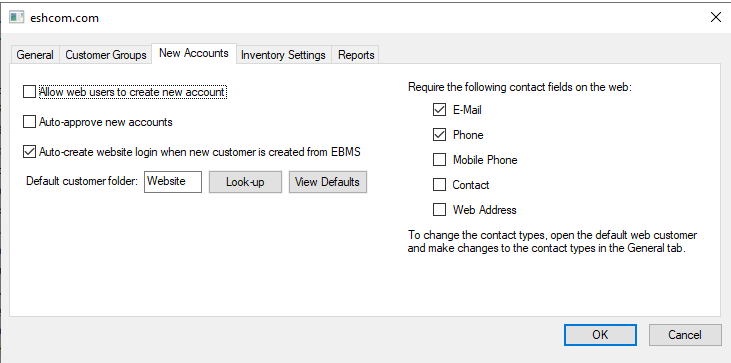
Enable Auto-create website login when new customer is created from EBMS to allow any new customer to access their account from the customer portal. This includes customers that were added using EBMS rather than the online customer portal. The Username defaults to the customer's ID within EBMS and the password defaults to the AUTOID. The user can be sent a link within an Autosend email for the client to login and pay outstanding invoices. Review Auto Send Temporary Web Account Credentials for details and setup instructions.