Go to Sales >
Proposals and the following window will be displayed:
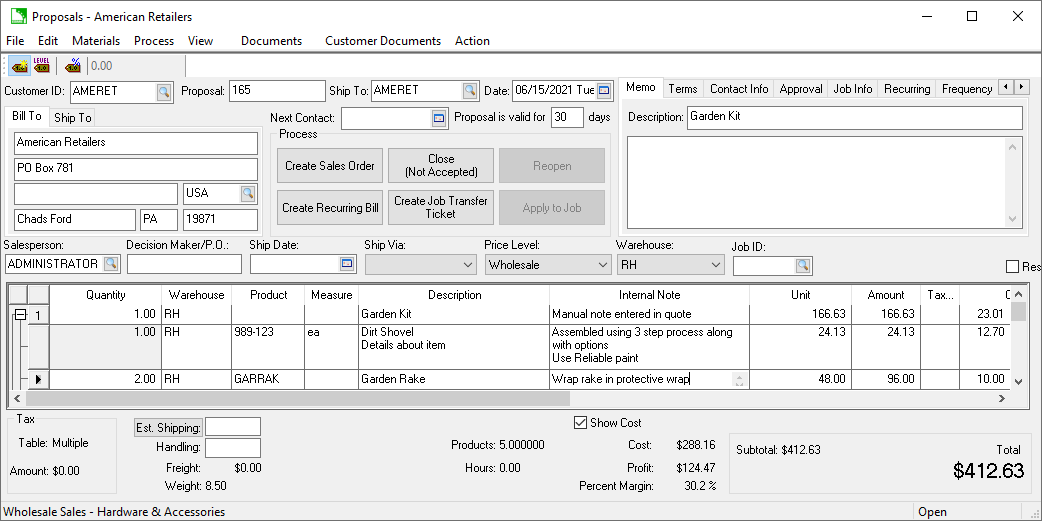
Type the customer ID in the Customer ID field or select from the customer lookup list by clicking on the lookup button to the right of the Customer ID field. This field will default to the customer that is currently selected on the customer list if the customer list is open. You must use a miscellaneous customer if you wish to manually enter the name and address into the invoice. Review the Customers > Miscellaneous Customer Overview section for details.
Tab through Proposal field to auto-generate the proposal number. The proposal number will be used as the sales order number when the proposal is processed into a sales order.
The Ship To field identifies the shipping name and address of the proposal if it is being shipped to the customer site. This address is used to determine the sales tax rate if the order is being shipped to the customer. Review the Tax Overview section for more details on how the shipping address is used to calculate sales tax. Blank the Ship To ID and press tab on your keyboard to manually edit the Ship To name and address, instead of creating a customer ID. The Ship To tab (beside the Bill to tab) will automatically show, allowing the user to change the shipping address. Ignore the Ship To field if the product has been picked up (FOB) or service was rendered in-house. The Ship To field defaults to the ID specified in the Sales > Customers > Terms tab > Ship To ID and does not need to be blanked if the Ship Via field equals the customer Standard Shipping Method setting. Note that the shipping address will not be printed on the invoice unless the Ship Via field is changed. Review the Creating Shipping Methods for more details on the Ship Via entry.
The Date field automatically defaults to today's date. Each time a proposal is opened or viewed, this field updates to the current date. When the proposal is processed into a sales order, the Date represents the date the proposal was processed and all of the general ledger transactions are posted using this date. The Entry Date defaults to the current date when a proposal is created. This date is used to identify the proposal entry date and is not used when creating general ledger transactions or when posting to history records. Select View > Advanced Options > Options tab to change the Entry Date.
Review [Inventory] Serialized Items > Attaching a Vehicle to a Sales Invoice for instructions on attaching a quote to equipment or vehicles.
Review Scheduling a Recurring Invoice for more information on the Recurring tab. Review the Recurring Billing > Frequency Settings for more information on the Frequency tab.
The Sales Person field should reflect the sales person who created the proposal. This entry can be used to process commissions. Review the Sales Person Commissions documentation for more details.
The Ship Date should reflect the date that the customer is picking up the ordered items or the date the items are to be shipped. This field can be very useful when printing the proposal reports.
The Ship via is used to specify the method of shipment. The Ship Via default is set in the Standard Shipping Method field specified on the Sales > Customer > Terms tab. Review the Creating Shipping Methods section for more details on the Ship Via entry.
The Price Level field defaults to the price level specified for the customer entered in the Sales > Customers > General tab > Price Level field. This setting is used to copy the appropriate inventory pricing to the proposal. Review the Inventory > Product Catalog > Pricing tab to view or set the different prices for each inventory item. To permanently change this setting for a customer, go to Sales > Customers > Terms tab and set Price Level.
Review [Financials] Job Costing > Overview for details on the optional Job ID or the Job Info tab.
Enter the proposal detail using as many lines as needed.
Enter the Quality of items being listed. The Quantity column must contain a value in order to calculate the extended Amount from the Unit price. This quantity can be restricted for specific inventory items by enabling the Require Integer Quantities option within the Count tab. Review the Tracking Counts > Integer or Fractional Quantities section of the inventory documentation for more details.
In the Product column, enter the product ID for the item that is being sold to the customer. Products can be added directly from a vendor's catalog if the items are not located within the EBMS product catalog. The Description, Cost and G/L code will automatically be filled in from the information entered in . Review [Inventory] Vendor Catalog > Accessing the Vendor Catalog from a Proposal or Sales order for details on this powerful quoting option.
The inventory available can be accessed by right clicking on the detail line, selecting Inventory Available from the context menu, and selecting a specific shipment from the available inventory.
The Unit of Measure field is an optional field that identifies the unit of measure being used for this inventory item. Review the Unit of Measure section of the inventory documentation for more details. If you never use multiple units of measure for any inventory items, this field can be removed from the invoice by right-clicking on any of the column titles and checking the Measure field off. To show the unit of measure column again, toggle the field back on.
The Unit Weight and the Weight columns are useful to calculate the total weight of the proposal for shipping calculations or shipping forms. Review the Freight and Shipping Tools > Calculating Total Weight for more details on these columns.
If the item doesn't have an inventory code, leave the Inventory field blank and manually type a Description of the item being sold.
Review [Inventory] Products > Notes and Instructions for instructions on using the Internal Note as well as product notes and descriptions.
Enter the Price of the item. Note that when you enter an inventory item, a price is copied from the inventory record based on the price level. The Price Level can be set on the proposal header or set within each proposal detail line.
The Amount field will automatically be calculated from the Quantity Shipped entry and the Price.
The Tax Group identifies which tax rates or taxes are used to calculate the sales tax within this proposal. The basic Tax Group options are Taxable and Non-Taxable. Review the Sales Tax > Inventory Tax Groups section for more details on creating advanced tax groups.
If the Taxed column is checked, sales tax will be calculated using the Tax Group setting. The Taxed switch is a convenient override switch for the current detail line. This column, which may be hidden, is an optional setting to conveniently enable or disable tax calculation.
Enter the correct revenue G/L Code. This field automatically defaults to the general ledger code that has been set for the specified inventory code (Inventory > Advanced tab). This code can be changed manually for this specific proposal.
The Cost amount reflects the Last Cost located on the Pricing tab of the inventory item or the perpetual cost for items classified as Track Count. Review the Tracking Counts > Tracking Inventory Counts Overview section within the inventory documentation.
The Markup / Margin and Percent Markup / Percent Margin columns reflect the gross profit of this line. Notice the Percent Markup / Margin and Total Markup / Margin at the bottom of the proposal screen for a total of these profit values.
Many optional proposal columns are hidden. It is recommended that you show the desired columns and adjust the widths of these columns to meet your specific needs. Review the Standard Features > Column Appearance section of the main documentation for more details.
Repeat the steps listed above for each proposal detail line.
The sales Tax table is used when calculating the sales Tax amount. To set the sales order as tax exempt, set sales tax table to EXEMPT. To change the Tax table setting for all future sales orders for a customer, go to the and change the customer default Tax Table.
The sales Tax is automatically calculated based on the total taxable (all detail lines that have the Taxable column checked) and the Tax Table setting. The sales tax amount can be manually altered by clicking on the check mark to the right of the Tax label. Do not manually change the tax total rather than checking the appropriate detail lines since the taxable total amount will not be accurate if the Taxable column is not properly toggled. The only reason to manually change the Tax amount is if the tax has been manually calculated on a hand written invoice, and the tax was rounded to a slightly different tax amount.
Enter any Freight charges that need to be added to the proposal. This charge is automatically calculated if the Ship Via entry does not equal the No Delivery (FOB) setting within the . The Freight charge will be calculated only if the total of the sales order is below the Minimum Free Freight amount entered in . Review the Freight and Shipping Tools > Freight and Shipping Calculations section for more shipping options.