Frequently Asked Questions
How do I return an item/credit to the customer?
Create a Sales Order for the customer returning the product. Enter the return as you would enter a typical sale to the customer, however, enter the quantities as "negative" values. This will turn your sale into a refund and add the items returned
to your On Hand Inventory count, (i.e. if the items have a classification of Track Count and purchase method of Stocked).
Next choose whether you wish to print a refund check (click Check payment method), pay cash for the refund (click Cash payment method), or apply the credit to the customer's account (click Charge payment method).
If you select Check, verify the correct Bank Account to pay from is selected, leave the Print Credit Check switch turned on, then click Pay & Process. Click OK to proceed with the refund check, verify the check number and bank account in the Print Check dialog, then click Print to continue writing the check.
Review Expense Invoices > Processing Vendor Credits and Refunds for more details.
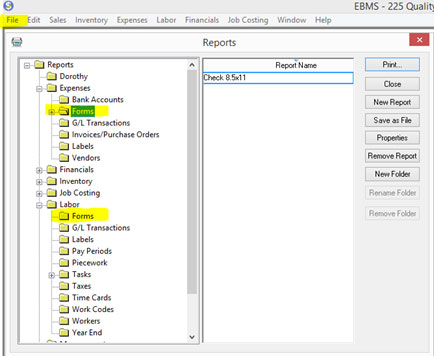
How do I print a check - I can't find the report?
Check reports are configured in the bank account window.
-
Go to , and double click the bank account from which you desire to write checks.
-
Click the Reports tab.
-
For vendor payments, click the Select Report button next to the accounts payable field, and browse to , and choose the desired check report.
-
For payroll payments, click the Select Report button next to the payroll field, and browse to and choose the desired check report.
-
Click the drop down to choose your desired configuration: checks printed in the middle or checks printed on the top.
-
If you are using pre-printed checks, select the pre-printed box.
You will then be ready to print both accounts payable and payroll checks.
Review [Main] Reports > Form Configuration to configure checks for vendor and worker payments.
Review Bank Accounts > Changing Bank Account Information for check setup instructions.
Review Vendor Payments > Quick Checks for more details.
Review Vendor Payments > Printing Checks and other forms on Blank Security Paper for instructions to configure security paper.
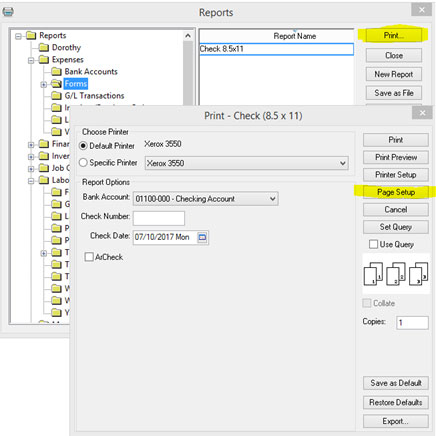
How do I print a check - my margins are off?
Sometimes when printing checks, you will need to make minor adjustments so that EBMS prints in correct areas of the check.
The most common adjustment is to adjust the top margin down so there is more space at the top of the check as well as pushing the printing on the check downward.
-
To make an adjustment of the top margin, go to the and then the . On the , go to the Expenses folder and the Forms folder.
-
Select the 8.5x11 report.
-
Click the Prints and then Page Setup.
-
Adjust the top Margin to .5 and click Save as Default in the Print dialog.
-
Make additional adjustments as needed.
Review [Main] Reports > Form Configuration for more details.
Review [Main] Reports > Printing a Report for additional report printing tips.
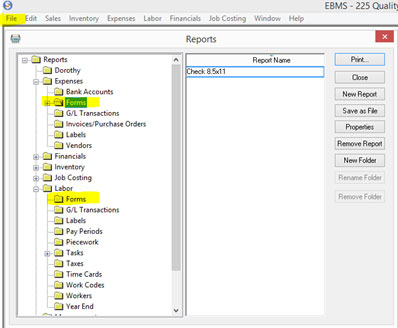
Where is a report that shows my Sales, Expense or Inventory based on this or that parameter?
Reports can be accessed from many places throughout EBMS. If you wish to access all reports that exist in EBMS go to the EBMS Navigator (home screen) and click and visit the folder containing the category
you wish to peruse - Sales, Expenses, Inventory (or Products), General Ledger (or Financials), Payroll (or Labor), etc.
The reports folder named System Folders contains a duplicate copy of reports that are set as default reports within EBMS. You may select any folder and click Print to bring up the print dialog where you can choose
criteria to pull your report. You may choose Print to print the report or choose Print Preview to view the report on your computer screen.
Review [Main] Reports > Report Menu for more details.
Why does my General Ledger not balance?
Many times, an unbalanced journal entry is the cause of an unbalanced general ledger. Another possible cause is network or data connection errors that resulted in unbalanced postings. Review Transactions and Journals > Journals > Creating Journal Entries for steps to create a journal.
Why are my inventory Costs or Prices off on a Sales order or Manufacturing Batch?
Sales Order selling price:
- Do you have the correct Price Level selected? Review [Main] Automotive > Pricing > Price Levels for Price Level details.
- Is the Price Level formula correct for this item? Review [Inventory] Product Pricing > Price Formulas for price
formula details.
- Right click on the Inventory ID and click Lookup.
- View the Pricing tab and check the Price Level formula.
- Also check the Markup formula that sets the value for Base Price. Is that formula correct? (Most Price Level formulas work off of the Base Price.)
- If the switch beside Cost named Update from Purchases is turned on it means the cost will be updated when a Purchase Order is processed into an Expense Invoice.
- Was a PO processed recently that changed the cost and therefore changed the Base Price and Price Level selling price? Review [Inventory] Tracking Counts > Cost-of-Goods-Sold (COGS) Adjustment Propagation for details.
- Is a Special Pricing record set for this customer and item?
Sales Order & Manufacturing cost:
Why is cost not matching the cost on the Pricing tab of the item?
To track the Inventory costs of Track Count, Stocked items, EBMS uses FIFO (First In First Out) which means if you buy new stock but have existing stock to get rid of, EBMS will continue linking the cost of the existing
stock until all of it has been sold before it starts linking the cost of the new stock. E.g. if you buy 10 items at $10.00 cost and buy 10 more at $8.00 when you still have 5 in stock, EBMS will link the 5 remaining items with a cost of $10.00 before
it starts linking the new stock that has the reduced cost.
Why can't I reconcile my checking Account; I can't get it to a Zero difference?
Be sure that your selected totals, (both in the deposits window and the payments window) match the deposits and payments totals listed on your statements. You may have bank fees or interest that need to be added as an adjustment. Make sure you've
entered your ending balance correctly. If the ending balance and the deposits and payments totals are all correct, but you still have a difference, this may be an indicator that something has been voided which was previously reconciled.
Review Account Reconciliation > Overview and locate the instructions for the correct financial accounts classification.
Review Account Reconciliation > Correcting Differences in Reconciliation.
Why don't my gross sales on my Sales Tax report match my total income on my P&L?
Your P&L/income statement totals reflect any document (sales invoices, journal entries, expense invoices) that use a sales/revenue GL account. The gross sales on your sales tax report only reflect transactions on AR sales invoices using a taxable
GL account. Review [Sales] Sales and Use Tax > Changing Rates and Other Settings for more details.
How can I reprint my bank reconciliation report?
-
Go to .
-
Choose the desired amount.
-
Enter your statement ending date (alternatively, you can enter the date of the newest transaction in the reconciliation window, if you want to see ALL outstanding transactions, but you will not have a zero-dollar difference on your report if you
do so.
-
Enter the statement ending balance (the number to which you last reconciled).
-
Print.
You can also print the account reconciliation report directly from the reconciliation window. Click the Print button at the bottom of the reconciliation window and choose the Account Reconciliation report.
If it is not listed on that menu, click Add Report, and choose it from the report menu.
Review Bank Accounts > Reconciling a Bank Account for more details.
How can I easily see my bank balance?
On the EBMS Navigator (home screen) you can click Bank Accounts or go to .
- Click yes if prompts pop up asking you to post transactions, and the bank account(s) will indicate the balance in the Bank Account window.
- To see account transactions, checks, deposits, etc., click to select and highlight the bank account you wish to view and click Reconcile.
- Review Bank Accounts > Bank Account Overview for more details.
Or, go to Account Reconciliation and your Bank Account balance will be reflected there.
- Click yes if prompts pop up asking you to post transactions.
- You can also access this by visiting . To see account transactions, checks, deposits, etc., click to select and highlight the bank account you wish to view and click
Reconcile.
- Review Account Reconciliation > Overview for more details.
Is there a report showing my checks that I just wrote?
No, but we do have a bank account register reports under , that can give you all the activity for a certain day.
Review the instructions at the end of Bank Accounts > Reconciling a Bank Account to print check registers.
Is there a way to re-print a payroll check?
Yes, there is a way to re-print a payroll check.
-
Open the payroll period in which the check was written. This is only possible in the current payroll year.
-
Go to the reconciliation window of the bank account the check was written form, and void the payroll check you wish to re-print. This will make the timecard outstanding again.
-
Go to the employee payments window and re-print the check.
Review [Labor] Processing Payroll - Advanced > Voiding a Payroll Check for steps to void a payroll check.
Review [Labor] Processing Payroll > Process Payments for steps to process a payroll payment including one that was voided.
Why can't I find the payment in the deposit screen when my customer invoice shows it was paid?
The first thing to check is that the payment was received into the correct account.
-
Go to invoice that was paid click .
-
Confirm that GL account listed under Cash Account is the deposit account you expect it to be.
-
If it is not, you can void the payment and re-enter it into the correct cash account.
Review [Labor] Processing Payroll - Advanced > Voiding a Payroll Check for instructions to void the payment.
Review [Labor] Processing Payroll > Process payments for instructions to re-enter it.
Please contact our support team for further troubleshooting assistance. This can be a data issue that will need to be corrected by one of our data experts.
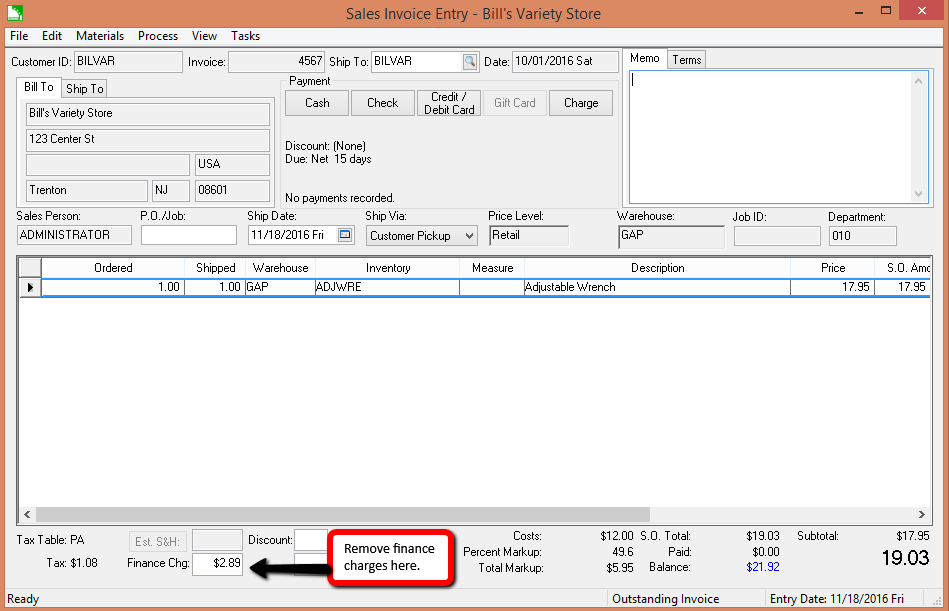
Why is my customer payment showing in the deposit screen when the invoice is still outstanding?
This could be due to finance charges or discounts that remain on the invoice. Those must be cleared or removed and then the invoice will be shown as paid. Network or data connection errors that prevent transactions from posting correctly could also
be the cause.
Finance charges can be removed or edited two different ways:
- They can be deleted (or edited) from the invoice itself:
- They can also be deleted (or edited) in the Customer Payments window:
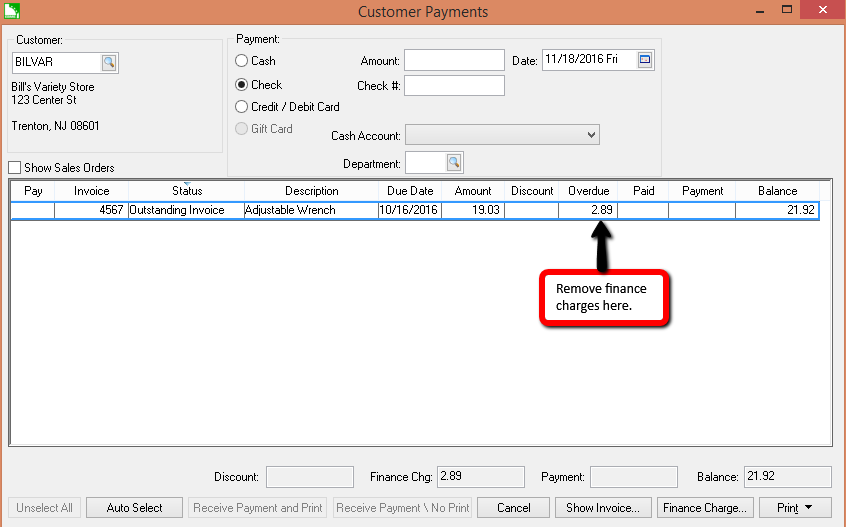
Review [Sales] Customer Payments > Viewing or Voiding Customer Payments for more details.
Why do I have an invalid G/L account when I try to post/deposit?
One of your documents contains an invalid (usually blank) G/L account and during the "Process" step, EBMS created a transaction set that contains that invalid G/L. If you go under each module menu you will see a submenu called "Display
unposted transactions" and then a list of G/L codes. In one of these screens, you will see the invalid G/L account (displayed in red). At the bottom of this screen, you will see the option to change this G/L account to a valid account. Review
AP Transactions > Displaying Unposted Expense Transactions for more details.
Why is my check or payment for the same vendor splitting into different checks?
There must be a slight difference in spelling of an address or something (even spaces and caps make a difference) – change EACH expense invoice's "Pay to" vendor to a random vendor then back to the correct vendor and that should resolve
the issue.
Look at the name (not ID) of the Pay-to vendor on the expense invoices. If the names are different, even though the ID's are the same, EBMS will create a separate check for each unique name.
Review Vendor Payments > Different Payment Vendor or Address for details.