Overview of CTO Process
The Configure-To-Order process is used to sell custom kits that are
purchased from a vendor as a kit. For example, a user may purchase a custom
machine with various options or components from a vendor. The custom machine
may come in many variations and the seller using EBMS may not want to
create an inventory ID code for each possible variation. Some possible
vertical markets that may use this feature:
Custom equipment with various options or variations
Custom made hoses or assemblies that may contain various fittings
or couplings
Custom built storage sheds with various colors, sizes, and options
Custom made furniture with various modifications, stains, or
options
Do not use the Configure-To-Order process in the following
situations:
Items that are customized or modified internally. Review the
Made-to-Order Overview
section for instructions on how to build or assemble items with options
that are assembled by the EBMS user.
Parts that are purchased as components and sold as a customized
assembly. Review the Components
and Accessories Overview section for instructions on kitting and
components.
Variations of an item being sold that are purchased from a vendor
using different vendor part numbers. Review the Product
Attributes Overview section for instructions on compiling a catalog
with a large volume of part numbers to identify the various options
available.
The benefits of this process is that the user can create an inventory
item with the following variations:
Costs can vary based on the users selected components options.
Review the Components and Accessories
> Optional Components and Accessories section for more details.
Pricing can be calculated based on the users selected components.
Review the Components and
Accessories > Optional Components Pricing section for more
details.
Optional components can be used to create a custom description
for an inventory item. Review the following Selling
a CTO Item section.
The special order process within EBMS can create a purchase
order including the custom item description directly from the sales
order. Review the Purchasing a
CTO Item section for more details.
EBMS's powerful special order tools can assist with the ordering,
receiving, and managing of the custom item from the time the customer
places the order until the sale is completed.
Enable the Configure-to-Order option
The following global options must be enabled to use the new powerful
CTO option:
Create a new inventory product within EBMS by selecting
and click . Review
the Product Catalog >
Entering New Inventory Items section for more information on creating
new inventory items.
Open the General
tab of the inventory item and choose your desired Classification
such as Track
Count, No Count, or any other classification with exception
of Service. Review
the Product Catalog > Item Classifications
for a complete list of classification options.
Select the Pricing
tab and setup the pricing for the custom CTO item. The pricing can
either be setup to have a fixed price no matter which components are
selected or the pricing can be setup so that the optional components
change the pricing according to the options selected. Review the Components and Accessories >
Option and Kit Pricing section for more details on variable prices
based on the options selected. Review the Pricing
> Price Formulas section for more details on fixed pricing.
Select the Count
tab to set the correct Purchase
Method. Associated
is the recommended Purchase
Method setting for a CTO item. Do not use the Stocked (Standard) or Replenishment purchase methods
for a CTO item. Review the Purchasing
> Purchase Methods section for more details on the purchase
method options.
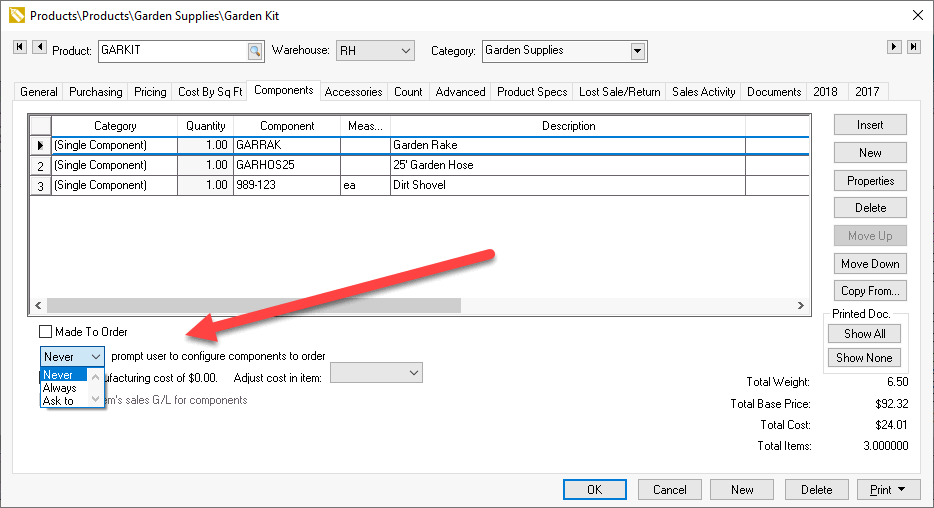
Select the Components tab
as shown below:

Set the CTO prompt user to configure components
to order option to set this product as CTO. This
option is located below the component list as shown above.
Recommendation: Filter down this setting
for a group of items within a category.
Complete the following steps to add the optional components
to the CTO item:
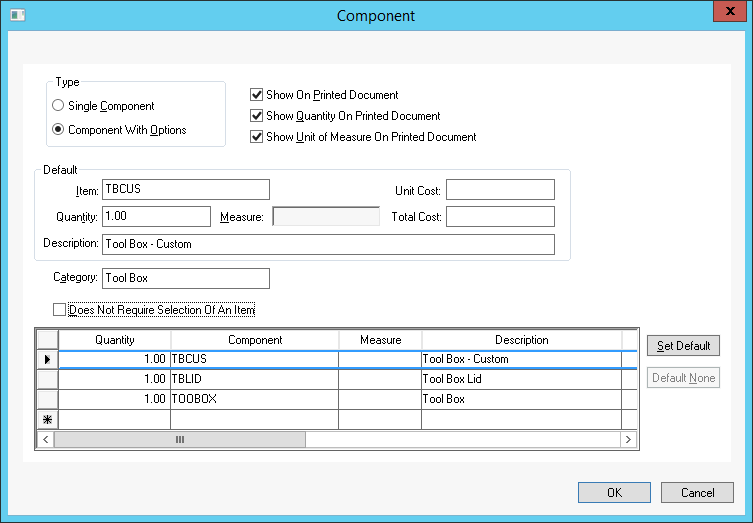
Select New under
the components tab to add a customizable option; the following
dialog will appear.

Select the Component with
Options type, as shown above.
Enable the following Show...
options to copy the optional component description to the sales
order and purchase order.
Enable the Show on
Printed Document option to show the optional component
description within a sales order, proposal, or purchase order.
Enable the Show Quantity
on Printed Document option to display the quantity
of items within each custom CTO item. If the quantity of items
on the component list is equal to one, the quantity will not
show even if this option is enabled.
Enable the Show Unit
of Measure on Printed Document option to show the component's
unit of measure setting.
Add a Category description.
This description is used to categorize the optional components
and will not show within the Configure-To-Order description.
Create the optional Component
list by adding a list of inventory items. These inventory ID's
need to be inventory items classified as No
Count. Note that these items are not required to be actual
inventory but may be items created only to identify the descriptions,
pricing, and costs of the Configure-To-Order item. Review the
Components and Accessories >
Optional Components or Accessories section for more details
on configuring optional components.
Select the inventory option most commonly used and select
Set Default.
Click OK to save
the component with the option list.
Repeat these steps for each component or option within the customized
Configure-To-Order item.
All Kitting options must be disabled for Configure-To-Order items
- The following Assembly Kit
option must be disabled in the Components
tab of an inventory item classified as No
Count. Review the Materials
List > Entering Components into the Materials List section
of the sales documentation for details on enabling the Assembly
Kit option for kits and assemblies.

- The following Made to Order
kitting option must be disabled in the Components
tab of an inventory item classified as Track
Count or any other perpetual inventory item. Review the Made to Order > Overview
of the MTO Process section for more details on enabling the Made to Order kitting option.

Review the Product Catalog >
Changing Inventory Items section for details on the inventory item
settings.
Review the following section, Selling
a CTO Item for details on processing the sale of a Configure-To-Order
item.
Review the Purchasing a CTO Item
section for details on creating a purchase order from the Configure-To-Order
sales order.


