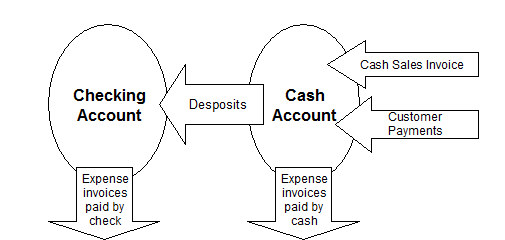
Managing cash through undeposited fund accounts are very important components in maintaining accurate books. The general ledger account classified as cash is an internal account that records undeposited monies (cash or non-cash) from the time the money is collected until it is deposited into a bank account. These funds may consist of customer checks, cash, or sales paid via credit cards.
Whenever money is collected from a customer and processed as a cash sales invoice, down payment, or customer payment, the monies are recorded in an undeposited funds account. Multiple accounts may be used to separate undeposited payments with cash or personal checks from payment card payments or other payment types.
Undeposited fund accounts should be reconciled each time a deposit is made via the Deposit window and weekly or monthly via the Cash Reconciliation window.
Creating separate undeposited Fund accounts for different payment methods allows the user to reconcile incoming payments properly. Separate undeposited fund accounts for different locations is also recommended. Complete the following steps to configure undeposited fund accounts.
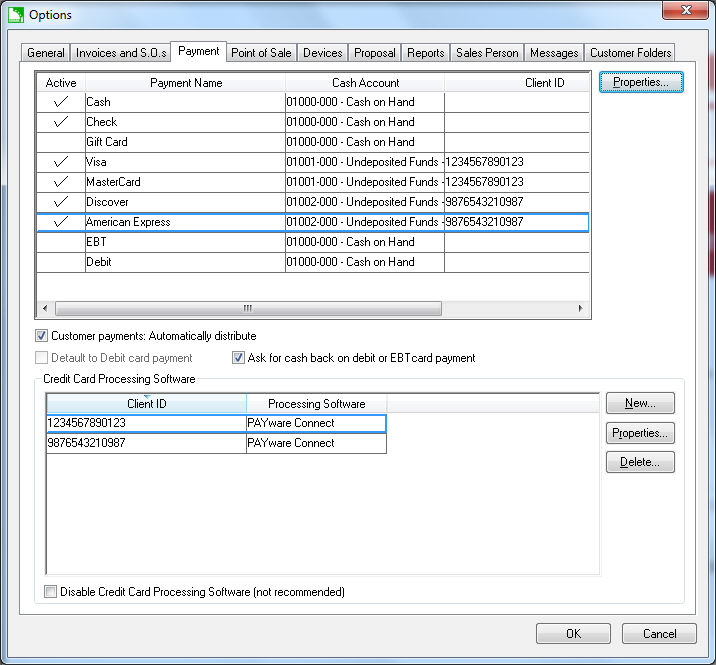
Create general undeposited cash account: In the example above the user associated the Cash and Check Payment types with the same Cash Account since cash and checks are deposited together. Separating the Cash Accounts for the Cash and Check payment types would be the proper setup if all cash payments are added to a separate petty cash account and should not be combined with other check payments.
Create separate payment card undeposited accounts: Notice that the credit card receipts from Visa, MasterCard, and Discover Payment types are grouped into the same cash account since these 3 card types are processed under the same merchant account. The 3 card types should be under a single cash account if they are settled into the bank account under a single account. The American Express Payment type is separated into a separate account since American Express transactions are processed under a separate merchant account.
Click on each Payment option and click the Properties button to change settings.
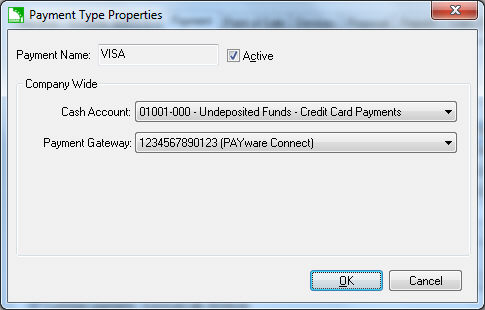
A Payment Type can be made inactive by disabling the Active option. A payment type cannot be deleted or removed. Some Payment types such as Cash and Check cannot be disabled.
Set the appropriate asset account: Each Payment Type must be associated with a Cash Account.
Additional credit card processing details may appear on this dialog. Review the Point of Sale > Payment Card Processing > Processing Credit Cards section for more details on the additional settings.
If the Company Profiles setting set in Financials > Options > Settings is set to Based on Department, the cash accounts
are set for each department. For example, the following dialog shows a list of Cash Accounts for each payment type instead of a single Cash Account.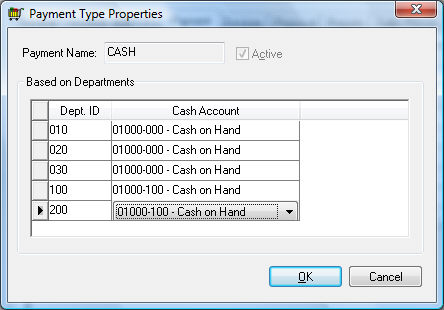
The Cash Account for each Dept ID may be the same or differ as shown above. A list
of Cash Accounts will be displayed if the user chose the Based on Warehouse Company Profiles setting. Review the Getting Started > Company Setup > Company Profiles section of the main documentation for more details on Company Profiles settings.
The associated Cash Accounts will default within the sales invoice or customer payments dialog when a specific Payment type is selected. Review the Invoices > Payment Methods and Terms section for more details.
Review Point of Sales > Penny Rounding Cash Payments to round all cash payments to the nearest nickel.
The Deposits window is used to transfer monies from a cash account to a bank account or in other words, make a bank account deposit. The cash Ending Balance should be verified each time a deposit is processed. Verifying the cash Ending Balance will guard against a cash sales invoice being accidentally processed as charge, customer payments not processed properly, or expense invoices being paid from a cash account instead of a charge account. Reconciling cash will expose any user error involving payments, deposits, or cash disbursements. Complete the following steps to process a deposit:
Go to
Sales > Deposits to open the Deposits window. A dialog may prompt the user to post before opening the Deposit window if transactions were not posted to general ledger. The Show transactions up to date will default to today's date. Note that all Receipts and Paid Outs dated after the Show transactions date will not be displayed.
The Receipts window lists all the payments that were processed from cash invoices, down payments, or customer payments using the selected cash account. Select all the payments that are being deposited by clicking on the Status column. Click the Select All button to select all cash transactions. Notice that as the Selected Receipts values reflect the total selected transactions that were processed as Cash,Checks, or Other. The Other total includes all payments such as credit card, debit card, gift card, and other payments that were not processed using the Cash or Check methods.
The Beginning Balance reflects the general ledger balance of the selected cash account. Review [Financials] Chart of Accounts > Account History for more details on account balances. Note that the Paid Out total is already deducted from the Beginning Balance.
Compare the Cash total with the total amount of cash that is in the deposit. Enter the cash adjustment value into the Cash Adjustment entry so that the Total Deposit is correct.
IMPORTANT: It is important that the Total Deposit reflects the total of the deposit and the Ending Balance reflects the total cash left
after the deposit is made. The Ending Balance should equal zero if all payments are being deposited and no petty cash is stored in the office after the deposit. The Ending Balance should equal the cash balance before continuing with the process. Review the Financials > Account Reconciliation > Correcting Differences in Reconciliation section of the main documentation for details on making cash adjustments
Right-click on any payment line and select Remove from list to remove any cash transactions that will not be deposited. This option should be used with caution.
Process the deposit by completing the following steps:
Verify that the Total Deposit equals the total being deposited in the bank account. Also verify that the Ending Balance equals and petty cash.
Enter the Deposit Date.
Enter a Description that will be included with the deposit financial transactions.
Set the appropriate Deposit To bank account.
Click Deposit and Print to generate a deposit slip or Deposit / No Print to skip printing the deposit slip.
The Bank Deposit Slip is set with the bank account's Report tab. Review [Financials] Bank Accounts > Changing Bank Account Information to report configuration instructions for deposits and other forms.
The Paid Out tab lists all the cash paid outs. This feature is used when the cash account is also used to pay miscellaneous expenses (petty cash). Expenses paid with petty cash must be entered and processed within the accounts payable (Expenses) module. Go to [Financials] > Vendor Payments > Paid Outs section of the main documentation for details on processing paid outs.