The weigh scale POS option of EBMS is used to sell a product that is sold by the pound. This option involves a scale connected to the POS Station and is used when the product is weighed at the time of check out. The Weigh Item on Entry option on the inventory item triggers the POS station to capture the weight of the product. A scale must be attached to EBMS before this option can be used.
Avery Berkel Scale
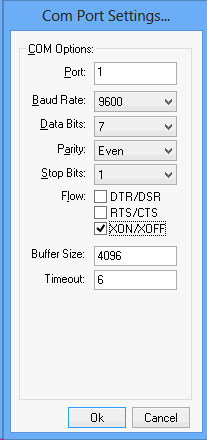
Select the Connect to Serial Port option and configure the serial port settings for the specific scale as shown below:

Set the Scale Type to Avery Berkel to configure an Avery Berkel scale. Review Advanced Tools > Weigh Scale Interface for more details.
Honey Well Stratos MS2xxx Series Scale/Scanners are also supported by EBMS. Contact a CSR for technical details. Visit www.EagleBusinessSoftware.com and select Store > Hardware and Peripheral Options to review hardware options including scales.
The Honeywell Status is attached to the POS station using two different cables.
The scale uses a serial cable and the scanner uses a USB cable (the driver used is a COM port emulator).
Scan the following barcodes from the Configuration Addendum Manual
In EBMS go to Sales>Options>Devices. In the Weight Scale section, select the Connect to serial port radio button. Then click on Port Settings. Enter in the following information (this can be found on page 25.)
Scan the following barcodes from the MetroSelect Configuration Guide
Enable Bi-Directional USB Serial Emulation Mode (page P3)
Disable the carriage return suffix [CR] (E14)
Enter/Exit Configuration Mode (Page E17)
Configurable Suffix Character #1 (Carrot symbol, Page E17)
Code Byte 0 (Page M2)
Code Byte 9 (Page M3)
Code Byte 4 (Page M2)
Enter/Exit Configuration Mode (Page E17)
If the scanner will be used with bulk food labels, then scan the barcode for Enable "$" Prefix ID for UPC/EAN, on page E12
If the scanner is used to scan book ISBN (EAN-13) barcodes then skip the step above (or disable the prefix by using the barcode on E12) and do the following:
Enter/Exit Configuration Mode (Page E1)
Configurable UPC-A ID, Page E3)
Code Byte 0 (Page M2)
Code Byte 3 (Page M2)
Code Byte 6 (Page M3)
Enter/Exit Configuration Mode (Page E1)
Install the driver
Right click on the Install file and select "Run as administrator"
When the dialogs close, that means installation is done.
Plug in the USB cable for the scanner. This will create a virtual port in the Windows Device Manager using the driver that was just installed. It should show as Honeywell bidirectional device.
In EBMS go to Sales>Options>Devices. In the Barcode Scanner section, select the "Connect to serial port" checkbox. Then click on Port Settings. Enter the same settings as specified above for the scale.
Open a Sales Order/Invoice and verify that it is working correctly. If it is not working there is a little utility called "See it" which can be used to listen in on com ports. It can be found here: \\BOG\g-drive\EBMS\POS Technical\see-it It allows you to see if the scanner is sending the information correctly.