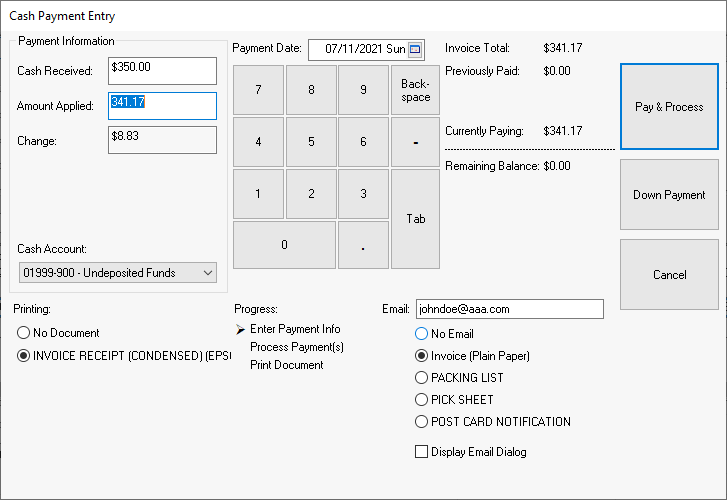
A payment can be applied to the sales order as a down payment, processed as a cash payment at the time the invoice is processed, or paid on account after the invoice is processed. All three methods use the same Payment options although the process options change.
The Payment options include the following. Each option requires specific information to complete the Payment process.
The following payment entry dialog appears when a user selects a payment
on the sales invoice.

Enter the Cash Received to calculate the Change amount due to the customer. The Cash Received can be kept blank if no Change calculation is desired.
Verify the Cash Account.
Select
the desired payment receipt document. Select
No Document if no receipt is desired. To set default printing
options go to Sales > Options
and click on the Reports tab.
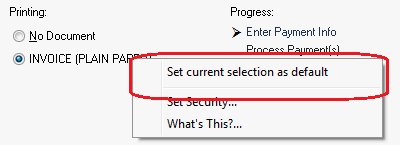
To customize Printing options by the current computer and user, right
click on the desired default option and select
Set current selection as default as shown below:
Click on Pay & Process to process the payment. If the Amount Applied does no equal the total of the invoice the Pay & Process button will be replaced with the Split Tender button. The Split Tender process is used to apply multiple payment types to the same invoice.
Click on Down Payment to make a payment on a sales order. Review Customer Payments > Down Payments for more details.
Complete the following steps to process a check payment:
Enter the down payment amount into the
Check Amount entry.
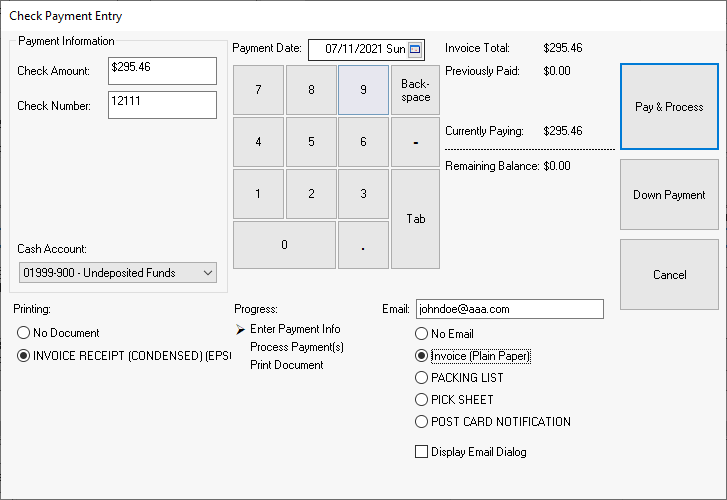
Enter the customer's Check Number.
Verify the Cash Account.
Select the desired payment receipt document. Select
No Document if no receipt
is desired. Note: Any dialog defaults can be set by right
clicking on the option and selecting Set current
selection as default from the context menu.
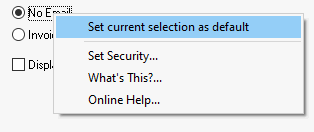
This dialog gives the user the option to send an email receipt to the customer. Select a specific report to send. This report list is configured in the Auto Send Sales Invoices mode. Review CRM > AutoSend > Auto Send Sales Orders or Invoices for configuration instructions.
Enable the Display Email Dialog to edit the content of the email before sending receipt.
Click on the Pay & Process button to process the payment. If the Amount Applied does no equal the total of the invoice the Pay & Process button will be replaced with the Split Tender button. The Split Tender process is used to apply multiple payment types to the same invoice.
Click on the Down Payment button to make a payment on a sales order. Review the Customer Payments > Down Payments section for more details.
Complete the following steps to process a payment card payment:
Enter the Amount of
the down payment.
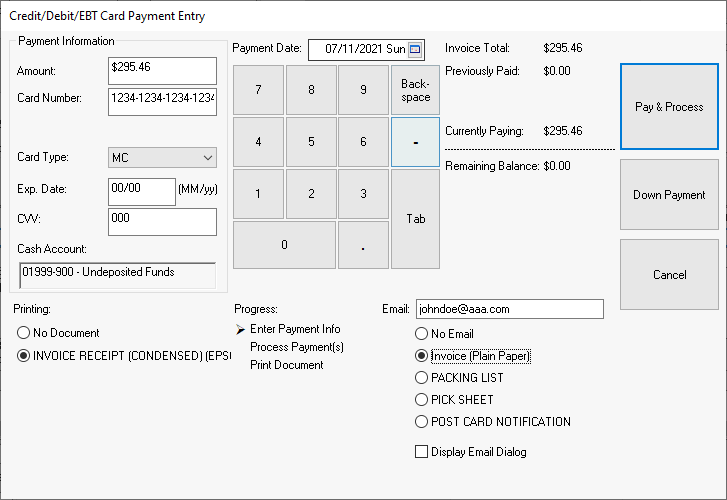
Enter the Card Number without spaces or dashes
Verify the Card Type. This setting will default based on the card number.
Enter the card's Exp. Date using month and year.
Enter the CVV code located on the back of the card.
Select the desired payment receipt document. Select No
Document if no receipt is desired. Note: Any dialog
defaults can be set by right clicking on the option and selecting
Set current selection as default from the
context menu.

This dialog gives the user the option to send an email receipt to the customer. Select a specific report to send. This report list is configured in the Auto Send Sales Invoices mode. Review CRM > AutoSend > Auto Send Sales Orders or Invoices for configuration instructions.
Enable the Display Email Dialog to edit the content of the email before sending receipt.
Click on the Pay & Process button to process the payment. If the Amount Applied does no equal the total of the invoice the Pay & Process button will be replaced with the Split Tender button. The Split Tender process is used to apply multiple payment types to the same invoice.
Click on the Down Payment button to make a payment on a sales order. Review the Customer Payments > Down Payments section for more details.
Click the Pre-Authorize button to validate the card and pre-authorize the amount specified. Note that pre-authorization does not debit the credit card but does validate that the funds are available. Review the Payment Card Processing > Processing Payment Cards section for details on pre-authorization and a comparison to the Verify Card option.
Click the Verify Card button to validate the credit card information by sending a Pre-authorize command for ONLY $0.50 regardless of the payment amount. The customer will see a pending $0.50 transaction that will clear in 3-5 business days. The purpose of the Verify Card is to make sure the payment card is valid and store the card on the invoice (or customer account for stored cards). This option does NOT verify that the amount of the payment is available on the payment card. nd you will have to manually run the stored card for the invoice amount when you are ready to process the transaction, EBMS does not send a completion command during the invoice process like the Pre-Authorize option. But the Verify Card option does allow the user to process a payment using another payment method or card. This option does not debit or pre-authorize the payment card.
Review the Gift Card section for more details.
The following documents are printed or sent when one of the process buttons on the right side of the dialog are clicked.
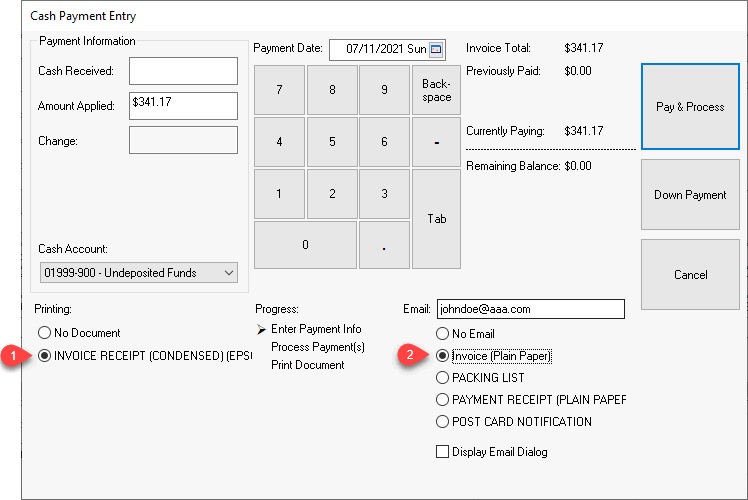
The selected form is emailed to the Email address. The email is copied from the customer's contact list. This Email setting can be changed on the dialog. Review CRM > Send Now and Print Now Tools for instructions to change or add to the email form list.
Enable the Display Email Dialog to open an email dialog before sending the receipt.
Note: Any dialog defaults can be set by right clicking
on the option and selecting Set current selection
as default from the context menu.
 Review
the Customer payments
> Processing Payments section for more details on processing payments.
The most common method to record payments on account are done using the
Vendor payments window. Review
this section for details on the Vendor
Payments window.