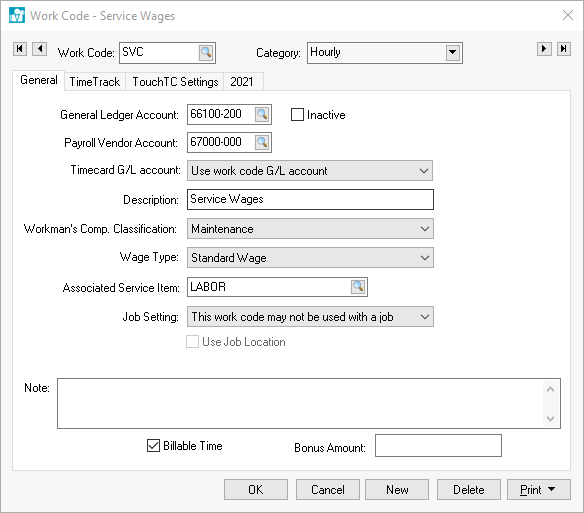
A work code may have multiple financial accounts associated to a single work code.
The General Ledger Account identifies the expense or cost of sales general ledger account into which the payroll expenses are posted for this work code. To create detailed work code history using a number of different work codes without using a large number of different general ledger wage accounts, it is possible to direct multiple work codes into a single general ledger account.
The Payroll Vendor Account is an optional setting that is used only when the 1099 subcontractor expense differs from employee labor. This setting with default to the General Ledger Account if the Payroll Vendor Account is blank. Review Subcontract Workers > Configuring EBMS for Subcontractor Labor for more details on this optional setting.
The Description of the work code is used in search lists or reports to further describe the work code.
Workman’s Compensation Classification: This setting is used to generate workman’s compensation reports based on the employee’s work class that is identified by the work code. If employees are grouped within the Workman’s Comp classifications rather than an employee having multiple classes then set the Workman’s Comp. Classification to (Use Employee Class). Review the Getting Started > Workman's Compensation section for more details.
The Wage Type options depend on the available payroll modules and include Standard, Piecework (if piecework is enabled in the Labor > Options > Settings tab) and Prevailing Wage (if prevailing wage is enabled in the Payroll > Options > Settings tab). Normally this setting is set to Standard.
Enter an optional Associated Service Item if the work code labor is being resold. This entry should be kept blank for non-billable labor. This service item is used for reporting purposes.
The Note field can be used to further explain the work code or to record details as needed.
To create a new work code, click the New button and enter the information described above.
Click Delete to delete the current work code. A work code can not be deleted if wage history has been posted to the year pages.
The Print button works like other print buttons and can have reports linked to it to select or reports can be added by selecting Add Report.