A manufacturing batch within EBMS is used to create whole goods from consumed products. Labor and other services can also be added to a batch to properly calculate the finished goods cost. The components list or bill-of-materials may include service codes to add labor and create tasks or work orders. A product item classified as service may be configured to create tasks when a manufacturing batch is created. Review [Labor] Tasks > Creating Tasks > Attaching a Task to a Service Item for configuration instructions.
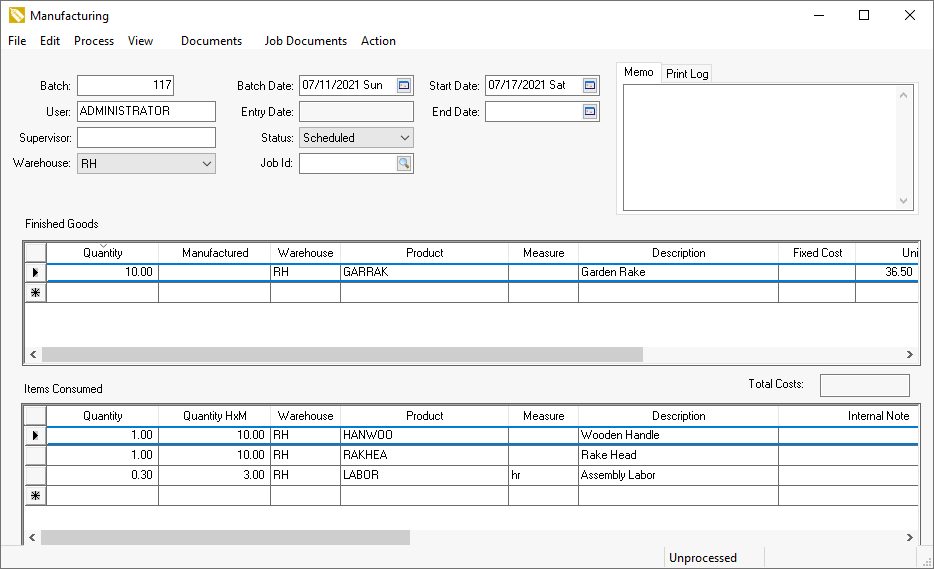
Select Inventory > Manufacturing to open a manufacturing batch:
Add a service code (Labor) in the Items Consumed list as shown above:
Right click on detail line to create task or work order and select Attach New Task to create a new task.
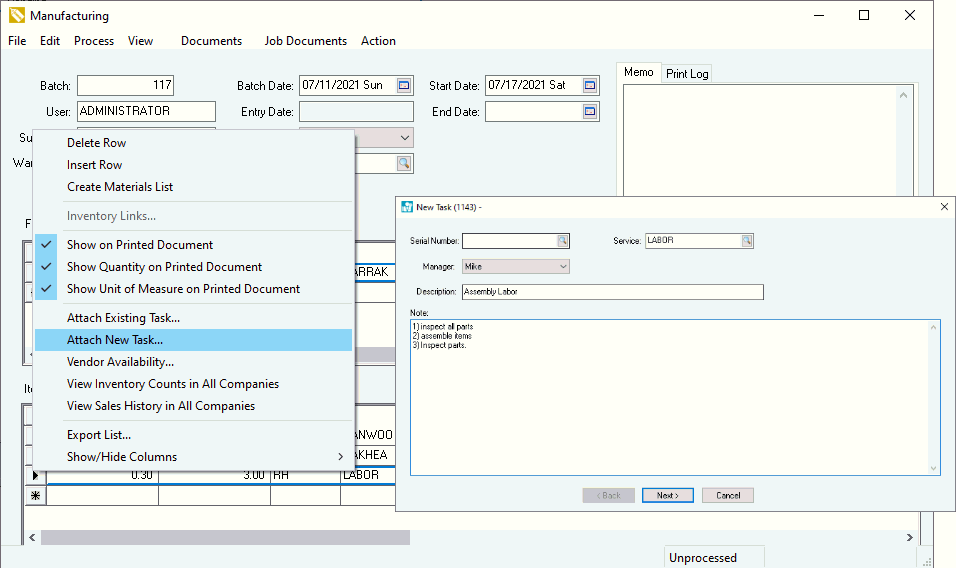
Note that the quantity within the batch will be copied to the task. The task labor quantity can change the batch's labor quantity if the billing options are enabled.
Review [Labor] Tasks > Managing Tasks > Billing a Product or Task for information on attaching billable time to the quantity on an invoice or batch.
Multiple tasks may be added to a manufacturing batch if different work codes are used for different activities. Consider using a single labor work code and change the batches status based on the task's pipeline setting.
Review [Labor] Tasks > Creating Tasks > Creating Tasks from a Manufacturing Batch for more details on linking tasks within manufacturing bill of materials.
Complete the following steps to use tasks to monitor the progress of a manufacturing batch using the pipeline settings of a task.
Enable the Synchronize
Batch Status and Start Date with task Phase and Start Date
option within .
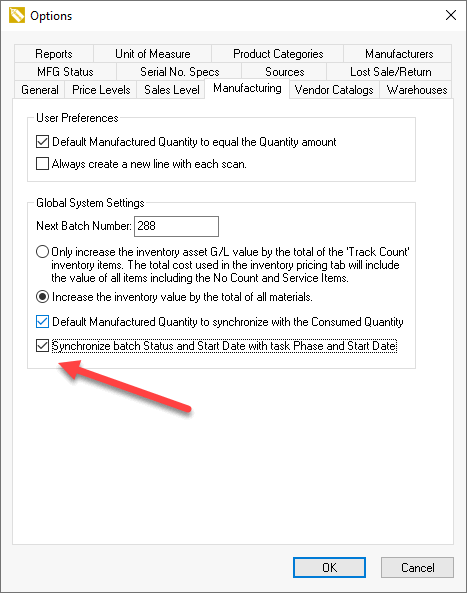
Enable this option to copy the start date and manufacturing batch status
from the attached task. Note that the batch status and the task
pipeline setting labels must be identical.
Create a list of task pipeline phase task settings to identify the manufacturing process as listed in the 2nd column below. Unlike the samples below, the manufacturing status and the task pipeline phases may be identical. Review [Labor] Tasks > Scheduling Tasks > Pipeline Phases for setup instructions. The following sample of manufacturing tasks and pipeline phases can be used to identify the progress of the project. Note that the system is using three separate task types; sales w/2 phases, manufacturing w/6 phases, delivery task and a single manufacturing batch w/7 status steps.
A) Equipment manufacturing status |
Task pipeline phase |
|
1) |
|
Sales lead (task #1) |
2) |
|
Design (task #1) |
3) |
Cutting |
Cutting (separate task #2) |
4) |
Manufacturing |
Manufacturing (task #2) |
5) |
Assembly |
Assembly (task #2) |
6) |
Finishing |
Finishing (task #2) |
7) |
Assembly |
Assembly (task #2) |
8) |
Inspection |
Inspection (task #2) |
9) |
|
Package (separate task #3) |
10) |
Delivery |
Delivery (task #3) |
Note that the following sales task (task #1) and the manufacturing task (task #2) both contain a Production pipeline phase.
B) Furniture manufacturing status |
Task pipeline phase |
|
1) |
|
Sales lead (task #1) |
2) |
|
Order entry (task #1) |
3) |
|
Create batch and tasks (task #1) |
4) |
Production |
Production (task #1 and separate task #2) |
5) |
Finishing |
Finishing (task #2) |
6) |
Final Assembly |
Final Assembly (task #2) |
7) |
|
Package (separate task #3) |
8) |
Delivery |
Delivery (task #3) |
9) |
|
Follow up (task #1 or sales task) |
Create the manufacturing status settings. For example the 7 or 4 status settings as shown above. The label text of the manufacturing batch status must match the pipeline phase label. Review Creating a Batch > Batch Status for steps to create a list of status settings within a manufacturing batch.
Add a service code (Labor) in the Items Consumed list of the manufacturing batch. Review the beginning of this section for instructions to add a task to a batch.
Right click on the service detail line to create a new task or attach to an existing task or work order.
Use the task scheduling tools to organize and schedule manufacturing batches. Review [Labor] Tasks > Scheduling Tasks > Overview for scheduling tool documentation. Note that the Start Date and task Phase can be used to change the manufacturing batch Start Date and Status.