Product Returns, Trade-ins, and Sales History
EBMS includes a feature to process inventory item returns and trade-ins.
The system assumes that any negative quantity entered into a sales order
is either a return or a trade in. This option assists the user in identifying
the date a product was purchased and a unit price at the time of the purchase.
A return is processed differently than a trade-in.
Returns:
A return is processed as a negative sale. The sales total is reduced by
the quantity amount and the sales G/L is reduced to offset the original
sale. A return reason can be attached to any product that is being returned.
Review the Product
Return Reasons section for more details on attaching a reason when
inventory items are returned.
Trade-in:
A trade-in is processed as a purchase. Rather than using the sales G/L
the Trade-ins G/L entered within the Advanced tab is used instead. The
trade-in item is processed as a purchase instead of a sale using the purchase
G/L transactions. Review the Tracking
Counts > Inventory Variance section for more details on purchase
and sales G/L transactions.
Complete the following steps to configure and process a return or trade-in:
Open an inventory item and click on the Advanced
tab as shown below:
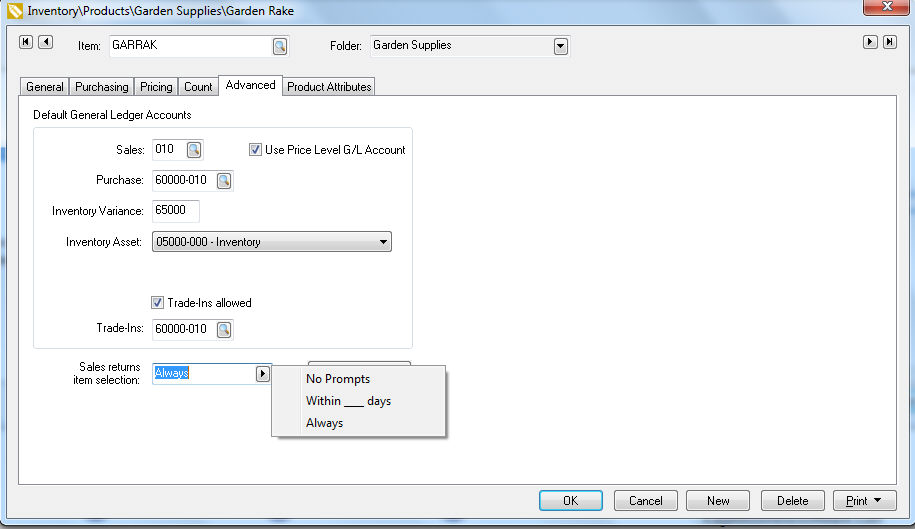
Enable the Trade-Ins
allowed option to allow the user to create trade-in transaction
if the Trade-Ins button is
clicked.
Set the Trade-ins
general ledger code to record the trade in purchase. Set the
G/L code to match the Purchase G/L
if trade-ins cost is combined with purchases.
Set the Sales returns
item selection to Always
or Within __days to open the
returns dialog when an item is returned.
Click OK to
save the settings within the Advanced
tab of the inventory item.
Continue by opening a sales order. Review Sales
> Sales Orders > Entering a Sales Order section within the sales
documentation for details on creating a sales order.
Enter the Customer ID
and other general invoice information.
Enter a negative quantity (amount to be returned and credited)
into the Shipped column (and
Ordered) of the sales order.
Enter the Inventory
ID to open the following returns dialog. The dialog will not open
if the Sales returns item selection
option within the advanced tab of an inventory item is set to No Prompts.
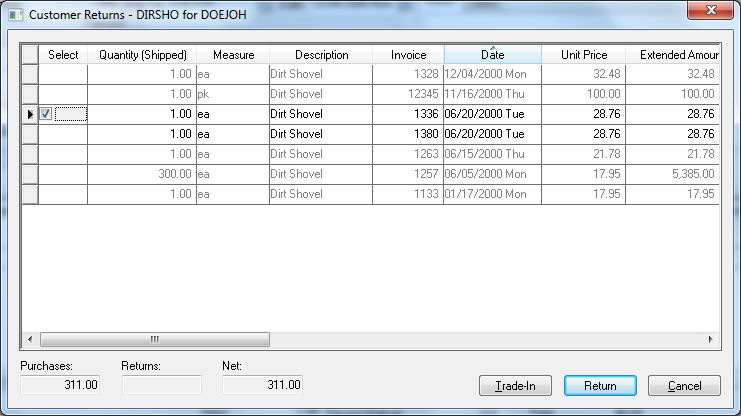
Select the item that is being returned by clicking on the Select column.
Adjust the Selected Quantity
to match the items returned.
Multiple purchase lines may need to be selected to match the
quantity to be returned.
Click the Return button
to process and return or click Trade-in
to process as a trade in. Note that transaction difference
between the two processes described at the beginning of the section.
The following dialog will appear to prompt the user for a Reason and to allow the user to
add notes as an Explanation.
Select one of the Reasons
from the drop down list. Review the Product
Return Reason section for more details on adding or changing
Reasons on this list.
The Action setting
determines how the return is processed. Review the Product
Return Reason section for more details on these 4 Action
settings that are configured with each Reason
option:
Return to Stock
Return for Disposal
Return to Vendor (Drop Ship)
Return to Vendor
Enter an optional Explanation
for the return.
Click OK
to complete the return process.
Serializing trade-ins can be used to record unique unit characteristics
including the value of each piece of equipment or vehicle. Review the
Serialized Items > Purchasing or Manufacturing
an Item > Trade-in an Item section for the steps to process serialized
trade-ins within EBMS.
Viewing Sales History
Sales history can be viewed from the sales order as shown below.
Right click on the detail line that contains an inventory item and select
View Sales History... from the
context menu to open the following dialog:

This dialog is for historical purposes only. Right click on any
sales record and click View Document
from the context menu.
Review Sales Activity section
for details on the sales history on a quote or sales order.