Go to to open the following
window:
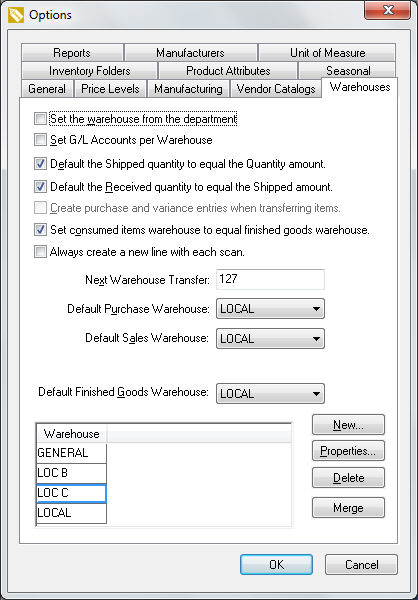
Both the Set the warehouse from the department and the Set G/L Accounts per Warehouse options must be disabled.
Enable the Default the Shipped quantity to equal the Quantity amount option unless the user enters the products in the inventory transfer list before the transfer step is processed. This option should be enabled in normal situations.
Enable the Default the Received quantity to equal the Shipped amount option if the product is received within the target warehouse at the same time it is shipped from the source warehouse. Review the Using Multiple Locations > Transferring Inventory between Warehouses section for more details.
The Create purchase and variance entries when transferring items option is disabled and does not apply in this situation.
The Set consumed items warehouse to equal finished goods warehouse option is used within the manufacturing window. Review the Manufacturing > Creating a Batch > Multiple Warehouses section.
Disable the Always create a new line with each scan option to increment the quantity Shipped instead of creating a new line for each scan. This option only applies when using bar code scanners. Review [Sales] Point of Sale > barcodes > Scanning barcodes for more details on scanning barcodes.
The Next Warehouse Transfer number is a sequential number used in the Warehouse Transfer window. Review the Managing Inventory within a Warehouse and Transferring Inventory between Warehouses section for details on the Warehouse Transfer window.
Click on the New button to add a new warehouse. Review the Create Warehouses section for detailed instructions on creating warehouses.
Enter the Default Purchase Warehouse. The expense invoice and windows will default to this setting. Set the Default Sales Warehouse that will be used within the sales invoice. These defaults are user selected so that each user may set their individual defaults. Click the OK button.