Transferring Inventory between Warehouses
The Warehouse Transfer window
is used to transfer inventory items from one warehouse to another. This
feature is needed if an item is purchased at one warehouse and sold from
a different warehouse. A warehouse transfer ticket should be created and
processed whenever items are moved from one warehouse to another in order
to maintain accurate inventory counts. Complete the following steps to
transfer inventory from one location (warehouse) to another:
Go to Inventory >
Warehouse Transfer to open the following window:
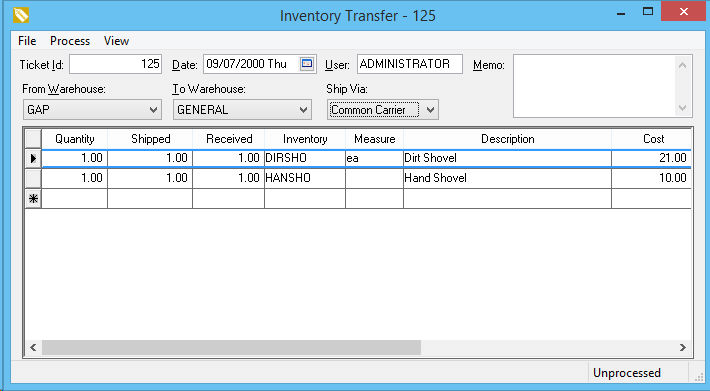
The Ticket Id
is used to identify the specific transfer. Hit the <Tab> key
to use the Next Warehouse Transfer
number. The number increments each time it is displaced and can be
changed in the Inventory > Options
> Warehouses tab. The Ticket
Id number should be manually entered if a transfer ticket is
used that contains a preprinted number.
Enter the Date
when the inventory is being transferred. This date is used to post
inventory history and general ledger transactions.
The User entry
will default to the users login name. This entry can be changed to
reflect the user that was responsible for the inventory transfer.
The From Warehouse
should be set to the location where the inventory transfer originated.
This setting will default to the Default
Purchase Warehouse within Inventory
> Options > Warehouses.
The To Warehouse
is the destination of the inventory items and will default to the
Default Sales Warehouse. Go
to Inventory > Options > Warehouses
to edit the list of available warehouses or to change the Default
Sales Warehouse.
The Ship Via
is the mode of transportation used to move the item.
Complete the following steps for each detail line:
Repeat the steps listed above for each inventory
item that is being transferred.
Select Process
> Process to transfer the inventory from one warehouse
to another. The following dialog will appear if the Transfer
quantities do not match the Quantity
column values:
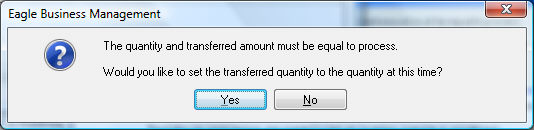
Select Yes
to copy Quantity values
to the Transfer column
and continue the transfer process.
- The following transactions are created when an inventory transfer
is processed:
Standard
Transfer Transactions Debit
/ Credit
The inventory asset is debited the value of each item Debit.
The inventory asset is debited the negative value of each
item Debit (negative).
The inventory asset account may differ for the same item if the Set G/L Accounts per Warehouse option
is enabled. This option is found in the Inventory
> Options > Warehouse tab.
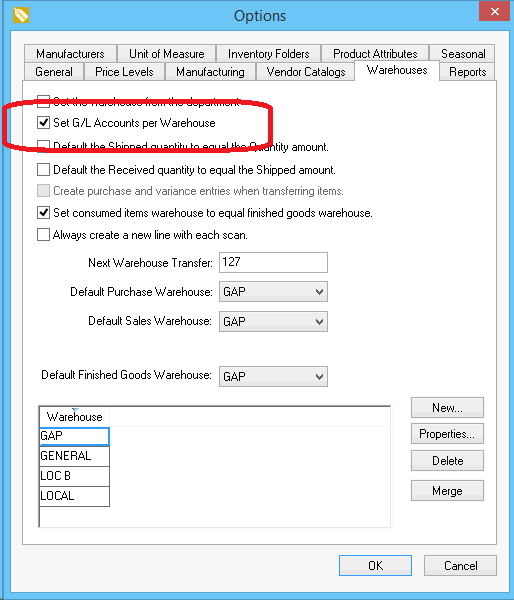
No inventory transactions are created for the purchase and variance
accounts unless the Create purchase and
variance entries when transferring items option is enabled. Review
the Multiple
Inventory Location Management > Using Multiple Location > Generate
Purchase and Variance Transactions for Warehouse Transfers Option
section for more details on this option. Review the Tracking
Counts > Inventory Variance within the main for more details on
the variance account.
Select File > Copy
to make a duplicate of a ticket. This function can save time when
entering similar tickets.
Select File > Save
from the transfer window menu to save the transfer information without
processing the transfer.
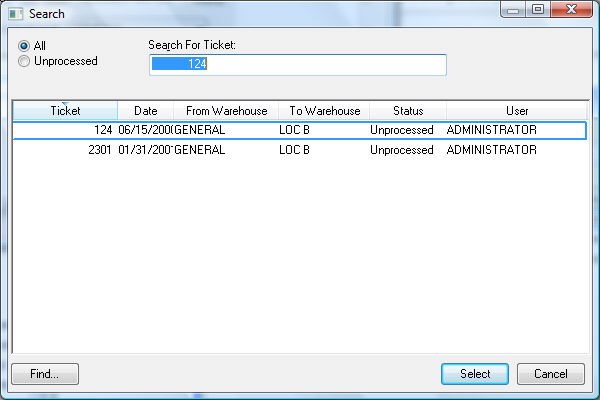
Click on the File > Open
from the transfer menu to open an existing transfer ticket.
Select Process > Unprocess
from the Transfer menu to void an inventory transfer.