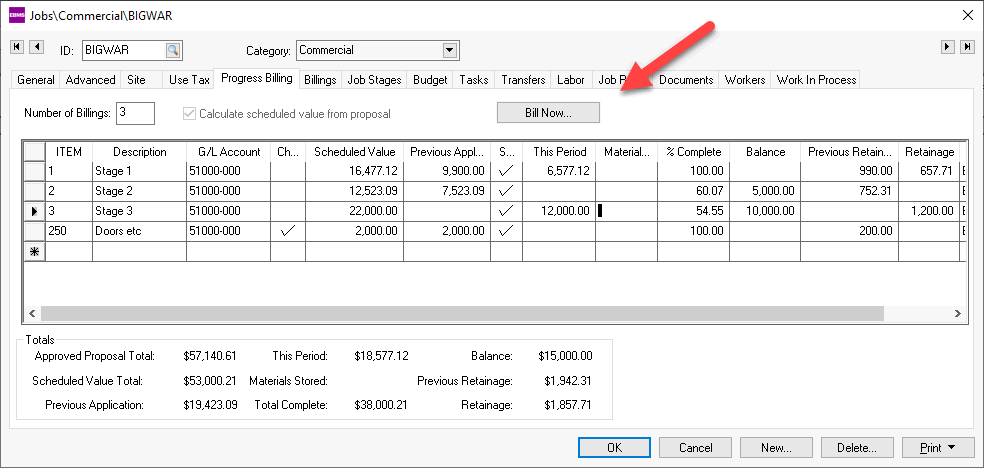
Go to the Progress-billing tab of a job to
invoice the customer or contractor for a specific job and the following
window will appear:

Enter Progress-BIlling details as explained below:
Item a unique code for each line of the progress-billing table. This code may be used within different jobs but cannot be duplicated within the same job.
Description Should describe the progress-billing line.
G/L Account This account is used in the sales invoice to allocate the revenue within the general ledger.
Scheduled Value Reflects the total contracted amount for each progress-billing item of the job. This value should not change after the initial billings have been processed. Adding additional change order lines will reflect any changes made to the scheduled value.
Previous Application Contains the total amount that has been billed.
Note: The number of billings is contained on the header part of the window and is labeled Number of Billings.Select The progress billing line will show on the invoice if the Select option is enabled. This option will be enabled by the system when a new line is created or if the user enters a value in the This Period, Materials Stored, or % Complete columns. These columns will be cleared if the Select option is disabled by the user. This column may be hidden. See the Standard Features > Column Appearance section of the main manual for details on showing hidden columns.
This Period Enter the billing amount for the current invoice excluding any unused materials. This Period amount can be calculated by entering a percentage within the % Complete column. Both amount (This Period or % Complete) can be edited and the other column will be changed accordingly.
Materials Stored Enter the total materials costs that are to be billed but have not been used for the current job. Note that the total will be added to the This Period amount and posted to the Previous Application column at the completion of the billing. The Materials Stored amount should reflect the Total amount of materials stored to date. For example, if the job contained $ 1,000 of materials stored at the time of the last billing and a total of $ 1,500 is being stored currently, $ 1,500 should be entered as materials stored rather than $ 500 (the additional materials this month).
Total Completed Reflects the total billings, including the current billing. This total can by altered by changing the previous two column amounts or by entering a percentage in the following column. Total Completed = Previous Application + This Period + Materials Stored.
% Complete This period amount will be changed to reflect the percentage entered within this column. For example, if 50 percent is entered than This Period will reflect the balance to bill this period to total 50 percent of the Scheduled Value amount. This Period = (Scheduled Value * 50%) – Previous Application – Materials.
Balance Reflects the balance that needs to be billed after the current billing is completed. Balance = Scheduled Value – Total Completed.
Previous Retainage Reflects the retainage that is withheld from the customer's invoice to date. This total does not include the amount shown in the Retainage column.
Retainage Total retainage withheld from the progress-billing invoice can not be entered within this column. Review the Retainage section for details on withholding retainage on a customer's invoice.
Repeat the steps above for each applicable line until the total matches the desired billing total.
Click on the Bill
Now button to process the progress-billing
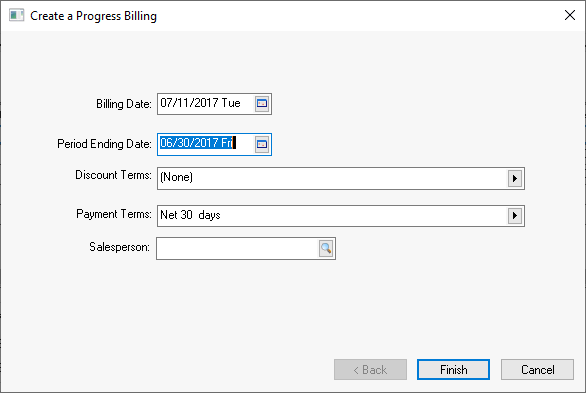
invoice and the following dialog will appear:

The process will create a sales invoice for a customer
listed within the job. A progress-billing document will be printed
instead of the standard sales invoice. The progress-billing document
is set within Job Costing > Options
> Progress
Billing tab.
Enter the appropriate Billing Date as the invoice date.
Enter the Period Ending Date to identify the end of the billing period.
Enter the invoice terms. These will default from the customer. Review [Sales] Customers > Payment Methods and Terms for instructions to set default terms.
Enter the optional Salesperson entry and click the Finish
button.

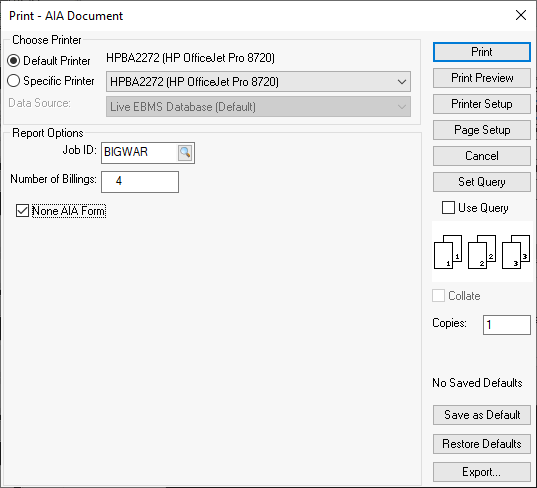
Enable the None AIA Form option if the project is not governed by an AIA (American Institute of Architects) contract. This option gives the user the same format without the AIA labels.
Click the Print
button on the print dialog to print the progress-billing
document. Go to to change the Progress-billing
Report document setting.

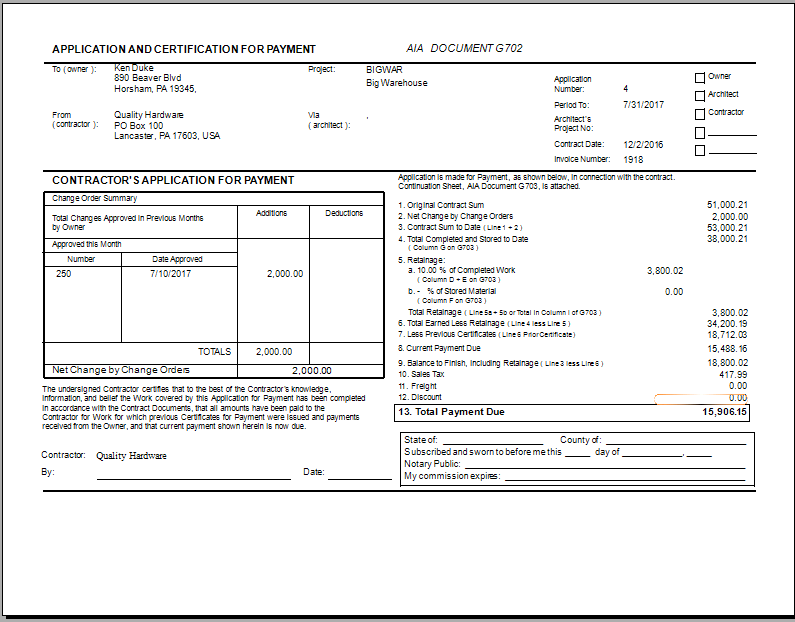
The form contains the total contract, change order list, pervious payments,
balance to finish, and total payment due as well as many other important
pieces of information for the current contract.