
EBMS can be used to process direct payments electronically to employees, to vendors, and receive electronic payments from customers. The following technology is used to process these direct payments:
United States: Automatic Clearing House (ACH) is used primary for business to business (B2B) and payroll.
Canada: Electronic Fund Transfer (EFT) is the backbone of the Canadian payment industry including debit and fund transfers: Contact Eagle Software Canada for assistance to configure EFT transactions.
Scenario: An equipment sales and repair company processes payroll using the EBMS labor module. The payroll includes hourly pay for the service technicians, commission pay for sales staff, and salaried pay for managers. Most of this pay is paid to employees using the direct deposit payment method instead of printing pay checks. The sales managers pay is deposited into two bank accounts based on a predetermined ratio. A NACHA file is created by EBMS containing the pay for all employees. This file is uploaded weekly using the ACH or EFT tools within the company bank’s online cash management portal. This entire process does not involve Eagle software or an additional merchant service.
Scenario: A small manufacturer purchases most of their raw materials from a single supplier. This company subcontracts some of the manufacturing processes to sub-shops that requires regular payment transfers. This company pays vendors using a direct electronic payment rather than using printed checks or the more expensive credit card payment. This systematic direct payment process in conjunction with the Auto Send document tools requires a limited amount of clerical effort. This timely method of paying partners reduces postage and specialty forms.
Scenario: A plumbing and HVAC contractor offers preventive maintenance contracts for various of their client’s heating and air conditioning units. Billing clients monthly is the preferred payment method for both the contractor and their clients. Processing costs are reduced substantially by using the new EBMS direct payment feature instead of credit cards. The credit card guarantees, services, and cash back perks are not part of the direct payment which allows the contractor to reduce costs and offer a more economical contract. The contractor processes these contracts on a weekly basis based on the contract date. Each batch of contracts is compiled into a NACHA file and uploaded to their bank, who processes the transfer of funds.
EBMS implements direct payments in the following processes:
Direct deposit payroll: Review [Labor] Direct Deposit Overview for instructions to electronically pay workers for labor.
Direct vendor payments: Review Vendor Payments > Direct Vendor Payments ACH
Receive direct payments from customers: Review [Sales] Customer Payments > ACH Payments for details to collect accounts receivable payments electronically from customers.
The user must establish internet/on-line services with any bank(s) that process an ACH Transactions file before the direct payments can be put into operation. Speak with the bank’s customer service representative who handles corporate or business internet/on-line services to determine if direct deposit capabilities are available. Direct deposit transactions must be approved before implementing the service within EBMS. There will be enrollment forms to complete and return to the bank so that they can set up the internet/on-line access for your company. The bank’s approval time in implementing direct deposits must be considering when planning the timing of implementing this feature within EBMS.
Complete the following steps to configure the bank account information within EBMS. The user must enter the bank’s routing information for each company bank account used to transfer direct deposit transactions. This account is normally the checking account used for payroll.
Go to and select the bank account used to make
or receive direct payments.
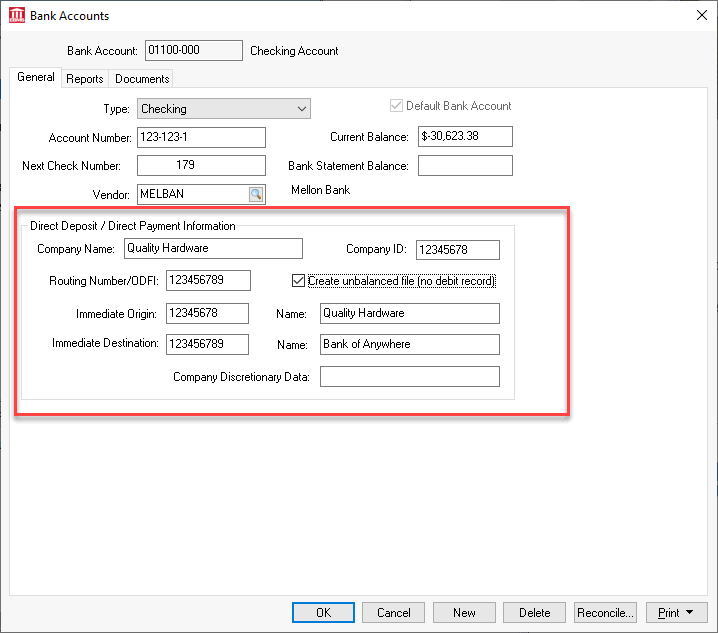
The bank account Type should be set to Checking.
Enter or verify the bank account number
within the Account Number
entry. As the source of funds for the direct deposit transactions,
this should be the company’s payroll account number within the originating
bank. It is part of the MICR encoded numbers
on pre-printed checks and pre-printed deposit slips. It is the set
of numbers that immediately precedes the On-US transit symbol (" ").
").
Enter the Account Number, Next Check Number, Vender Setting ect. Review [Financials] Expenses > Bank Accounts > Changing Bank Account Information for more details on these settings.
Enter the Company Name as required by the bank that is processing direct payments. The Company Name may also need to appear in the exact syntax the bank requires. Because of a limit on the number of characters in this field, the bank may require an abbreviated copy of the company name.
Enter the direct payment Company ID. The Company ID is the identification code for the employer or sender. This exact employer identification code is defined by the bank and must be formatted properly with dashes. The bank may ask the company to use its tax identification number or EIN number. Copy the Company ID and Company Name directly from the direct deposit agreement from your bank or consult with your bank to get these exact values.
Enter the Routing
Number/ODFI of the originating bank in Routing
Number. As the origin of funds for the direct deposit transactions,
this should be the bank’s unique identifying number within the Federal
Reserve System. It is part of the MICR
encoded numbers on pre-printed checks and pre-printed deposit slips.
Use the nine digit number between the two transit symbols ("")
Enable the Create unbalanced file (no debit record) option only if required by the destination bank.
Enter the Immediate Origin code. This setting is an ACH origin or sending point identification number.
Enter the ACH origin or sending point Name. This is usually the EBMS company name.
Enter the Immediate Destination code. This is the receiving point or ACH Identification number of the destination bank.
Enter the Immediate Destination Name. This is the ACH destination or receiving point name. This is usually the destination bank name. It is recommended that the user consult with the bank to determine if there is a standard bank name that should be utilized for this entry.
Enter the optional Company Discretionary Data only if required by the bank. This value will be placed in the batch header record starting in column 4. This information consists of exactly 20 numeric characters. Most banks do not require this code.
Review Create Prenote and Submit NATCHA to Bank Web Portal for steps to test bank information.