


An App is a suite of application that can be run on a tablet, scanner, or smart phone with access to EBMS data. These lean apps can read or write information to EBMS through a secure wireless network using portable devices such as a phone or tablet without requiring a traditional network connection. Eagle Business Software is committed to making EBMS data more accessible to mobile users.
MyEBMS allows the user to run an EBMS app on a tablet or smart phone using the Android, IOS, of Windows operating systems. Unlike the MyEBMS suite of apps, EBMS software requires MS Windows operation system or a Microsoft Remote Desktop (RDP) client to access a MS Windows Server from a non-Windows OS.
The following applications will operate on the Android and IOS operating systems as well as the MS Windows 10 OS:
There are a few apps that do not run on the IOS or Android operating system. Review the following links for more details on these MS Windows only apps:
MyTime App: This App gives the user the ability to access work orders remotely. The MyTime App will track time and parts within a task or work order as well as record notes or change the status. The App is an ideal solution for service technicians to review their schedule or work order list from a portable device in the vehicle. Review the [Labor] > MyTime App > Overview for more details.
MyDispatch: This dispatch app is used to organize tasks managed within EBMS or using MyTime. MyDispatch and MyTime are complementory apps. Review [Labor] MyDispatch > Overview for details on this app.
MyEBMS licenses can be licensed using either of the following license options:
Concurrent EBMS user licenses the same way as any other EBMS client license: This method should be used if an EBMS user uses both EBMS and various apps. This method can also be used to test drive an app.
Purchase App specific licenses: This method is ideal for users that use one or a few apps without using EBMS.
Set the License option within the MyEBMS app settings to enable the B) option. Option A) will be used if no app licenses are purchased.
Complete the following steps to install the base MyEBMS app and connect to the EBMS software:
Use the following App stores to download the EBMS App:
Use Google Play to download MyTime for a phone or tablet running Android:
Use Apple App Store to download IOS apps for an Apple phone or tablet:
Use Microsoft Store to download MS Windows apps:
The MyEBMS apps communication must be configured either of the following two methods. This configuration step is required before MyEBMS can connect to the EBMS data.
Direct https connection: This technical method used
requires a company URL with a SSL certificate, static IP address,
and security firewall configurations configured by the user's
IT staff.
Note that this method is not recommended since the configuration is not supported by the
Eagle Business Software's support staff.
Relay connection: This recommended connection method reduces complexity and internal security settings. The relay method is the only connection method supported directly by Eagle Business Software support staff. Configure the Advanced Communication Settings to setup advanced settings within the EBMS Server Manager to communicate to any remote app.
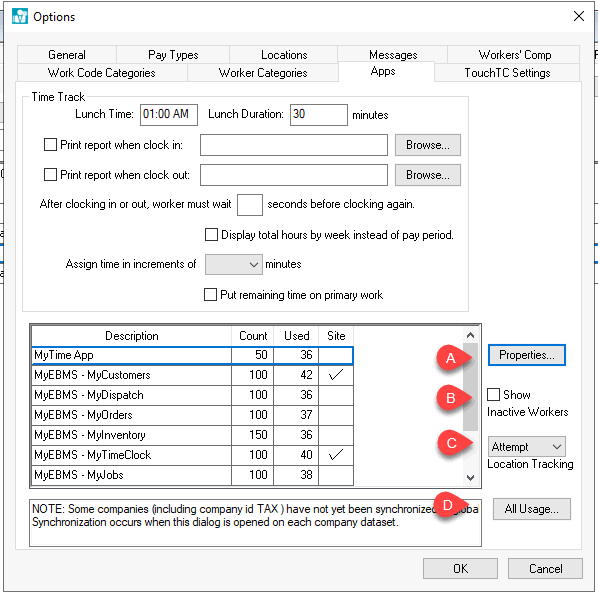
Click Properties to view the MyEBMS app user licenses: EBMS Apps can be purchased using subscription rather than using EBMS users. The Count column displays the number of MyEBMS app licensed users. The Site setting indicates a site license that does not require user licenses. Contact an EBMS rep to purchase an app license.
Enable the Show Inactive Workers to view inactive worker's MYEBMS licenses. Review [Labor] Workers > Terminations for steps to make a worker inactive.
Set one of the following Location Tracking options. Review [Labor] MyDispatch > Recording Worker Locations for more information on location tracking settings including a link to the privacy policy.
Click All Usage to view the current app licenses. Note that non-license users (concurrent EBMS users) will only show if the app is active.
Select an app and click Properties
to enable users if the Site option is not
enabled to open the following dialog:
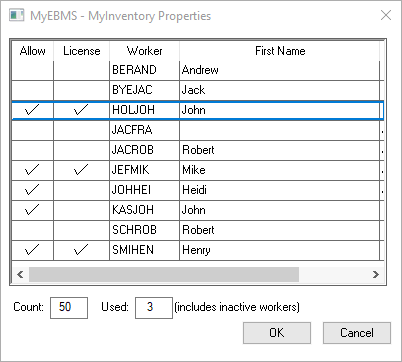
Enable Allow to identify the workers that have access to the app. The Used totals the number of selected workers.
Enable the License option to use a MyEBMS specific license. A user with License enabled requires a MyEBMS license. A user with License disabled will use a concurrent EBMS user license.
Some MyEBMS options are managed within the worker record of EBMS. Open the Worker record by selecting Labor > Worker from the main EBMS menu.
Click on the General tab
as shown below:
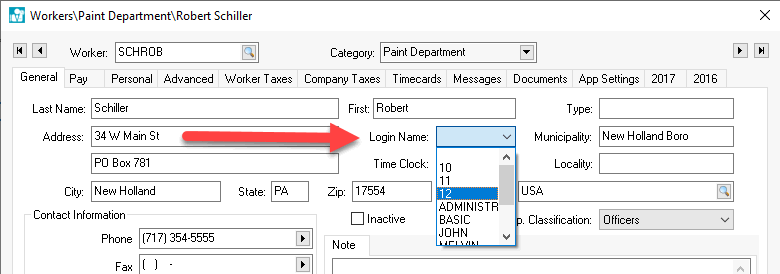
Associate the EBMS Login Name created under File > User Management with the employee record as shown above. Review Security > Creating Users and Assigning Rights for details on creating security login names.
Click on the App Settings
tab of the worker record as shown below:
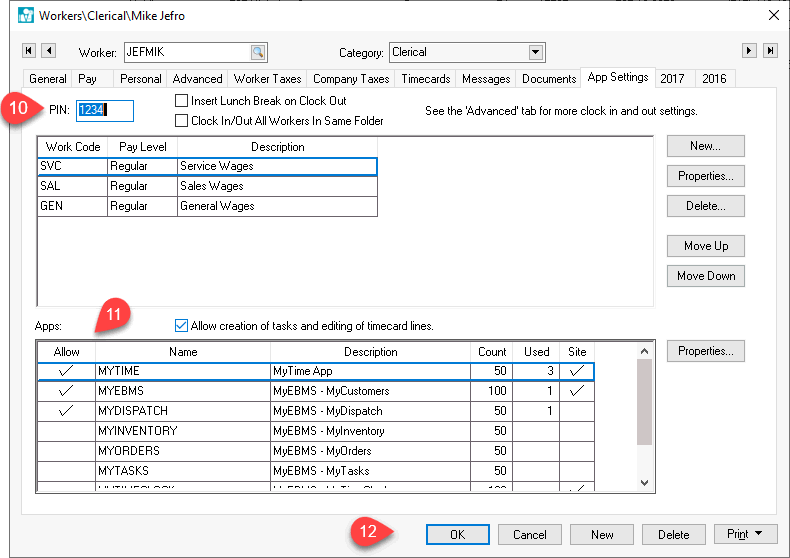
Add an optional user PIN that may be used in some EBMS apps.
If the Site option is not enabled then enable the Allow option for the app feature that you wish to enable for this worker to use remotely. In the example above, the license contains many EBMS apps but Mike Jefro only has access to 3 apps since the Allow option is enabled for the first 3 apps. The Allow option does not restrict the user on the local EBMS LAN network.
Click OK to save App Settings for this worker. Repeat the last 5 steps for each additional Workers.
Log into the MyEBMS app loaded onto the device in step #1.
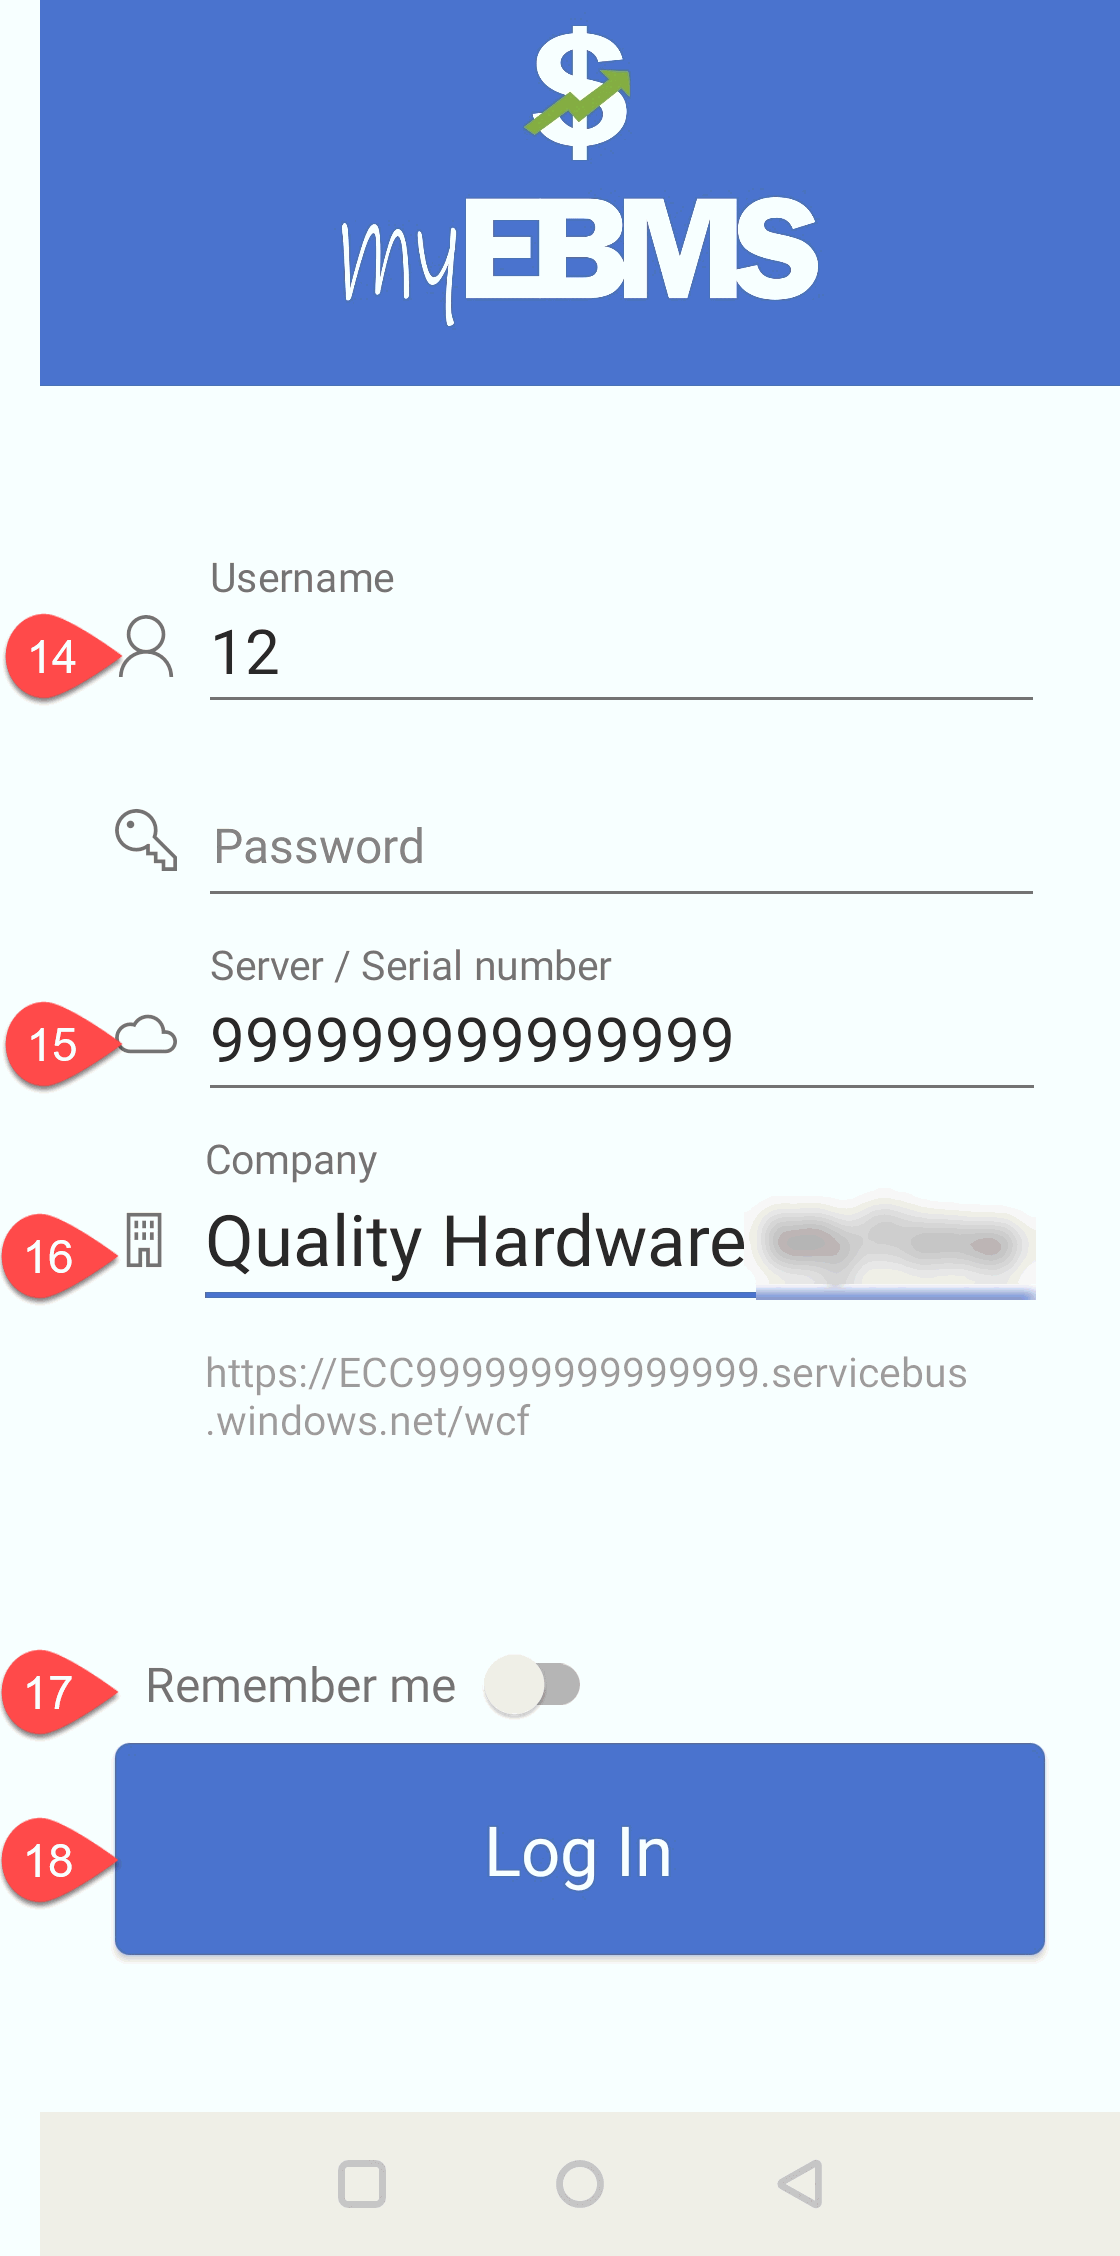
Enter Username and Password as configured in EBMS File > User Management.
Enter the EBMS serial number as the EBMS Server setting. This serial number is located at the bottom of the same EBMS Server Manager > Advanced tab as the communications Relay Key. Review Server Manager > Advanced Communication Settings for details.
Select the appropriate Company from the available list. A company data set must have the Enable external services option enabled in the EBMS Server manager. Review Server Manager > Enabling Access to Company Data to locate the 3 character data set code.
Enable the Remember me option if the app is always used by the same user,
Click on the Login button to link to the EBMS software.
Review the following for more details on individual app options:
MyCustomers: [Sales] Customers > MyCustomer App
MyProposals: [Sakes] MyProposals > Overview
MyOrders: [Sales] MyOrders > Overview
MyInventory: [Inventory] MyInventory Overview
MyTime: [Labor] > MyTime > Overview
MyEBMS Time Clock: [Labor] Time and Attendance > MyEBMS Time Clock
MyDispatch: [Labor] MyDispatch > Overview
MyJobs: [Financials] MyJobs > Overview
MyTasks: [Labor] MyTasks > Overview