Purchasing Special Orders
Special order items and items identified as Drop Ship within
the sales order must be "purchased" before the sales order can
be processed. The purchasing step is accomplished by linking the sales
order to the purchase order. This step can be done using any of the following
steps:
Linking the purchase directly from the sales order
detail line - This option is useful when a single line item is purchased
immediately from the vendor.
Purchasing the entire sales order - This purchase
option is used extensively for drop ship orders or when most of the
sales order lines are purchased immediately from the vendor.
Purchasing special order items from the Special
Orders tab of the purchasing screen - This popular option allows
the user to purchase special order items after the sales order is
created an saved. This option should be used when the purchasing
staff places the orders for products sold by a separate sales team. Using
the Purchasing window facilitates the ordering of special order items
and stocked items from a common interface.
Creating a purchase order from MyTime. Review
[Labor]
MyTime > Adding Products to a Task or Work Order for more details
on this method of special order purchasing.
Note that purchase order lines can be created from a sales order without
using an inventory item. The quantity, Description,
and Vendor Part Number are copied
to the purchase order with either of the 4 purchasing options.
Linking special orders and drop shipments to a purchase order should
be done at the time the items are ordered from the vendor. Review the
instructions below for each of the three linking options:
A. Linking the purchase directly from the sales order detail
line
Right click on the detail line to link a purchase order directly
to a specific line item of a sales order as shown below:
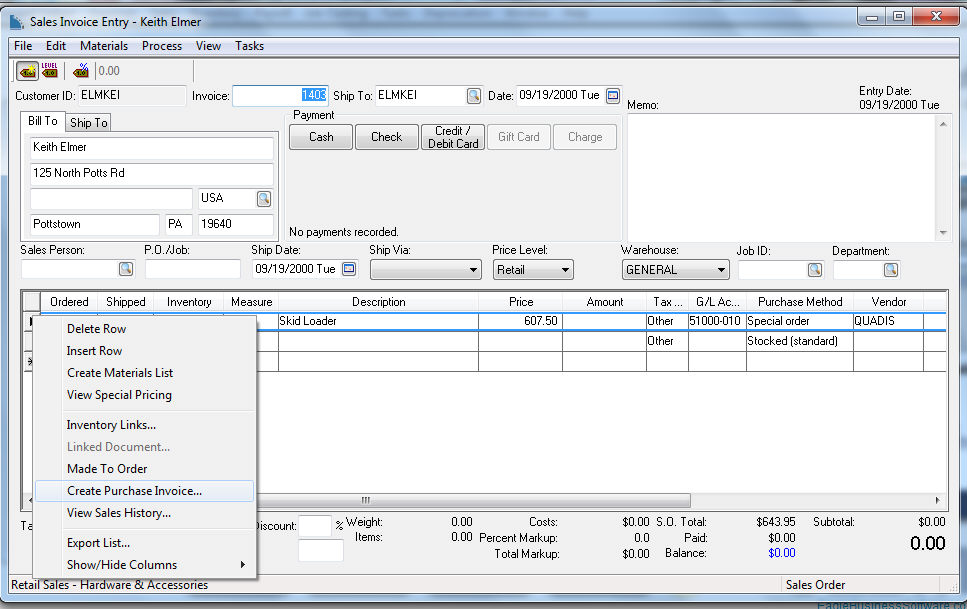
The Create Purchase Invoice
option will only appear if the Purchase
method is set to Special Order, Drop Shop, or Replenishment
and if a Vendor code is entered.
The option will also not be available if the line item has already
been linked to a purchase order. The following dialog will not appear
if the Purchase method is
set as Drop Ship.
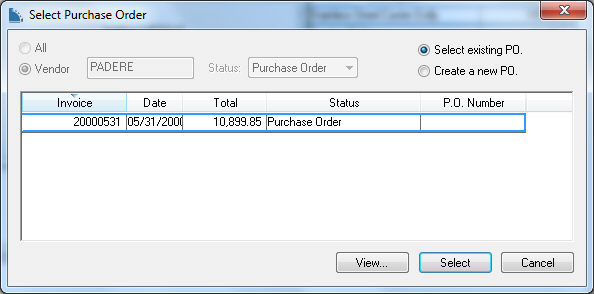
Select the Create a new PO
option if you do not wish to append to an existing purchase order.
Click on the Select existing
PO and configure the All/
Vendor settings to select
an existing purchase order.
Click on the Select
/ Create button to create
the purchase order as shown below:
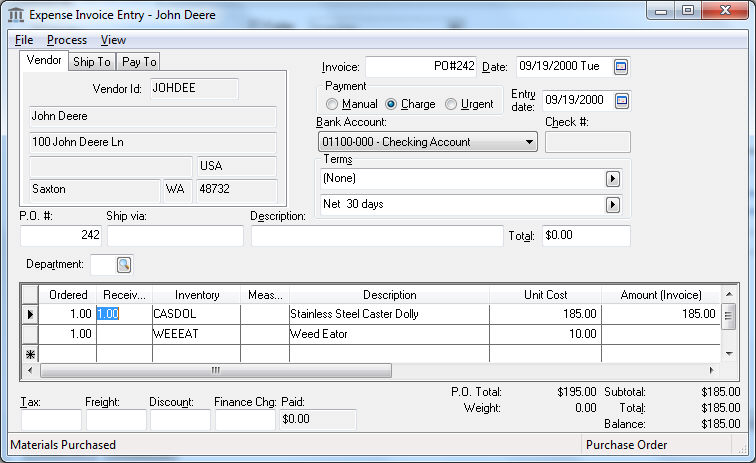
The Ordered quantity,
Description, and Vendor Part
Number is copied from the sales order to the Received,
Description, and Vendor Part
Number columns of the purchase order.
The Received quantity of the
purchase order is linked to the Shipped
quantity of the sales order if the Purchase
Method is set as Drop Ship
or Sync Quantities. These
special order transactions will not affect the inventory On-hand
count of the inventory item since these values always match. Use the
Associated method if the quantity
fields should not be synchronized. Populate the Received
quantity when special order items are received from the vendor.
Drop shipments will never be handled by the user since the product is
shipped directly from the vendor to the customer. Populate and process
both invoices at the time the product has been shipped to the customer
and the sales order is processed. The Shipping
Customer ID within the Ship To
tab of the purchase order will be populated with the Customer
ID within the sales order for drop ship purchase orders. Right
click on any of the drop ship detail lines of the purchase order and select
Linked Document from the context
menu to view the associated drop ship sales order.
B. Purchasing the entire sales order
This purchasing option is the recommended method used for sales orders
that contained dropped shipped items especially if the sales order includes
multiple items that are shipped on the same purchase order.
Open the sales order and select Process
> Create Purchase Orders(s) from the sales order menu as
shown below:
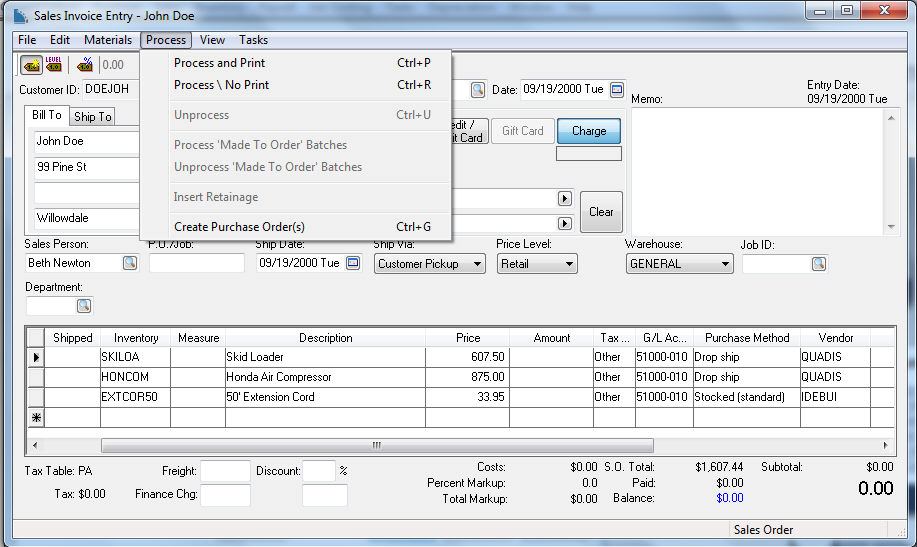
Review the previous section for details on the wizard to create the
purchase order.
C. Purchasing special order items from the Special Orders tab of the
purchasing screen
The Purchasing Window contains
a Special Orders tab that lists
all the special orders and drop shipments that are not linked to a purchase
order.
Go to Inventory > Purchasing
and click on the Special Orders
tab as shown below:
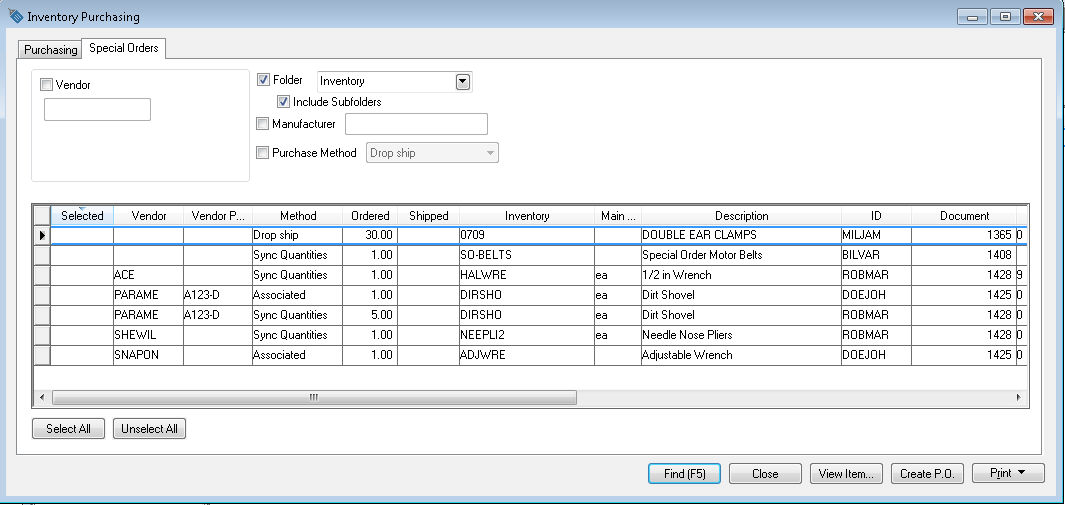
Click on the Find (F5)
button or hit the F5 keyboard
key to list all the special order items the match the query option
on the top of the window. All special order items will be listed if
all the query options are disabled as shown above. Set any of the
following query options to limit the special order list:
Enable the Vendor
option to list only the special orders that are set to be purchased
from the selected Vendor.
Enable the Folder
and the Include Subfolders
options to limit the list to special order items from a specific
folder group or subfolders. Review the Product
Catalog > Adding and Deleting Inventory Folders section
for more details on inventory item folders.
Enable the Manufacturer
option to list only items associated by a single manufacturer.
The Manufacturer setting
is found within the General
tab of the inventory item.
Enable the Purchase
Method option and select a specific method to limit the
special order lists to one of the Purchase
Method settings - Drop
ship, Replenishment, Sync Quantities and Associated.
Review the Purchasing > Purchasing
Methods section for more details on these options.
Note that the Find (F5)
button must be clicked to refresh the list of items.
Enable the Selected
option (first column of item list) for each item you wish to place
on the purchase order. Click on the Create
P.O. button to link Selected
special orders to a purchase order.
The special order list can be evaluated when the Create
PO is launched from the main Inventory
Purchasing window by enabling the View
when creating purchase order option within the Inventory
> Options > General tab. Review the Purchasing
> Using the Purchasing Window to Create Purchase Orders for details
on this option.


