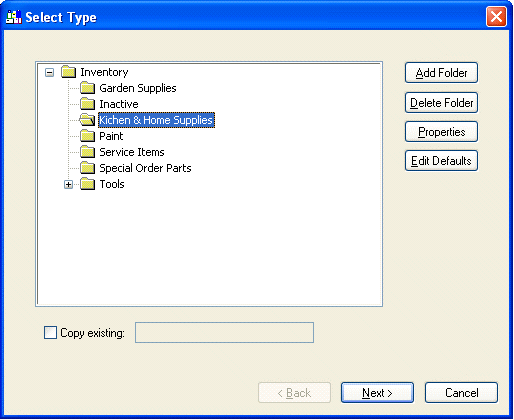
A new inventory item wizard is used to create a new item. Review the Changing Inventory Items section for instructions on changing existing items. Complete the following steps to add a new inventory item.
1. Open the inventory item list by selecting Inventory Items from the main Inventory menu.
2. Select Edit > New from the main menu to start the new inventory wizard. (Clicking New within the inventory Item window will also activate the new wizard.)

3. Highlight the folder in which you want to place the new inventory item and click Next. Review the Adding and Deleting Inventory Folders section for more details on creating new folders.
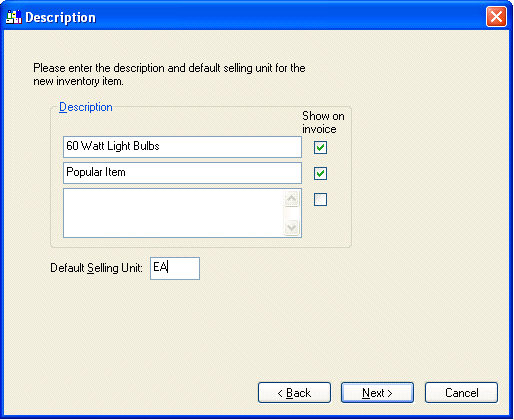
4. Enter a Description of the inventory item. This description may span up to three lines. Note that if information is typed on the second and third lines, the Show on Invoice switch is turned ON. If the Show on Invoice switch is ON the description will show on the sales invoice. Switch the description line OFF to enter a description that should not show on the sales invoice. If the first line is turned OFF the user will be prompted to manually enter the item description. Click the Next button to continue to the Information page.
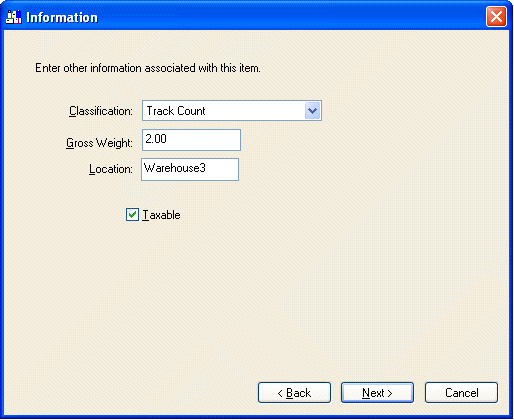
5. Change the default classification if necessary by clicking on the down arrow button to the right of the field. All of the following options may or may not appear depending on the version of EBMS that is being used.
· Use the Service classification for service items. In other words, inventory items that are not tangible products but services, such as maintenance labor or warranty policies. Review section Using Inventory items to identify Service Items for more details on using service items.
· Use the No Count option for inventory items that are purchased and sold but exact inventory count in stock is not recorded or maintained.
· The Track Count classification should be set for any inventory item that you wish to track the exact count in stock. Review the Tracking Inventory Counts Overview section for more details on tracking counts.
· The Registered Whole Goods classification is explained in the Registered Whole Goods section. This option may not be available if the system does not contain the whole goods module option.
· The Special Orders classification is explained in the Special Orders section. This option may not be available if the system does not contain the Special Orders module option.
6. Enter the Gross Weight of the inventory item. This weight is used within a sales order or invoice to calculate the total weight of an order. This field can be kept blank if total weight is not needed or if the inventory item does not have a weight.
7. Enter the storage Location of the inventory item. This optional field can be useful to identify the location of the item within a warehouse or store.
8. Turn the Taxable switch ON if this item is subject to sales tax. Click the Next button to continue.
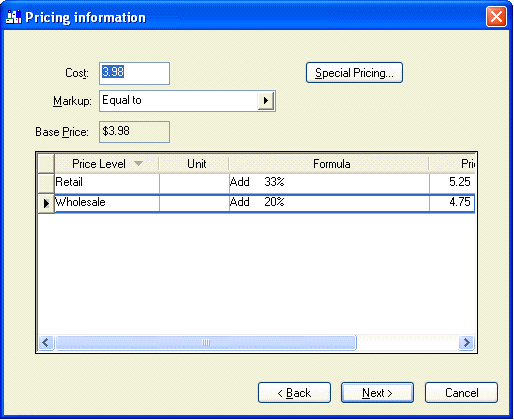
9. It is optional to enter an amount in the Cost field since the cost will automatically be updated the next time an expense invoice is processed. However, it may be useful in setting the pricing for this item if a value is within the Cost field.
10. Set the Margin/Markup setting to Equal to if the price of the items are normally calculated from the cost.
Set Margin/markup to (none) to manually enter the base price and calculate different price levels from base price. An example of using a manual base price is if all price level prices are derived from a suggested list price. The base price would equal the list price that is manually entered.
11. The Price Level and Unit columns cannot be edited within the wizard. To add additional price levels to the list go to Inventory > Options > Price Levels. The Unit column depicts the main unit of measures that is set within the folder defaults. See the Unit of Measure section for more details.
12. A G/L Account column will appear if the Use Price Level G/L account switch is turned ON. This option is found in the advanced tab of the inventory item. Enter the 5-digit sales general ledger account code for each price level. This feature allows the sales total of each price level to be posted to a different general ledger account. For example, the retail sales could be posted to a different general ledger account than the wholesale sales.
13. Set the Formula column to (none) to enter a price amount for each price level. Enter the desired formula to calculate the price from the base price. Review the Inventory Pricing Overview section for more details.
Click the Next button to continue.
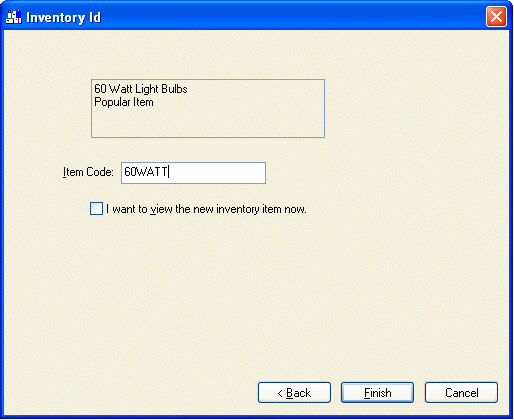
14. Enter the Inventory Id. This Id is required to be unique for each inventory item. The inventory item Id is used throughout the entire accounting system for all transactions associated with this inventory item. Plan to use a satisfactory Id since changing the inventory Id is a lengthy process. Code the item from the most general characteristic to the most specific. For example, for a 25-foot measuring tape, a possible Id could be TLMT25. TL – Tool, TM – measuring tape, and 25 for the size. Review the EBMS Features > Creating and Changing Ids section for more details. Click Finish to create the new inventory item or Cancel to ignore new entries.
When the above inventory item is created, there may be other item details that need to be edited. To view all inventory item information, review the Changing Inventory Items section.