To enter a new vendor invoice:
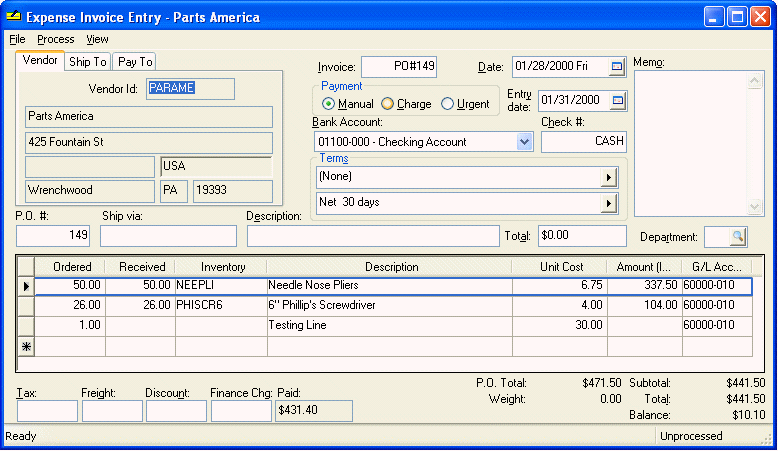
1. Go to Expenses > Invoices and P.O.'s; the following window will appear.
NOTE: This same window is used to enter purchase orders.

2. Type the vendor Id in the Vendor Id field or select from the selection window if the entry is blank. This field will default to the vendor that is currently selected on the vendor list. You must use a miscellaneous vendor if you wish to manually enter the name and address onto the invoice. Review the Miscellaneous Vendor section for details. Press Ctrl + tab keys on keyboard or click on tab keys with your mouse to move to Ship To tab or Pay to tab. The Ship To Id field is used to identify a customer when product is being shipped directly to a customer otherwise this information is blank. The Pay to Id is used to identify the vendor that is printed on the check. The Pay To vendor is copied from the vendor Terms tab and is normally the same Id as the Vendor Id.
If this vendor has any open purchase orders, a window will appear, asking if you wish to edit or add to an existing purchase order, or if you wish to create a new one. Select New to create a new invoice.
3. Enter the Invoice number on the vendor’s invoice. If you are entering a bill that has no invoice number, such as a utility bill, use any unique number such as the date (19990123). A message will appear if the invoice number entered is a duplicate.
· Date – Enter the invoice date.
· Payment - Click on the payment method being used. Manual is selected when the invoice is being paid immediately with a credit card or direct debit or has already been paid with a hand written check. Charge is selected when the vendor has sent the items and is allowing payment on credit. Urgent should be selected when you wish to pay this invoice immediately after being processed. An Urgent invoice is processed the same way a Charge invoice is processed but the Urgent invoice is switched on to be paid the next time invoices are paid.
TIP: If you wish to apply a vendor credit immediately toward outstanding invoices from the same vendor, set the Payment option to Urgent. The credit Pay switch within the Vendor Payment window will be turned ON so the credit is applied to the next payment. The credit will not be processed if the outstanding invoice balance for the vendor is less than zero.
· Entry Date – Defaults to current date. (A different date can be manually entered). This date is used to record the date in which the purchase order was entered. If a quick check is issued, the check date defaults to the Entry Date.
· Bank Account – If paying a vendor via manual payment, be sure to select the general ledger account that the monies are being drawn from. For cash payments, use a cash account. For credit card payments, use the credit card account. For a check payment, use the default. This field defaults to the default bank account specified in Expense > Options > General tab.
· Check # - Defaults to cash. If paying by credit card, enter a transaction number such as the current date. If you are entering an invoice that has been paid with a hand written check, enter the check number in this field. This field can only be edited if the Payment type is set to Manual.
· Terms default to the settings entered in the vendor window. They can be changed in the invoice entry window from the default setting to an alternative selection. This will change this invoice only. To permanently change the terms for a vendor, see Editing Vendor Information > Terms tab. To select a terms template click on the right arrow and select the terms or discount that you wish to use. After selecting a template, enter the term values if they are required.
· The PO# field records the purchase order number used on this invoice. Keep this field blank if no purchase order has been used.
· Ship via is for informational purposes only so you can know how the items are being shipped to your location.
· The Description field is for informational purposes only. The description should identify the contents of the P.O. or invoice. It could be an order confirmation number or something similar. This information is printed on the payment check stub.
· Enter the Total of the invoice in the Total field. This is used to verify that the proper amounts have been entered into the invoice.
4. A vendor invoice can contain as many detail lines as needed. If you are entering a non-inventory invoice, such as an electric bill from a utility vendor, columns such as the Inventory, unit of Measure, and Vendor Part Number can be ignored since they are used to record information on inventory items. If you are entering an invoice without inventory items, enter the following information: otherwise, proceed to the next step.
a. A quantity (1) in both the Ordered and Received columns.
b. Type a short description in Description column.
c. Enter the total of the utility bill in Cost.
d. Enter the expense general ledger Id that records electric costs into the G/L Account.
It is not necessary to enter additional detail lines into this invoice.
5. Invoice includes Inventory Items
· Quantity Ordered. The Ordered quantity is recorded in the Count tab of the inventory item if an inventory item is entered.
· The Received field should equal the quantity reflected on the vendor’s invoice. If the Received amount is less than the Ordered amount and the Create back orders automatically when processing a purchase order switch is ON, the system will automatically create a new P.O. for the amount backordered (Ordered – Received). The Received amount can automatically be copied to the Received field by setting the Default the quantity received to equal quantity ordered switch ON. See Expenses > Options > Invoices and POs tab to change both switch settings.
· In the Inventory column, enter the inventory ID for the item being purchased. The Manufacturer Part Number, Description, Cost and G/L Account will automatically be filled in from the information entered in Inventory > Inventory Items. If you wish to retrieve the specific item using the Vendor’s Part Number keep inventory Id blank and enter the Vendor part number.
· The Unit of Measure field is an optional field that identifies the unit of measure being used for this inventory item. Review the Unit of Measure section for more details.
· If the Inventory Id is blank, the system will attempt to retrieve the inventory item using the Vendor’s Part Number. If inventory Id is not blank, the system will automatically store the vendor’s part number. Review the Inventory > Inventory Items > General tab. If the item doesn’t have an inventory Id, let the item field blank and manually type a description of the transaction. This description will be used on the detailed transaction description posted to general ledger.
· Enter the Unit Cost of the item. Note that when you enter an inventory item the last cost is copied into the Unit Cost field. This amount is used to calculate the Amount (Invoice) and the invoice Total.
· The Amount (Invoice) field will automatically be calculated from the quantity Received entry and the Unit Cost.
· Enter the correct G/L Account. This field automatically defaults to the general ledger account that has been set for the specified inventory item (Inventory > Advanced tab). This account can be changed manually for this specific invoice. If the Vendor > Advanced tab > Update this expense account when processing an invoice switch is ON the G/L Account on the first line will be copied to the vendor window.
· The Received Date column is useful to enter the expected shipping arrival date for each line item. This date may be updated to identify the actual arrival date of the merchandise. This optional column may be ignored if the user does not require reporting on shipping details.
· Repeat the steps listed above for each invoice detail line. It is recommended that you adjust the widths of the invoice detail columns to your specifications. Review the Column Appearance section for more details.
6. To enter an amount of Sales Tax listed on the invoice press Alt + T with the keyboard or click on Tax field with your mouse.
7. Enter the Freight, if any, due on the invoice.
8. Discount field – This field allows you to enter a dollar amount that will be taken off the invoice total. If the current vendor invoice has a discount based on payment date enter the discount terms in the term’s field and ignore any discount dollar entry. If you manually enter an amount in this field the terms discount field will be blanked.
9. Overdue field – This field allows you to enter an overdue charge. Most likely, you will not use this field in the invoice entry window. If the vendor allows an item to be charged and you do not pay within the allotted time, an overdue charge will be applied. When the payment is made, the overdue amount will show up in this field when you view the invoice.
To add or edit an invoice note or Memo go to invoice menu option View > Memo. This memo can also be seen on the upper right corner of the invoice window if the screen size allows it.
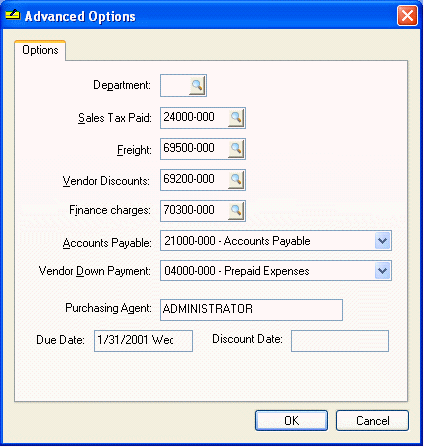
To view or edit advanced invoice settings select invoice menu option View > Advanced Options and the following window will appear.

· The Freight, Finance Charges, Vendor Discounts, Sales Tax Paid, Accounts Payable, and Vendor Down Payment fields are general ledger accounts that are copied from the vendor’s Advanced tab. These accounts will normally remain the same.
· The Purchasing Agent defaults to the login name of the user who created the original purchase order or invoice.
· The Due Date and Discount Date are calculated from the terms field. These dates cannot be changed without changing terms.
10. To process the invoice, select Process > Process (CTRL+P) from the invoice menu. Review the Processing an Invoice section for more details on processing an invoice. If the invoice’s payment type is Charge or Urgent, the invoice will appear in the Vendor Payment window.
To enter another invoice order select File > New or press Ctrl + `N’ on the keyboard and the system will prompt you to save the invoice.