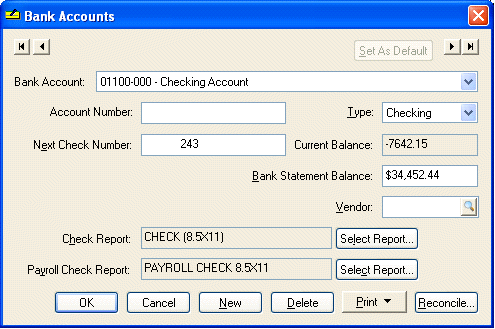
The Bank Accounts window is an extension of the general ledger information for accounts with a bank account classification.
Select Bank Accounts from the Expense menu. The following window will appear. This window can be used as a convenient way to view current bank balances. The current balance total only includes transactions posted to the general ledger.

· The Bank Account Id is the general ledger account number and description. This cannot be edited within the bank account window but must be changed in the General Ledger Chart of Accounts window. Review the Chart of Account Folders section. To select a different bank account, click on the down arrow to the right of the Bank Account field and select from any of the accounts listed.
· The Account Number given to you by the bank can be changed at any time. This number is used only for history and reporting purposes and does not identify the account on invoices or other windows throughout EBMS.
· The Next Check Number is automatically set when the computer generates a check. This number can also be changed when the check process dialog displays the beginning check number.
· Bank account Type can be changed without any adverse effects on any transactions processed.
· The Current Balance reflects the ending balance recorded in the general ledger account. This balance cannot be changed within this window but must be adjusted with a journal entry or within the Bank Account Reconciliation window. Review the Correcting Differences in Reconciliation section for details on adjusting the current balance. Note that this balance does not reflect any temporary transactions that have not been posted to general ledger.
· Bank Statement Balance amount reflects the last bank statement ending balance. This total is automatically copied from the Account Reconciliation window. See Reconciling a Checking Account section for more details.
· Vendor ID field is an optional field identifying the bank information. A bank should be entered as a vendor along with all the appropriate contact information. Right click on Vendor Id field and select Lookup on the context menu. After the Vendor window opens click on the New button to create a new vendor.
· Accounts payable Check Report and Payroll Check Report settings are available only if the bank account Type is set to Checking. Click on Select Report buttons to define the proper check that you wish to use for this checking account. The check report must match the preprinted forms that you are using. If this checking account is not used in payroll then ignore the Payroll Check Report setting.
· Click on the Reconcile button to access the Account Reconciliation window. Review the Reconciling a Bank Account for details on this window.
· For more details on the Print button, review the Reports section of this manual.
· The Delete button does not delete the bank account’s associated general ledger account but makes the account inactive barring it from being used as a bank account in invoice and payment windows.
· The New button is used to create a new bank account. Review the Adding a Bank Account section for details on creating a new bank account.
Click on OK to save changes made to bank account or click on the Cancel button to ignore changes.