A stage is defined within EBMS as a group or category of expenses that can be analyzed as a unit. By using stages, a manager can summarize a portion of a project or job. For example, a contractor may wish to analyze a job's labor costs regarding the framing of a building or the material costs required for the electrical stage.
A stage must be defined in the Master Stage List found in the dialog before it can be used within a job. This allows the manager to report and summarize costs for a certain work type (stage) between multiple jobs.
Stages can be grouped in user defined stage folder groups. For example, a building contractor may divide a building project into the following folder groups:
General
Site Work
Framing
Roofing and Siding
Windows and Doors
Insulation
Plumbing
Electrical and Heating
Drywall and Trim
Furnishings
Each stage group may contain additional folder sub-groups. For example, the Site Work group may contain the following sub-groups:
Driveway
Site Excavation and Drainage
Building Excavation and Backfill
Building Stone
Site Utilities
Sewer System
Import / Export Fill
Landscaping
Each folder group or sub-folder group will be subtotaled on cost analysis reports. The user should not create sub-folder groups if that level of detail is not desired when analyzing the job.
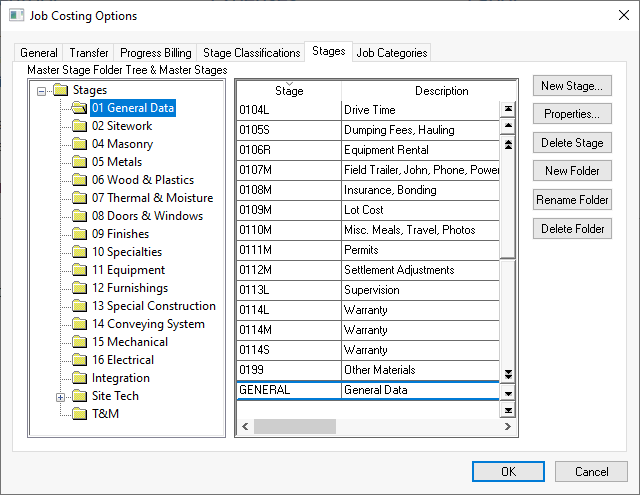
A stage must be defined in the Master Stage List found in the options dialog before it can be inserted into a job. The user will be able to organize jobs and stages much more effectively by properly entering the standard stages for all general jobs within the Job Costing options dialog. EBMS includes a number of master stage lists. Contact your EBMS consultant for details on Master Stage Lists for different vertical markets. To create or change the master stage list go to and the following window will open:

The stage group folders are used to organize job stages.
To add group folders, highlight the parent folder and click the Add F older button. Type the new folder group's name to label the new folder. Use the Rename Folder or Delete Folder buttons to change the folder label or to remove it from the list.
Create new stages after the standard stage folder groups have been created. A folder group does not contain any job stage information such as budgets or costs but contains multiple stages.
Complete the following steps to add new stages:
Highlight the folder in which the new stage is to reside.
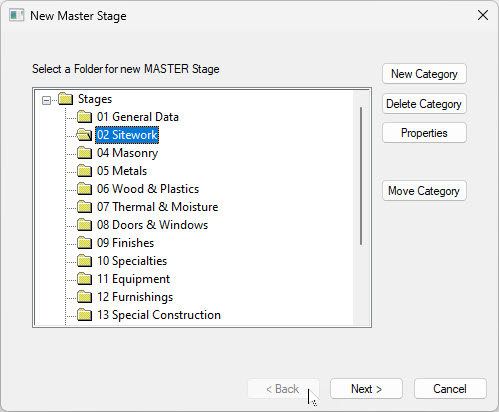
Click on the New Stage button and the following dialog will appear.

Select a folder for the stage and click Next.

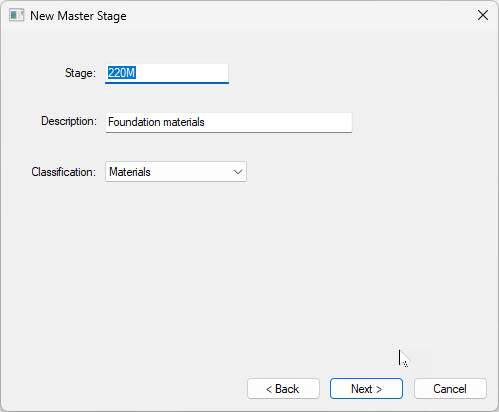
Enter a Stage ID code used to identify the stage throughout the job costing system. This Stage ID must be unique for the entire system even if the stages are in different folder groups. Use a coding method that contains the identifiers of the stage's group or parent group.
Enter a stage Description that is descriptive of the type of costs that will be entered into this stage.
Enter the stage Classification. The Hours fields contained within the Totals tab of the job stage will be affected by the Classification. Review the Jobs > Classifications section for more details. Click Next.

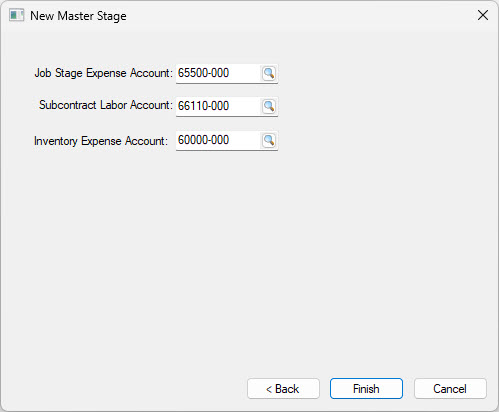
The following optional financial accounts should be left blank if expense accounts differ based on job folders:
Job Stage Expense Account: The expense account within the job is copied into the expense invoice or purchase order when an inventory item code is not present on the P.O. Note that this overrides the vendor's default general ledger account. This account is also copied into the expense invoice if a No Count item has the enabled. The G/L is inserted into the timecard if the Timecard General Ledger Account option is set to the Use Job Stage Account within payroll's work code. Review Job Costs > Labor Expenses for more details.
Subcontractor Labor Account: Enter a Subcontractor Labor Account to expense labor that is billed through an expense invoice rather than a labor module. Review Job Materials > Subcontractor Labor within a Job Transfer.
Inventory Expense Account: Enter an Inventory Expense Account if the stage is classified with a source of inventory. Review Job Costs > Product Items and Job Costs for more details on the Inventory Expense Account entry.
Click Finish to create a new stage.
Master stages can be added to the list at any time. The Add Stage wizard within a job allows the user to add master stages "on the fly." Master stages should be created so they can be used within other jobs whenever possible rather than being unique for a single job.
The new stage can now be used within any job to record the budget, a group of expenses, and revenue. Go to and print the report to print a complete list of master stages. Review the Entering Job Stages section for details in creating stages within a job.
Review Jobs > Job Management Reports for job stage report information.