Payment Portal

The EBMS Payment Portal is an online web based payment method that allows a customer to access outstanding invoices and make payment toward any or all of these invoices. Unlike the Customer Portal, the Payment Portal does not provide a full listing of all sales orders, paid invoices, or purchase history. This feature is intended to be accessed by your customers to make payment on outstanding invoices in a convenient online portal.  You are required to upgrade to the EBMS Customer Portal for more complete access to account info, purchase history, and product details.   

A website link can be included when a company electronically sends invoices or statements such as an emailed PDF file. This tool does not require a website or a company URL.

Complete the following steps to setup a payment portal:

  1. Configuring the Card Not Present (CNP) account.  Contact your EBMS Account Manager for more information about getting started with online credit card processing.

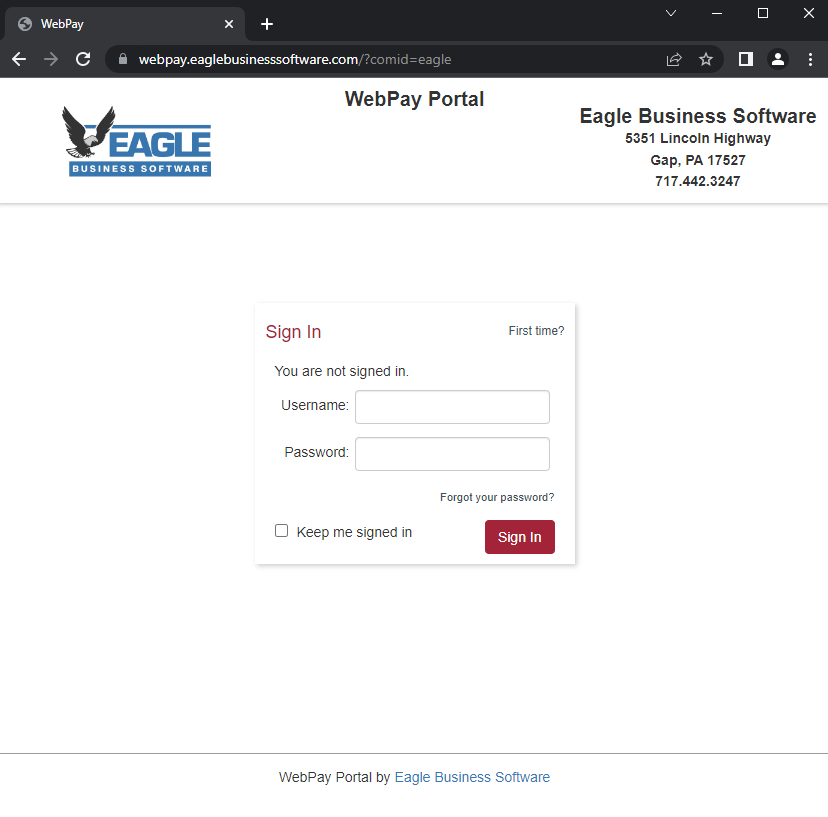
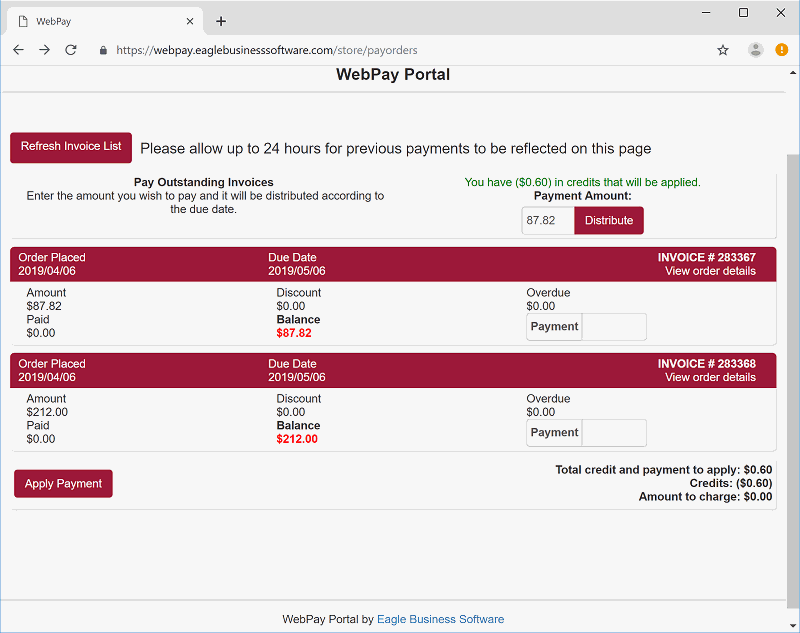
  2. Configuring the Payment Portal. The online payment portal does not require a company website or a company URL. Contact the EBMS support staff to configure the convenient, browser-based sales invoice payment portal. The following steps and information is required to set up the portal:

    1. A company logo (.png or .jpg file) similar to the EBMS logo. This file may be no larger than 50kb. Review [Main] Getting Started > Company Setup > Logo for more details.

    2. Name of the company, address, phone number, and email that is shown on the payment portal.

    3. Static text such as instructions or a welcome message that will be displayed on the portal login page.

  3. Complete the following steps to set up the Payment Portal:

    1. Communicate the information listed above to the EBMS support staff and request assistance with the following setup steps.

    2. This feature requires the EBMS Payment Portal tool to be added to the EBMS license.

    3. Set up the Azure Bus setting within the EBMS Server Manager application.

  4. Create customer login accounts and passwords within EBMS to give customers access to the online Payment Portal the website Customer Portal. The customer cannot create their Payment Portal account online although they can change their password. Complete the following steps to set up customer accounts for the payment portal:

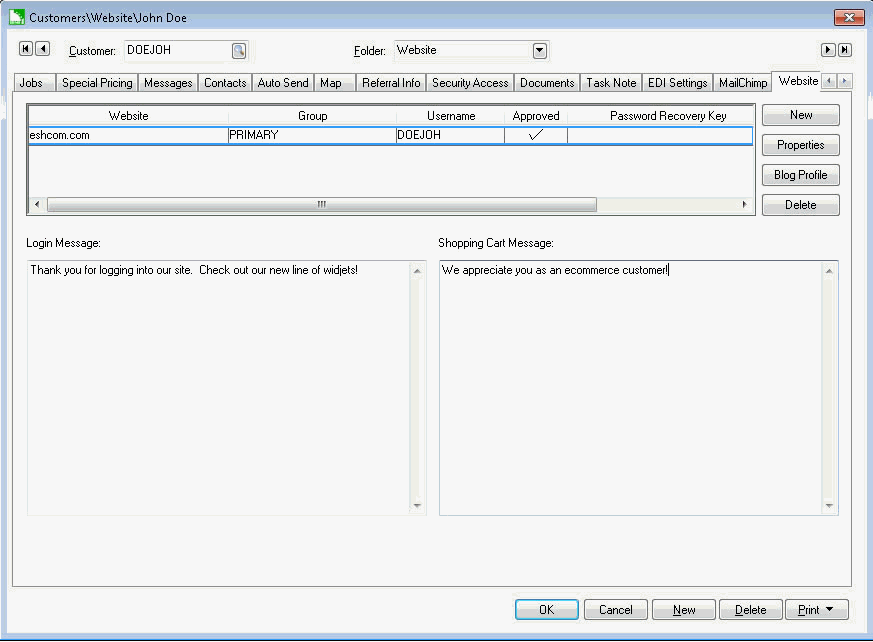
    1. Open a customer account by selecting Sales > Customers from the main EBMS menu and selecting a customer.

    2. Click on the Website tab as shown below:

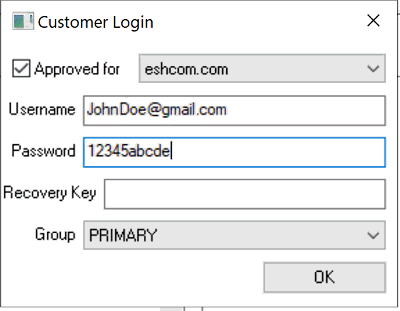
    3. An account can contain one or more user accounts and passwords. Click the New button to open the following dialog:

    4. Enter the Username and Password. The Recovery Key can remain blank. Review E-commerce and Customer Portal > Customer Portal > Overview for more details. Note that the Payment Portal has reduced features compared to the Customer Portal linked to a website.

    5. Save the Payment Portal account for each customer. Choose one of the following options to set up access of the Payment Portal for a group of customers:

      1. Manually enter the Username and Password for each account manually. This option is practical for a smaller list of customers.

      2. Ask an EBMS support rep to set a uniform Username for each customer such as the account code or email. The automated utility can set a default Password for each customer.

    6. The user is forced to create the initial Password if the password setting is blank.

Review the following instructions to give a customer access to the EBMS Payment Portal:

  1. Include a hyperlink on the invoice or statement email that includes the unique URL given to use by your EBMS support staff to open the following web page:

  2. The customer must enter the Username and Password given to them supplied by you. This information is shown on the Website tab of each user's customer account. Review E-commerce and Customer Portal > Customer Portal > Overview for more details. The following webpage will open when the customer logs into the payment portal by clicking on the Sign In button:

  3. Credits will appear as a message on the top of the portal. These credits will be applied to any additional Payment Amount entered by the user. Enter the Payment Amount in the top right corner of the payment portal and click on the Distribute button to apply the payment to individual invoices from the oldest to the newest.

  4. Payments can also be entered for individual invoices. Note that the amount can be equal to Balance but can be another amount. The invoice payment can be less than or greater than the invoice balance.

  5. View or print the invoice details by clicking on the View Order Details link listed under the invoice number. The invoice can be printed from this form. The form format is set by the Report to Print when Processing Sale setting within the Sales > Options > Report tab. Review [Sales] Invoices > Printing a Sales Invoice or Payment Receipt for setup instructions.

Note that the Payment Portal does not include the options to customize the portal page, copy the invoice, view product information, or make account changes. All these options and more are available on the more advanced Customer Portal option. Review E-commerce and Customer Portal > Customer Portal > Overview for more details on the customer portal.