Go to Expenses >
Invoices and P.O.'s, the following window will appear. Note
that purchase orders are entered in the same window as vendor invoices.
Type the vendor ID in the Vendor ID field or select from the selection window if the entry is blank. This field will default to the vendor that is currently selected on the vendor list. You must use a miscellaneous vendor if you wish to manually enter the name and address onto the invoice. Review Miscellaneous Vendor > Overview for details. Select Edit > Change Vendor from the purchase order menu to change the Vendor ID.
Press Ctrl + tab on keyboard or click with your mouse to move to Ship To tab or Pay To tab. The Ship To ID field is used to identify a customer when product is being shipped directly to a customer; otherwise, this information is blank. The Pay To ID is used to identify the vendor that is printed on the check. The Pay To vendor is copied from the vendor Terms tab and is normally the same ID as the Vendor ID.
Tab to the Invoice field. When entering a purchase order, the purchase order number is auto-generated within the Invoice field (it will allow entering of a manual P.O.#). A message will appear if the number entered is a duplicate purchase order number. The next P.O. number is recorded in Expenses > Options > Invoice and P.O.s tab.
The Date field automatically defaults to today's date when entering a purchase order. This date represents the actual transaction date. All of the general ledger transactions are dated with this entry.
Click on the Payment method being used. Manual is selected if the purchase order will be paid with cash, credit card, or direct debit. Charge is selected when the vendor has sent the items and is allowing payment on credit. Urgent should be selected when you wish to pay this purchase order immediately upon receiving the invoice.
Entry Date - defaults to the current date (a different date can be manually entered). This date is used to record the date on which the purchase order was entered.
Bank Account - If paying a vendor via manual payment, be sure to select the general ledger account that the monies are being drawn from. For cash payments, use a cash account. For credit card payments, use the credit card account. For a check payment, use the default. This field defaults to the default bank account specified in Expense > Options > General tab.
Check # - defaults to cash. If paying by credit card, enter a transaction number such as the current date. This field can only be edited if the Payment type is set to Manual.
Invoice Terms default to the settings entered in the vendor window. They can be changed in the purchase order entry window from the default setting to an alternative selection. This will change the invoices affecting this purchase order only. To permanently change the terms for a vendor, see Editing Vendor Information > Terms tab.
PO# field: this will default to the PO number created in the Invoice field.
The Ship via field records the shipping method used for this purchase order.
Description field: this is for information purposes only. This description should identify the contents of the P.O. The information is printed on the payment check stub.
The Total field can be ignored when entering a purchase order.
Enter the invoice detail using as many lines as are needed. When tracking inventory, it is required that you enter the quantity of each inventory item purchased. When entering an invoice without inventory, it is recommended that you document the items listed on the invoice, but you are not required to enter each item individually.
Enter the quantity Ordered. The Ordered quantity is recorded in the Count tab of the inventory item if an inventory item is entered. This quantity field is also used to calculate the P.O. total. This quantity can be restricted for specific inventory items by enabling the Require Integer Quantities option within the Count tab. Review the Tracking Counts > Integer or Fractional Quantities section of the inventory documentation for more details.
The Received field should be blank when entering a purchase order.
In the Product column, enter the Inventory ID for the item being purchased. The Manufacturer Part Number, Description, Cost and G/L Account will automatically be written in from the information entered in Inventory > Product Catalog. If you wish to retrieve the specific item using the Vendor's Part Number, keep the inventory ID blank and enter the Vendor part number.
The Unit of Measure field is an optional field that identifies the unit of measure being used for this inventory item. Review the Unit of Measure Overview section for more details. If you never use multiple units of measure for any inventory items, this field can be removed from the invoice by right-clicking on any of the column titles and switching the Measure field off. To show the unit of measure column again, switch the field back on.
If the Inventory ID is blank, the system will attempt to retrieve the inventory item using the Vendor's Part Number. If the inventory ID is not blank, the system will automatically store the vendor's part within the inventory window.
If the item does not have an inventory ID, leave the Inventory field blank and manually type a description of the transaction.
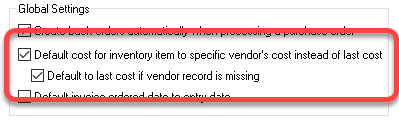
Enter the Unit Cost of the item. The Unit Cost is updated from the vendor's purchasing Cost or the Cost from the Pricing tab based on the Expenses > Options > Invoices and P.O.s settings as shown below.
This amount is used to calculate the Amount that may be hidden, Amount (Invoice), P.O. Total, and the invoice Total.
This cost can be adjusted to create a true landed cost by adding the Landed Cost module. Review the Landed Cost Overview section for more details.The Amount (P.O.) is calculated by the Ordered amount multiplied by the Unit Cost, and the Amount (Invoice) is calculated by the Ordered amount multiplied by the Unit Cost. The P.O. Total and the invoice Total are a sum of the Amount (P.O.) and the Amount (Invoice) respectively.
Enter the correct G/L Account. This field automatically defaults to the general ledger account that has been set for the specified inventory item (Inventory > Advanced tab). This account can be changed manually for this specific invoice. If the Vendor > Advanced tab > Update this expense account when processing an invoice switch is ON, the G/L Account on the first line will be copied to the vendor window.
Enter the expected arrival date of the merchandise ordered into the Received Date column. The entry is optional and is used for reporting purposes only.
It is recommended that you adjust the widths of the invoice detail columns to your specifications. Review [Main] Standard Features > Column Appearance for more details. Repeat the steps listed above for each invoice detail line.