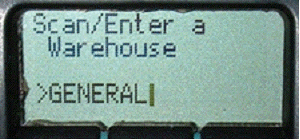
Prompt: Scan/Enter a Warehouse
Type in the Warehouse name, or scan a barcode. A single beep and a green light mean that the entry is valid. An error sound (4 beeps) and a red light indicate that the warehouse was not entered properly.
This prompt will only appear if the company has the Multiple Warehousing module and more than one Warehouse. If the Multiple Warehousing module is included in your EBMS software and this prompt does not appear, it is because there is only a single Warehouse and the scanner has already selected it.
Prompt: -INVENTORY MODE-
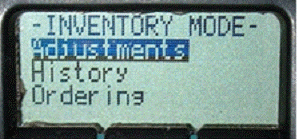
This is the menu which allows the user to select the type of Inventory editing that will be done. This list contains the following:
Adjustments - Make immediate adjustments to the On Hand amount. These adjustments are relative (adds to the current On Hand).
History – View the History of an item.
Ordering – Set the quantity ordered for an item.
UPC Association – Associate UPC’s with inventory ID’s.
Print Labels – Print labels for an item.
Counts – Make absolute On Hand changes. The user can count inventory that is spread out in a warehouse.
Select a type to continue by scrolling with the up and down arrows
Press Enter to select.
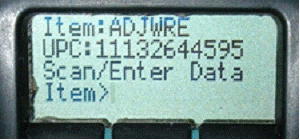
Prompt: Scan/Enter Data
ID> or Item>
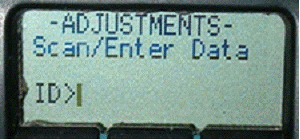
Scan or type an Inventory ID If the prompt contains ID or Item.
Counts or History mode
To switch the prompt within Counts or History Mode to Q Ord or Adj Q press FN and then the down arrow.
Q Ord (Quanity Ordered) - the input value will change the Quantity Ordered.
Adj Q (Adjustment Quantity) - the input value will adjust the Quantity
Note: This adjustment is the amount added to the current On Hand –to decrease the current value, enter a negative number
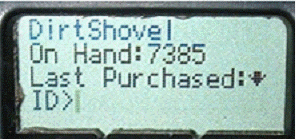
After making the change, the screen will refresh to show the new values (the Quantity Ordered change data is not displayed).
Whenever an adjustment is made, the date and user are recorded on the Inventory item. Go to Inventory > Inventory Items, and double-click an item to view it. Go to the Last Check Date tab.
If the EBMS Warehousing module is included in the company’s EBMS, the user will see a list of warehouses, with the user and last checked date. If the company does not have the Warehousing module, the user and the last date that this item was checked, will be displayed. To set these fields without changing the item’s count, use the scanner to make an adjustment of 0 (zero).
Create Items
This mode is used to create new inventory items directly from the scanner.
Prompt: Scan/Enter ID. The scanner will ask for an inventory ID. This can be anything that can be typed or scanned, but it must be unique – the scanner will display an error if it is not. Note: the item is created once it accepts your ID!
The scanner will prompt you to enter a Description of the inventory item you are creating. Enter 0 (zero) if you do not wish to enter a description.
The scanner will prompt you to enter the cost, which should be entered by using the keypad – the decimal point is on the 9 key.
The scanner will display the results on the screen and another inventory item can be created.
UPC Association
If you are in UPC Association, the prompt will initially say Item. Enter an Inventory ID and the scanner will beep and switch the prompt to UPC. Scan the UPC that will be associated with the Inventory item that you just entered. After you scan the UPC, the associated item ID and UPC will appear on the screen.
PRINT LABELS
To print labels enter the quantity of labels to be printed first, and then scan the item.
Inventory Counts
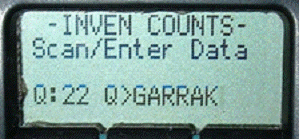
This mode is designed for scattered inventory. Adjustments mode allows the user to count the total quantity of an item and make a relative adjustment to the on hand amount. Counts mode, however, allows the user to make cumulative adjustments, which determine the absolute count of the inventory item. This is ideal for inventory that is in multiple locations around the warehouse.
Like Invoice Item Entry and Print Labels mode, the quantity that was counted is entered first, and the item is scanned afterwards. Unlike Adjustments mode, these changes in count are not immediately made. They are kept in a separate table, which can be viewed by going to Inventory > Adjust Counts Received from Scanner. A dialog box will appear which shows the current counts on any specific item. This table can be used to change any counts that are incorrect.
The detail of the item can be shown – including the individual scans by double-clicking on a line’s record selector. Click the Adjust All Items button and the adjustments will be made.
Note: the count for the item will be adjusted to match the quantity on the screen.