The approval process within the EBMS task module is an optional step that is used by a manager. This process is useful in the following situations:
The manager reviews and approves each task or work order before the task is invoiced.
A manager is required to review all tasks when tasks are completed.
The approval step is required to verify that the billable time is properly set for Worker bonus or commission payments.
A manager wishes to review all work orders that are completed for a larger project or are specific to individual Workers.
The approval process consists of two features; the manager settings and the approval process. Review both sections to properly implement the approval process.
The EBMS task module allows the user to setup managers to review and approve groups of tasks. The manager settings can be used to group tasks even if the approval process is not implemented.
Select
Labor > Tasks Options from
the main EBMS menu and select the Managers
tab as shown below:

Click on the Add button to create a new manager. The Active option must be enabled to use the manager within a new task.
Complete the following steps to set the proper manager within each task type:
Click on the Task Types tab and open a task type record
Click on the Edit Defaults button
Click on the Advanced tab
Set the appropriate Manager for the task type
Repeat steps 2 through 5 for each task type.
Tasks can be grouped based on manager for scheduling, approval, or general management purposes.
The
first stop in implementing the approval step within the EBMS task system
is to enable the Force Task Approval
option. Select the Labor > Tasks Options
from the main EBMS menu and click on the General
tab.

Create
a task list view within the main task widow (Labor
> Tasks) labeled To be Approved
as shown below:

Review the Customizing Task Views > Creating Queries section for more details on creating an additional view.
Set the Query option to the To be Approved setting as shown above.
Complete the following steps to create the To be Approved Query if it does not exist.
Click on the Queries button.
Click on the New button
Enable the Include only this manager’s tasks and enable the Choose when viewing option.
Enable the Include only tasks that option and select the have been completed option.
Enable the Include only tasks that I [have not] been approved by [any user] option and set the appropriate settings to match the options below.
Enable
the Advanced Query option
and click on the Set Query
button. Set the Set Query
option as shown below.

The combination of these settings will show all complete tasks that are completed and have the proper manager settings. Tasks that have been closed or have already been approved will be excluded.
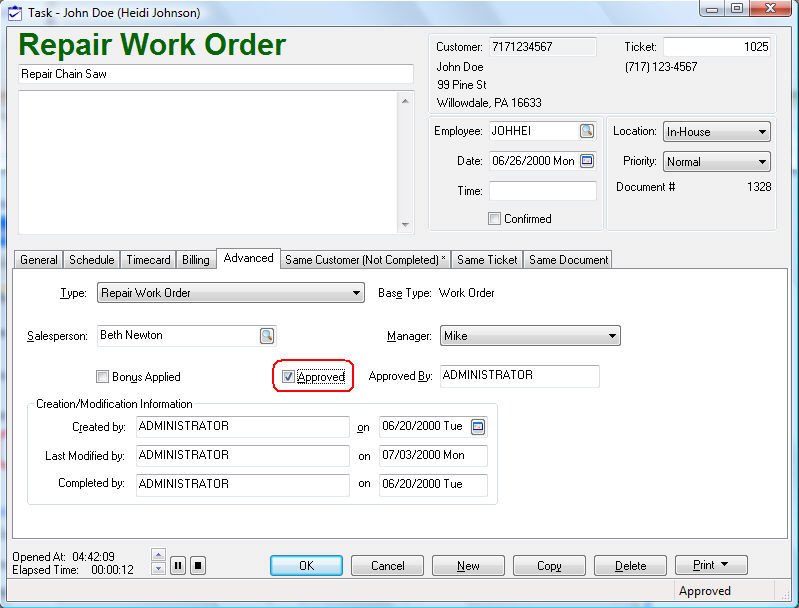
The
manager will individually open each task, review the details, and enable
the Approved option as shown below:
A task can not be approved if the task contains billable Time and no invoice is attached. Review the Billing a Project or Task section for more details on attaching an invoice and billing a project.
The user that enabled the Approved option is recorded in the Approved By entry.
Many managers wish to display a warning when a task is approved before the technician has clocked out of the task. This warning will also show when the task is completed if the approval option is already enabled. Complete the following steps to enable this warning:
Open labor app options by selecting from the main EBMS menu.
Select the MyTime App and click the Properties
button to open the following MyTime App Properties
as shown below:

Enable the Warn if task is completed and approved while clocked in option to display a warning message whenever a task is approved without being clocked out. This warning is displayed within EBMS and within the MyTime app.
There may be a group of tasks that do not need approval. Complete the following steps to bypass the approval process.
Select the Labor > Tasks Options from the main EBMS menu.
Open the Task Types tab.
Select the task type that does not require approval.
Click on the Edit Defaults button
Click on the Advanced tab and enable the Approved option.
This step will enable the Approved option when a task is created. This will cause the task status to ignore the approved status when a task is completed.