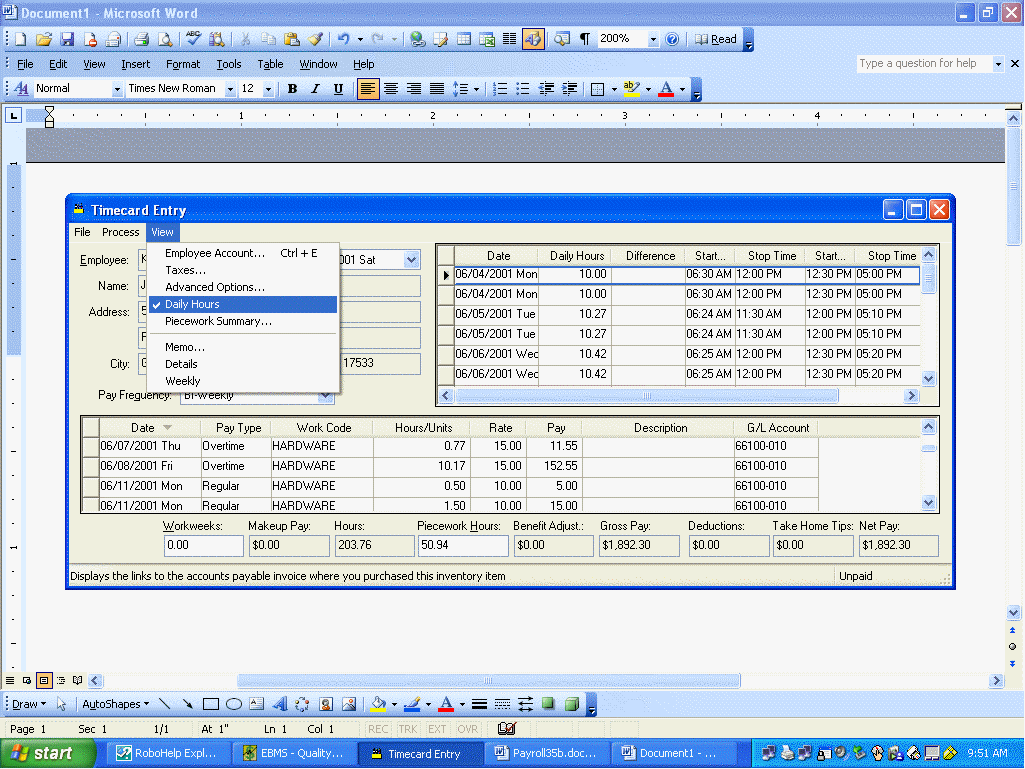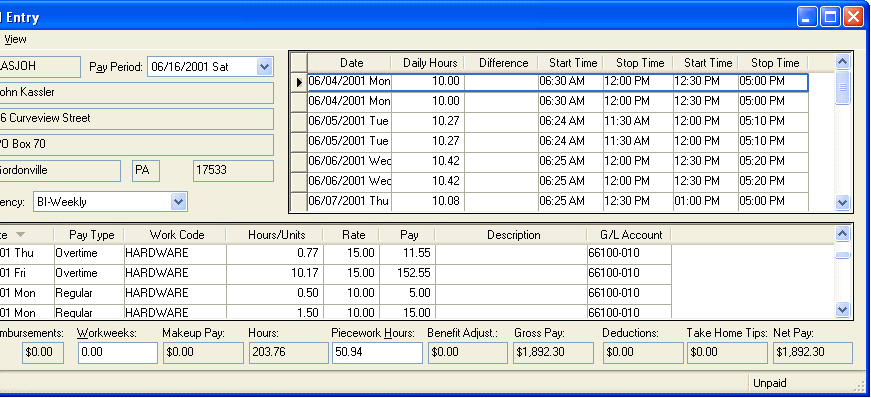
Daily hours information contains the clock-in and clock-out times for an employee. These start and stop times give the manager more detail than only recording the total hours worked per day. Using daily hours is an optional feature within EBMS although state or federal reporting requirements may require the user to record this detail.
1. Go to Payroll -> Timecard Entry and create a timecard entry. Review the Entering Timecards section for more details regarding timecard entry.

2. Select View > Daily Hours from the timecard menu to turn Daily Hours ON (Daily Hours checked on View menu) and to show the daily hour’s entry table.

Daily hours can be recorded either manually or using Eagle Solutions’ electronic time clocks. The timecard screen may need to be resized in order to view the entire daily hours table. Complete the following steps to enter daily hours manually:
1. Enter the Date of the first day worked.
Some date entry shortcuts are to enter "Monday" to enter Monday’s date or "Last Monday" to enter the date for last Monday. "509" would be a numeric syntax to enter the month (5 – May), day (09), and the current year.
2. The Daily Hours, Timecard Hours, and Difference are all calculated columns.
· The Daily Hours value reflects the total time for the individual start and stop times.
· The Timecard Hours are derived from the detail lines of the timecard.
· The Difference = Daily Hours – Timecard Hours
3. The time entry columns consist of a pair of Start Time and Stop Time that is used to enter an employee’s clock-in and clock-out times. Time entry can be expedited by ignoring the colon within time entry such as "1130" instead of 11:30. Other shortcuts:
5:00 PM can be entered by typing "5p".
8:00 AM can be entered by typing "8".
3:30 PM can be entered by type "1530" using the 24 hour clock.
Repeat steps 1 – 3 for each workday. Use multiple lines within the daily hours table if more than two Start Times and Stop Times are needed for a single day. Set the Date of the second line to the same date as the previous line.
NOTE: The Timecard Hours and the Difference calculations are calculated only on the first line of the redundant date lines.
Enter the detail lines of the timecard. Note that the Date will default to the first date contained within the daily hours list. Enter the Pay Type, Work Code, and other timecard detail information as usual. The Hours / Units value will default to the balance of unallocated daily hours for the specific date.
Review the Entering Timecards section for more details on entering timecards.
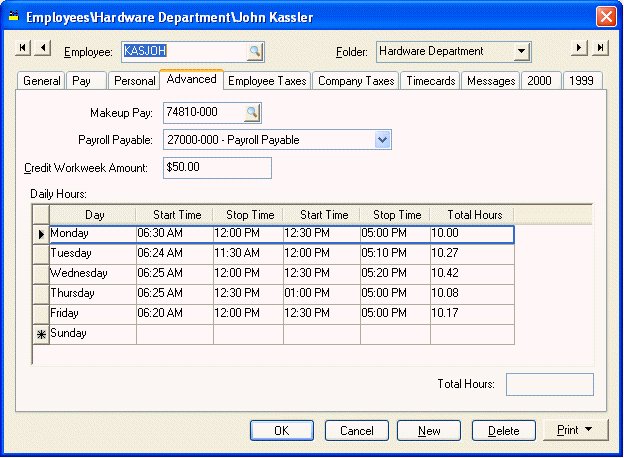
Default daily hours can be entered for employees in the Advanced tab of the employee record.

Set the Day of the week for each workday as well as the Start Times and Stop Times. Multiple sets of start and stop times can be entered for the same day of the week. Duplicate the day of the week if the employee’s pay frequency is Bi-weekly or longer.
Use the Payroll > Options > Employee Folders > Edit Defaults window to enter daily hours for all employees or a group of employees at the same time. Review the Change Defaults, Filter Down Data and Globally Change Data section of this manual for more details on globally changing default daily hours.
An employee’s Daily hour history can be printed by launching the Payroll > Employees > Employee’s Daily Hours report found on the main reports menu.
Electronic Time Clocks
Daily hours can be electronically entered into the employee’s timecard using Eagle Solution’s electronic time clocks. The employee clocks in and out by entering a numeric pin code that is set within the Timecard Login entry field of Payroll > Employee > General tab. This login pin code field will only show if electronic time clocks are connected to EBMS.
See installation and operation instructions that are shipped with the time clock for more details.