Open the job list by selecting Jobs from the Job Costing menu ().
Select from the main menu. A new job wizard
will guide you through the following steps:
It is wise to enter job defaults before creating new jobs and default job stages. By properly setting job defaults for each type of job in different folders, time-consuming settings such as General Ledger Accounts, Stages, and Options can be preset. Review the Setting Job Defaults section for more information on default values.
Complete the following steps to create a new job:
Open the job list by selecting Jobs from the Job Costing menu ().
Select from the main menu. A new job wizard
will guide you through the following steps:
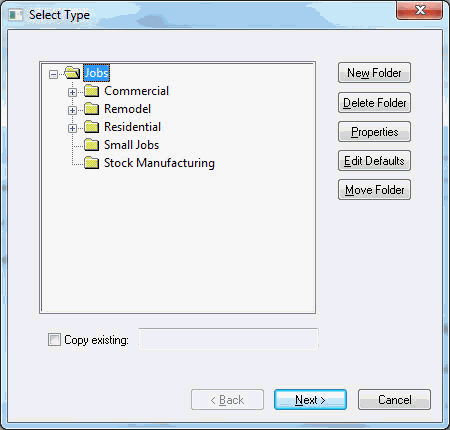
Highlight the folder in which you
want to place the new job and click Next.
Review the Getting
Started > Adding and Deleting Job Folders section for more
details on creating new folders.
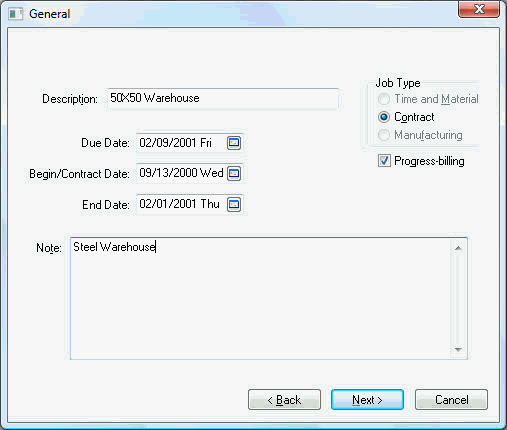
Enter the job Description as well as other miscellaneous job information within the Note field.
Set the Job Type to Time and Material if the entire job will be billed on a T&M basis. Select Contract if part of the job or the entire job is contractual. It is possible to have time and Material stages within a contract job.
The Progress-billing switch should be turned ON if the contract job is billed in stages based on the progress of the job rather than a single invoice. (Review the Progress-Billings section of this manual for more details on progress-billing.) The Progress-billing option will be disabled if the Job Type is set to Time and Material.
The Due
Date should reflect the date in which a
job needs to be completed. The Due,
Begin,
and End Date
fields should all be used in scheduling a job.
A job's description and date may be changed at any time. Click the
Next
button to continue.
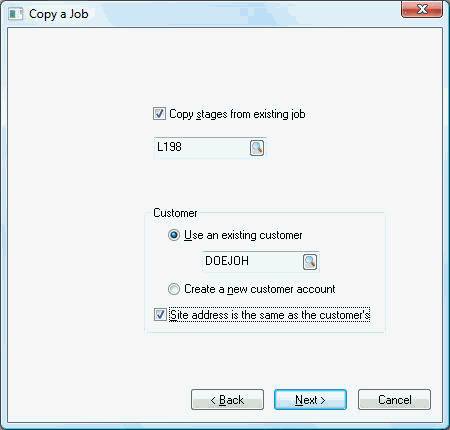
Enable the Copy stages from existing job option if you wish to copy information from another job. Keep switch OFF to use default stages. Ignore steps 9 and 10 if the Copy from Existing Job switch is OFF.
Enter an existing job that you wish to copy. To view all existing jobs click on the lookup button.
Select the Create a new customer account option if this is the first job for this customer or select Use an exiting customer option for a customer whose account has previously been established within EBMS.
Click the Site Address is the
Same as the Customer's switch ON to copy
the customer's address to the site tab. To view the customer's address,
right click on the customer code and select the Lookup option from
the context menu. Click Next
to continue.
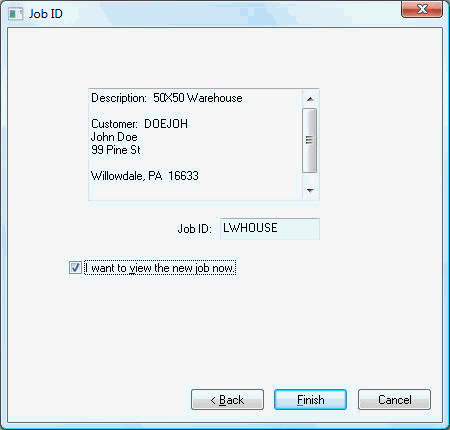
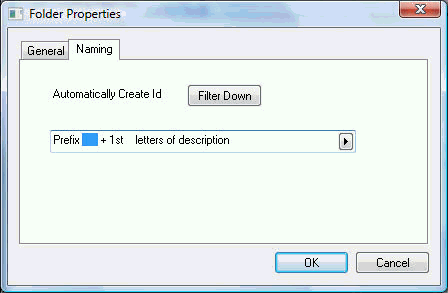
Enter a Job
ID to identify the job. This code can be
automatically be created by setting the appropriate naming setting
within the folder. Go to , highlight the
job folder, and click on the Properties
button. Click on the naming tab to set option.
Click Finish to complete the new job wizard.