Making an Inventory Account Inactive
An inventory should never be deleted even when the inventory no longer
exists unless there have never been any transactions with the inventory
item. It is permissible to delete an inventory item when no new transactions
have occurred within the years maintained by the system. For example,
if all transactions that occurred four years ago or before have been removed
from the system using the purge utility, and there have been no transactions
with an inventory item Garden Hose in the past four years, then the Garden
Hose inventory item could be deleted.
The following alternatives to deleting the inventory item are recommended:
Merge an inventory
item into another account. This option is the preferred option if
accounts were duplicated or two accounts need to be merged into one.
Review the Standard
Features > Merging Accounts vs. Deleting Accounts section of
the Main Documentation for more details.
Change an inventory
item to inactive status. Once an inventory item is made inactive,
it will be removed from a number of reports. An inactive product may
remain in the same folder in which it existed when active, but may
be hidden from search lists by unselecting Show
Inactive at the bottom of the list. Items
can be marked inactive using one of the following two methods:
Manually set an item as inactive.
Use a utility to mark a group of items inactive
based on activity such as purchasing, sales, or other activity.
Review the following sections for more details on each option.
Manually set an item as inactive
This is the recommended method for a few individual items. Complete
the following steps to make a single inventory item inactive:
Open the inventory item window by selecting Inventory > Product Catalog.
Choose the item you wish to make inactive and
open the inventory item record.
Enable the Inactive
option on the General tab.
Save the inventory information by clicking the
OK button.
Utility to Mark a Group of Items Inactive
This utility gives the user to mark an entire group of items inactive
based on the following criteria:
The item counts must be zero
The activity such as purchases, sales, or other activity with
this item was before a user specified date
The user can identify a folder or range of inventory item IDs.
The user has the option to disable the selected option for any
item at the end of the utility wizard as shown below.
Complete the following steps to launch the utility to inactivate a group
of inventory items:
Launch the utility by selecting Inventory
> Utilities > Inactivate Inventory Items from the main
EBMS menu to open the following dialog:
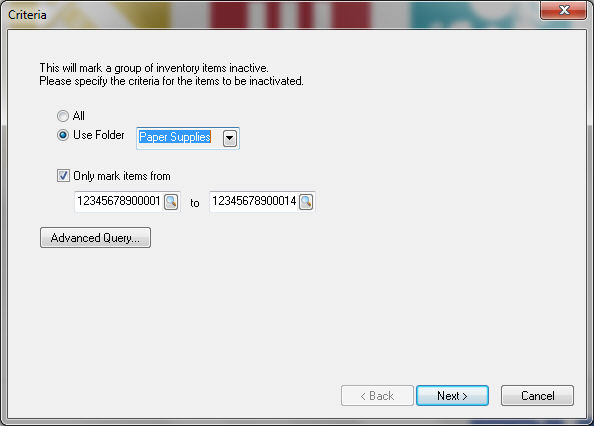
Select the Use Folder option
and set the sub-folder to evaluate. All sub-folders below the Use Folder folder will also be included.
This utility is powerful and should be used with caution. Run the
utility multiple times selecting individual folders rather than processing
a large number of inventory items using a root folder.
Enable the Only mark items
from option only to select a limited range of items within
the selected sub-folder. Select the desired range of inventory ID
codes to limit the query. Disable this option to include all items
within the selected folder.
Use the Advanced Query button
to add user defined queries. Review the Standard
Features > Advanced Query Options section of the main documentation
for more details and instructions on using queries.
Click Next to continue
to open the following page:
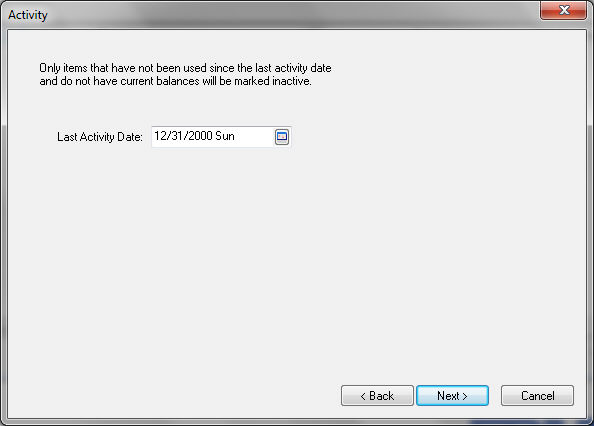
Set the Last Activity Date
to limit the inclusion of all inventory items with activity
since this date. This excludes any item that has been purchased, sold,
or other activity since this date. Click Next
to continue to the query list shown below:
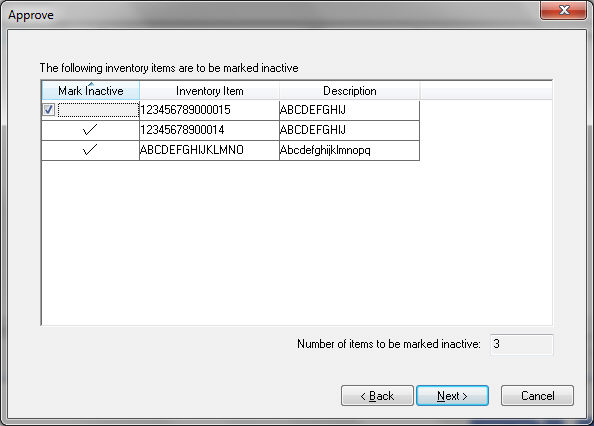
All items that are slated to be made inactive are listed in
this dialog. Note that all items with counts, with activity since
the Last Activity Date, or
not within the folder or other query will be excluded.
Disable the Mark Inactive option
to exclude a specific item from being moved as Inactive. Click on
the Cancel button to cancel
the process.
Click the Next button
to set the items with an inactive status. Note that this process can
not be reversed so use with caution. The following dialog will appear
indicating the number of items inactivated as shown below:
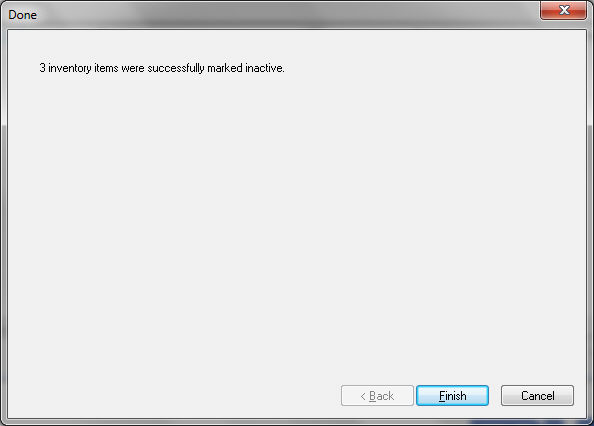
Click Finish to
complete. Repeat to inactivate other groups of items.
NOTE: All inactive (accounts,
vendors, etc.) will be grayed on the search lists when the Show
Inactive option is enabled at the bottom of the list.